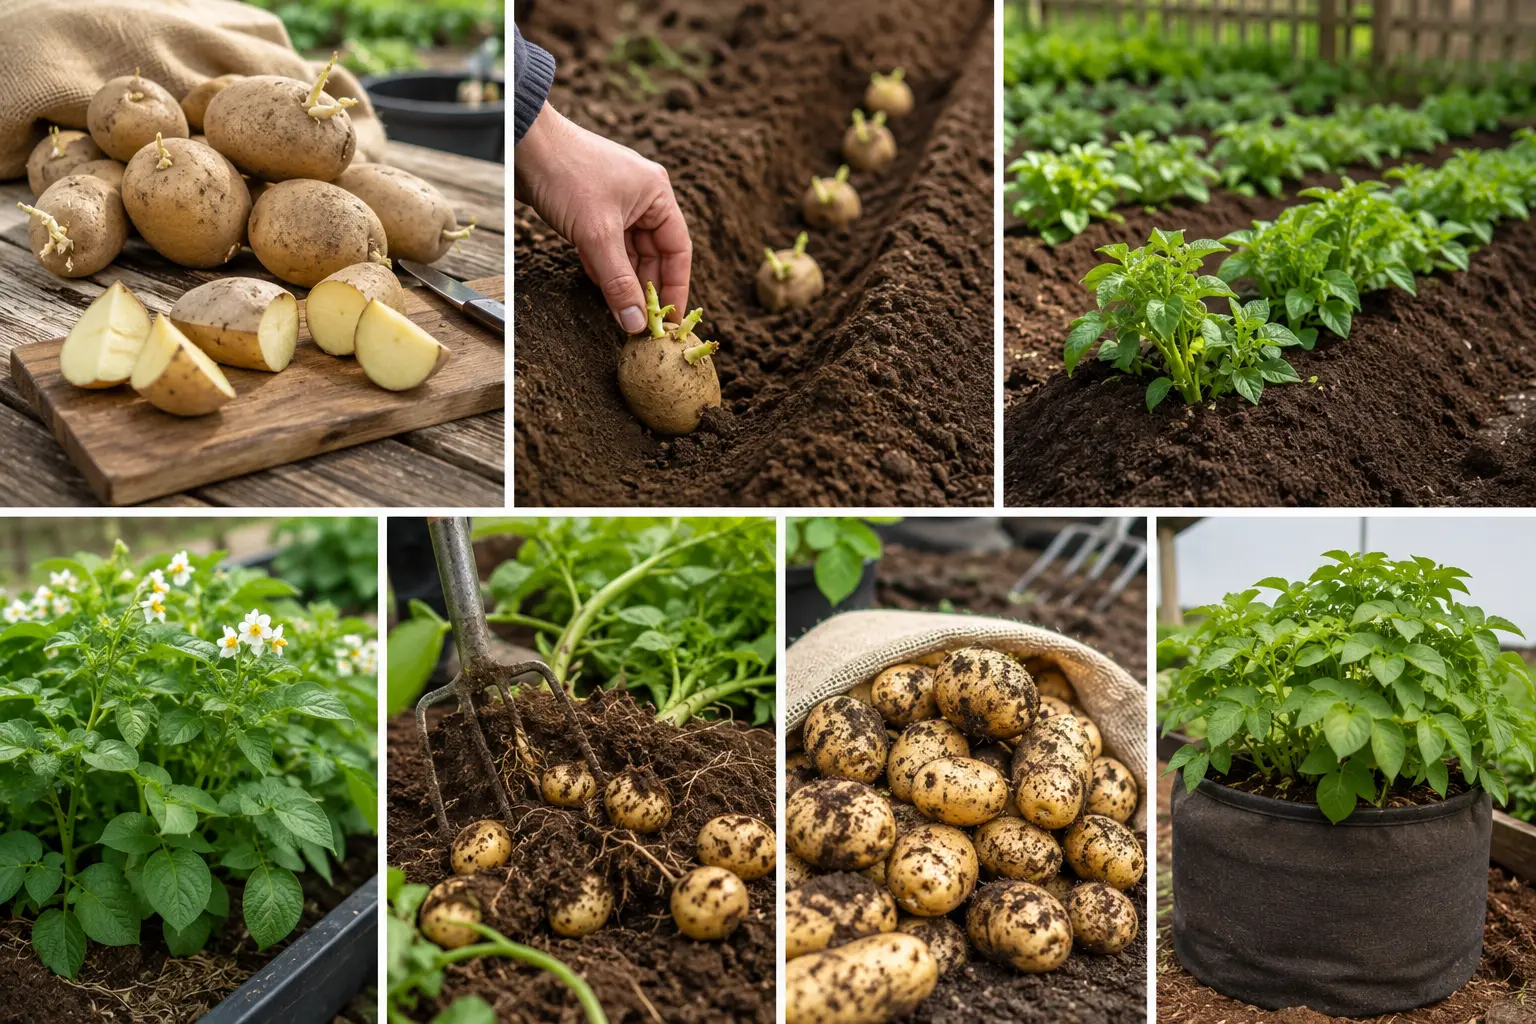
Plant certified seed potatoes two to four weeks before your last spring frost, hill the stems as they grow, and dig up the tubers ten to twenty weeks later once the foliage flowers or dies back. That’s really the whole job. Potatoes are one of the most forgiving crops you can grow, beginner or not, and they work in nearly every U.S. climate zone: raised beds, in-ground rows, patio containers, grow bags on a deck—all of it. Do it right, and you’ll pull out roughly ten times the weight of what you planted.
Potatoes (Solanum tuberosum) rank among the highest-yielding vegetables per square foot of garden space you can plant. A single 2.5-pound bag of seed potatoes, planted correctly, produces sixteen to twenty-five pounds of harvestable tubers, according to the University of California Cooperative Extension’s own field data. Below you’ll find variety selection, timing by climate zone, soil prep, planting method, ongoing care, pest management, and storage, with more agronomic detail than most gardening blogs bother to include.
What You Need Before Planting
A potato crop needs certified seed potatoes, a few basic tools, compost or aged manure, and a sunny spot with well-drained soil. The tool list is short: a spade or hoe for turning soil, a hand trowel for checking tuber size later, a garden fork for harvest, and gloves or a bucket for hauling compost. No dedicated vegetable bed? Grow them in containers on a patio or balcony instead. It works nearly as well.
Seed potatoes aren’t the same thing as the potatoes sitting in a grocery produce aisle. Garden centers and mail-order seed companies sell tubers certified disease-free by state agricultural inspection programs. Grocery store potatoes, on the other hand, are usually treated with a sprout-inhibiting chemical and can carry soil-borne viruses.
Buy seed potatoes by weight, not by count. A 2.5-pound order typically yields thirty to forty planting pieces once cut, enough for a 10-foot row spaced 12 inches apart. Order in late winter if you can. Popular varieties like Yukon Gold, Kennebec, and Russet Burbank tend to sell out at mail-order nurseries by early spring most years.
True potato seed (TPS) is a different product entirely, and it’s easy to mix up with seed potatoes. TPS comes from the small, tomato-like fruits some potato plants produce above ground. Most gardeners skip it: germination is unpredictable, and the resulting tubers can vary wildly from the parent plant. Worth knowing, too: those fruits are toxic and not for eating.
Best Potato Varieties for U.S. Gardens
Potato varieties fall into three maturity classes: early (70–90 days), midseason (90–110 days), and late or maincrop (110–135 days). Early varieties suit gardeners after a fast harvest or working with a short growing season. Maincrop varieties yield more and store longer through winter.
| Variety | Maturity Class | Days to Harvest | Best Use |
| Norland (red) | Early | 70–80 | Boiling, salads |
| Yukon Gold | Early–mid | 80–90 | All-purpose, mashing |
| Kennebec | Midseason | 90–100 | Baking, frying |
| Russet Burbank | Maincrop | 110–135 | Baking, long storage |
| Purple Majesty | Maincrop | 100–110 | Roasting, color contrast |
Disease resistance varies more by variety than most gardeners expect. Yukon Gold, for instance, is noticeably more prone to early blight in humid climates. That’s why plenty of experienced growers switch to something like Baltic Rose or Huckleberry Gold after losing a crop or two. Plant two or three varieties across different maturity classes, and you spread out your harvest window, so one disease outbreak won’t take everything down at once.
When to Plant Potatoes by USDA Hardiness Zone
Plant seed potatoes two to four weeks before the average last spring frost date in USDA zones 3 through 7. In zones 8 through 10, plant in late winter or very early spring instead. Potato foliage shrugs off a light frost fine, but a hard freeze kills exposed leaves, so timing really hinges on your local last-frost date rather than the calendar month.
| USDA Zone | Typical Planting Window | Region Example |
| 3–4 | Mid-May | Minnesota, North Dakota |
| 5–6 | Late March–April | Ohio, Kansas, Virginia |
| 7 | Mid-February–March | North Carolina, Tennessee |
| 8–9 | January–February | Georgia, Texas, coastal California |
| 10 | December–January | South Florida |
Don’t know your local last frost date? The National Weather Service and local Cooperative Extension offices both publish zone-specific frost tables for free. Planting two months before the last frost, rather than two weeks, risks tuber rot in cold, saturated soil. It’s the single most common first-year mistake among new potato growers.
Gardeners in zones 8 through 10 can also sneak in a second crop in July or August for a Christmas harvest, since mild winters let tubers mature underground without a hard freeze getting in the way.
How to Prepare Seed Potatoes
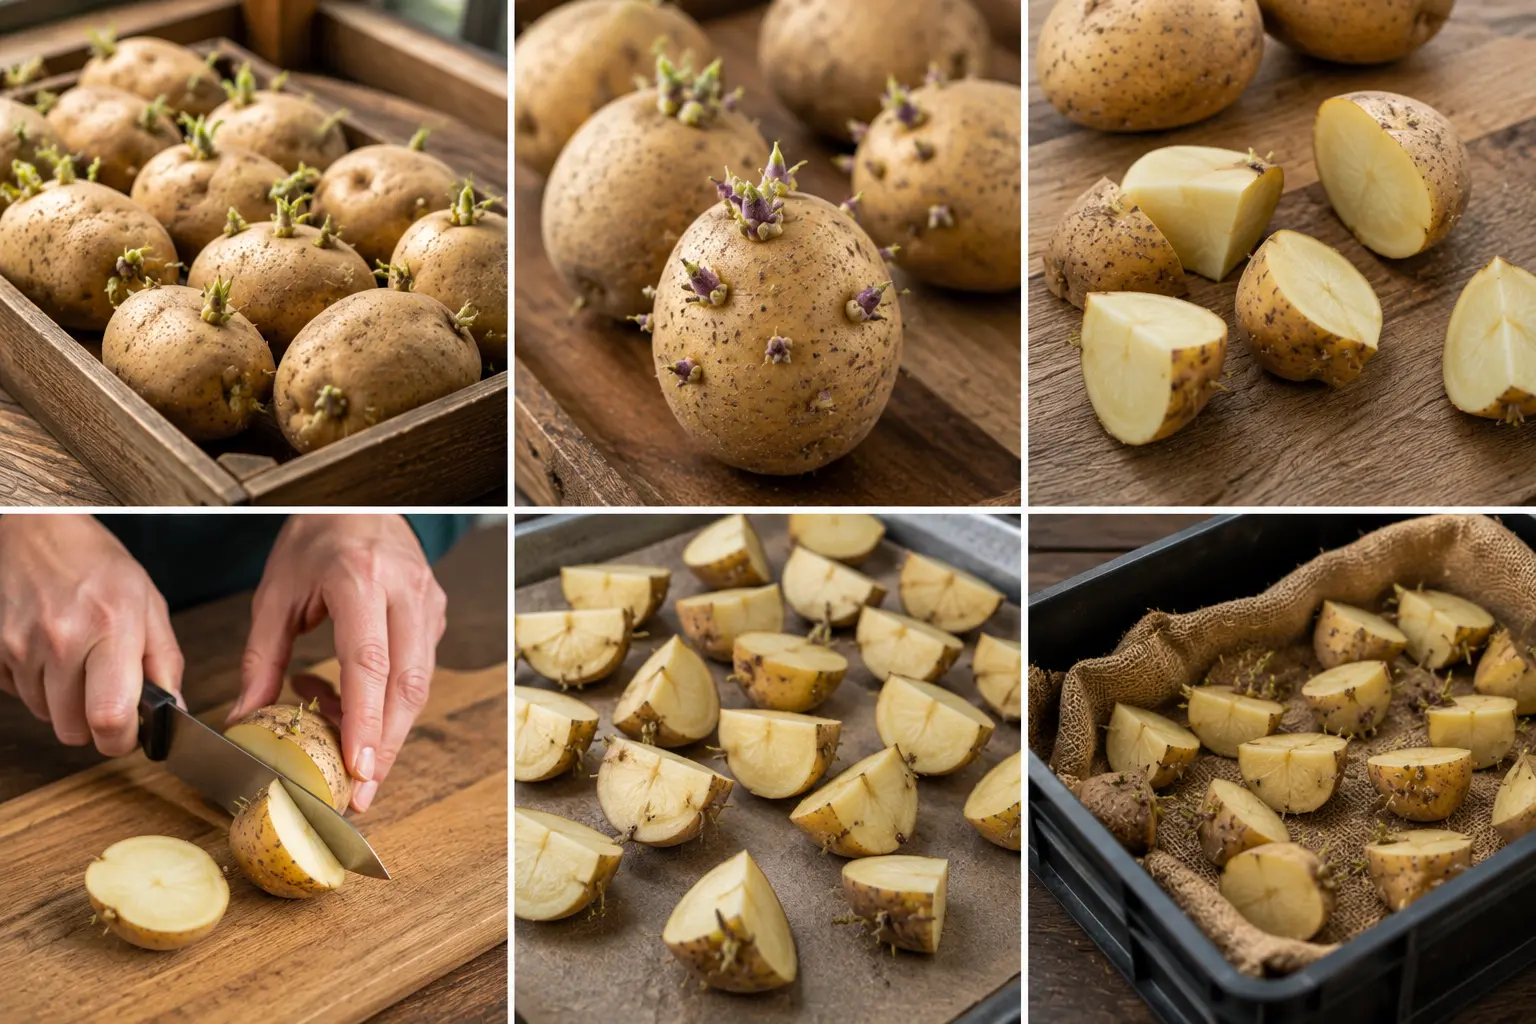
Cut seed potatoes into golf-ball-sized pieces two to three days before planting, and make sure each piece has at least one healthy eye. Let the cut surfaces dry and callus before they go into the ground. The eye is the small bud that sends up the above-ground stem; a piece without one will just rot in the soil.
Small seed potatoes, under two ounces, go into the ground whole and skip the cutting step entirely. Larger tubers get cut into two to four pieces, each roughly 1.5 to 2 inches across with two to three eyes apiece. Curing the cut surface for two to three days at room temperature forms a protective callus that resists rot and fungal infection once buried.
“Chitting,” also called “greensprouting” here in the U.S., means pre-sprouting seed potatoes indoors for four to six weeks before planting. Stand the tubers eyes-up in egg cartons or shallow trays under bright, cool light, and they’ll produce stubby green sprouts about half an inch to two inches long. Chitting shaves one to two weeks off the time to harvest, and it helps most in regions with wet spring soil, where unsprouted tubers sit longer before germinating and face a higher rot risk. Maincrop varieties don’t gain much from it, since they’re already growing over a much longer season regardless.
Soil Preparation and pH Requirements
Potatoes want loose, well-drained soil with a pH between 5.0 and 6.5, amended with two to three inches of compost or aged manure worked in the previous fall. Compacted soil, whether from clay content or heavy foot traffic, restricts tuber expansion and leads to more misshapen potatoes.
A simple home soil test kit, or a sample sent to a local Cooperative Extension lab, will confirm pH before planting season. Soil above pH 6.5 raises your odds of potato scab, a cosmetic disease that leaves rough, corky patches on the tuber skin without touching the flesh underneath. If you need to correct high pH, work elemental sulfur into the bed the previous autumn. Sulfur lowers soil pH gradually over several months, not overnight.
Rocky or heavy clay soil does better in a raised bed or under a straw-mulch planting method (more on both below), since either approach sidesteps the need to till difficult ground.
Planting Methods Compared
Four planting methods work reliably for home-garden potatoes: in-ground trenching, raised beds, containers or grow bags, and deep straw mulch. Each trades off yield, cleanliness, and labor a little differently.
| Method | Trench/Hole Depth | Yield Potential | Labor | Best For |
| In-ground trench | 4–6 in (10–15 cm) | Highest | Moderate | Full-size gardens |
| Raised bed | 6–8 in (15–20 cm) | High | Moderate | Poor native soil |
| Container/grow bag | 6 in (15 cm) starting depth | Moderate | Low | Patios, small spaces |
| Deep straw mulch | Surface-planted | High, variable | Low | No-till gardeners |
In-ground trenching delivers the most consistent yield. Dig a trench 4 to 6 inches deep; place seed potato pieces cut-side down with eyes facing up, and space them 12 inches apart with 30 to 36 inches between rows. Cover with 2 inches of soil at first, then keep backfilling as the plants grow.
Container and grow-bag planting suits gardeners without in-ground space. Start with 6 inches of potting mix in the bottom of a container at least 12 inches wide and deep, plant one seed piece per foot of container diameter, and keep adding mix as the stems lengthen, always leaving the top few inches of foliage exposed.
Deep mulch planting skips digging entirely: lay cured seed potato pieces cut-side down directly on top of amended soil, then cover with 8 to 12 inches of straw or alfalfa mulch. University of California field trials recorded yields up to ten times the planted weight with this method, though pillbugs and earwigs (both of which love the moist environment under thick mulch) can cut into yields significantly in years with heavy insect pressure.
Raised beds combine the drainage benefits of trenching with better control over soil quality, which makes them the strongest choice if you’re working with heavy clay or rocky native soil.
Hilling and Ongoing Plant Care
Hill potato plants by mounding 4 to 6 inches of soil or straw around the base of each stem once it reaches 6 to 8 inches tall, and repeat every two to three weeks until they flower. Hilling does two things at once: it protects developing tubers from sunlight (which turns potato skin green and builds up solanine, a toxic compound you don’t want to eat much of), and it anchors the plant’s shallow root system against wind.
Water 1 to 2 inches per week, and water more often during tuber formation if rainfall falls short of that. Containers dry out faster than in-ground beds and often need watering every day or two during peak summer heat.
Fertilize at planting time with a balanced organic fertilizer worked into the trench, then apply a nitrogen-rich feeding, like fish emulsion, once a month during active growth. Potatoes in well-amended garden soil rarely need feeding beyond that initial application. Container-grown potatoes deplete their limited soil volume faster, so feed those every four to six weeks.
Weed the bed for the first four to six weeks after planting. After that, the potato canopy shades out most competing growth on its own.
Companion Planting and Crop Rotation
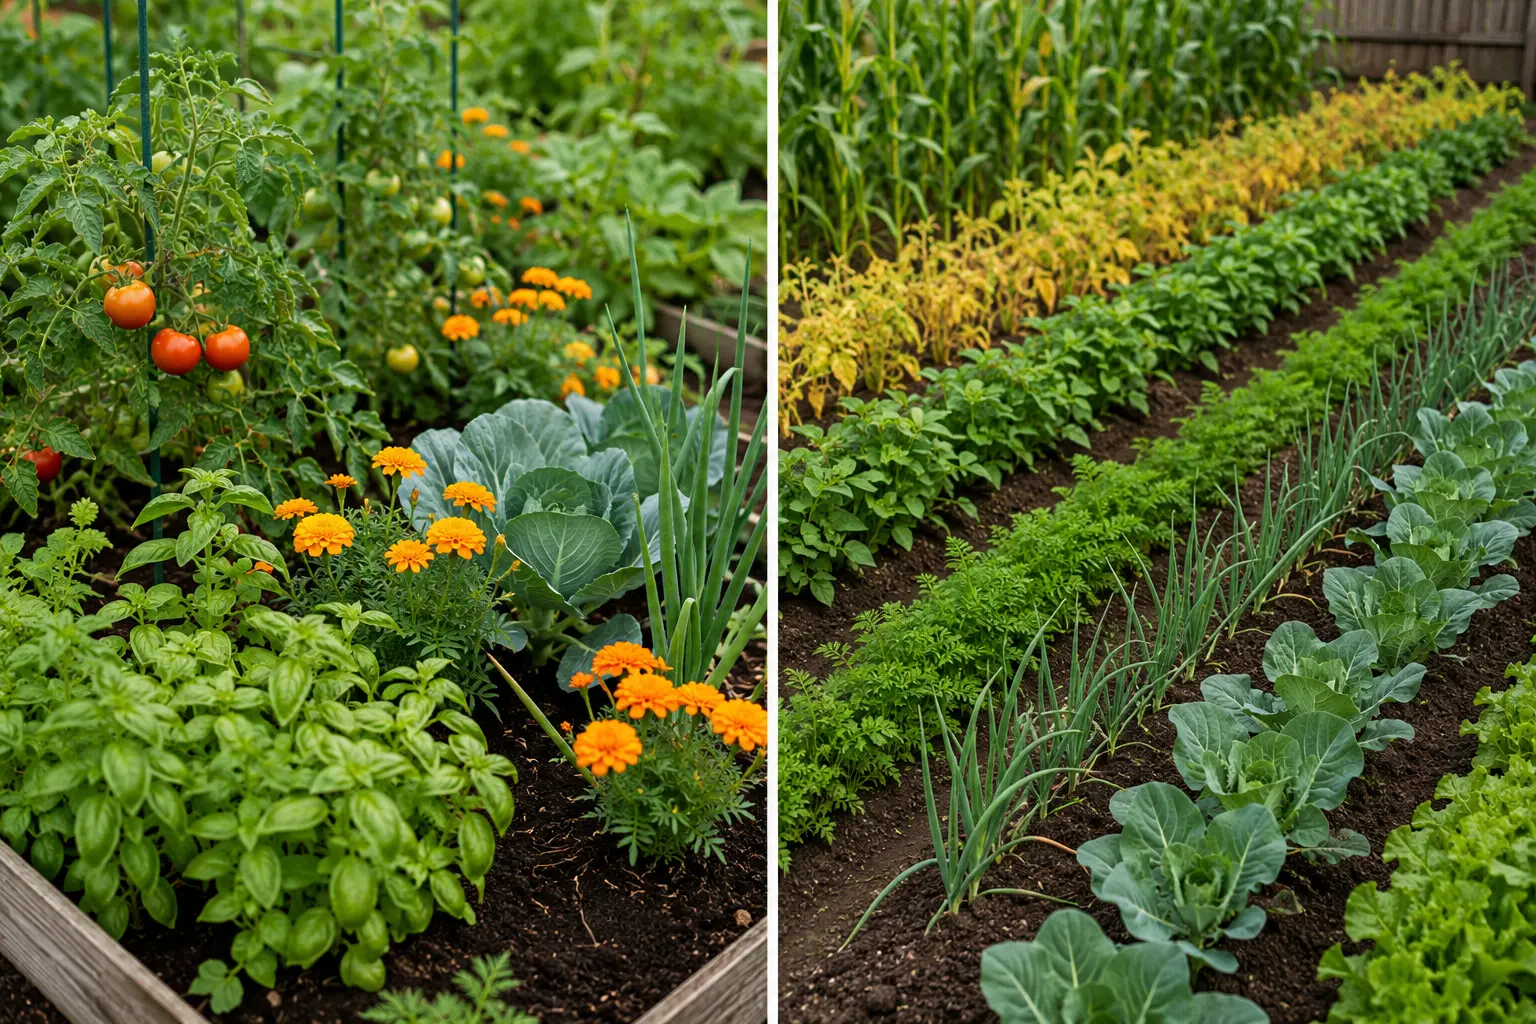
Beans, corn, cabbage, and marigolds grow well alongside potatoes. Keep cucumbers, squash, and tomatoes in a separate bed. Beans fix nitrogen in the soil that potatoes lean on heavily during tuber formation, and marigolds repel some of the soil nematodes that damage potato roots. Tomatoes and potatoes share several fungal diseases, including early blight, so planting them near each other raises the infection risk for both.
Rotate potatoes to a new section of the garden every three to four years, and steer clear of any bed that grew tomatoes, peppers, or eggplant the prior season. All four crops belong to the nightshade family and share the same soil-borne pathogens. Crop rotation is the single most effective long-term defense against a buildup of blight spores, scab bacteria, and potato cyst nematodes in your soil.
Common Pests and Diseases
The Colorado potato beetle and late blight cause the most crop loss among U.S. home gardeners, followed by potato scab, blackleg, and slugs. The table below matches visible symptoms to the likely cause, since getting the identification right determines whether you need to act now or can just keep an eye on things.
| Symptom | Likely Cause | Action |
| Yellow-striped beetles or orange egg clusters on leaf undersides | Colorado potato beetle | Hand-pick daily into soapy water |
| Dark, water-soaked leaf spots spreading fast in wet weather | Late blight | Remove infected foliage, avoid overhead watering |
| Rough, corky patches on tuber skin | Potato scab | Lower soil pH, avoid over-liming |
| Black, rotting stem base with yellowing leaves | Blackleg | Remove and discard infected plants, rotate beds |
| Holes in tubers near the soil surface | Slugs or wireworms | Use beer traps or diatomaceous earth |
| Stunted, weak plants in a previously potato-heavy bed | Potato cyst nematodes | Rotate crops for four-plus years |
Colorado potato beetle adults overwinter in the soil and emerge in late spring. Hand-pick adults and egg clusters daily for the first three to four weeks after emergence, and you’ll head off most of the damage before it starts. Late blight spreads fastest in cool, wet weather above 60°F (16°C) with high humidity, so if you’re gardening somewhere humid, space plants wider than the standard 12 inches to help airflow.
When and How to Harvest Potatoes
Harvest early or “new” potatoes two to three weeks after the plants flower. Wait for mature storage potatoes until two to three weeks after the foliage yellows and dies back. Flowering means the plant has shifted energy from leaf growth to tuber growth. Die-back means full maturity, with thicker, storage-ready skin.
Before pulling a full harvest, test tuber size by gently digging beside one plant with a hand trowel and checking a few tubers, then re-cover the soil if they need more time. Use a garden fork inserted at least 12 inches from the base of the plant so you don’t pierce any tubers, then lift the whole root mass by hand.
Get everything out of the ground before the first hard freeze in your zone. Temperatures below 27°F (-3°C) damage tubers still in the ground, though a light frost that only touches the foliage won’t hurt potatoes growing several inches underground. Toss any potato with green skin: that’s solanine buildup from sun exposure, and it makes the tuber unsafe to eat.
Curing and Storing Potatoes
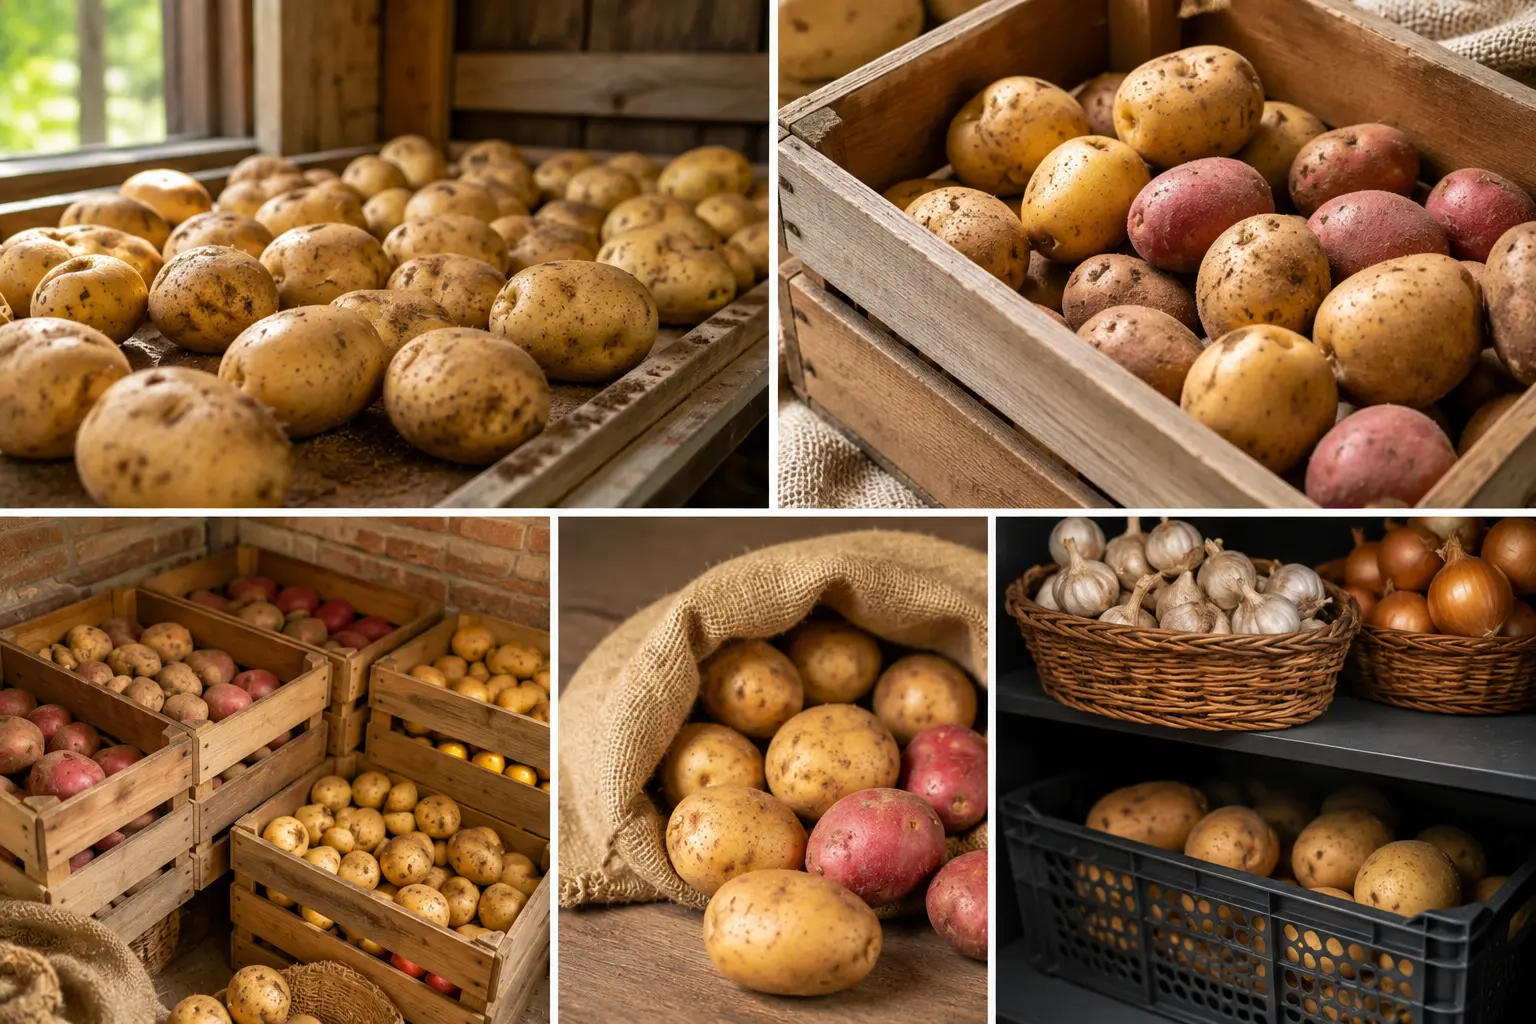
Cure freshly harvested potatoes for ten to fourteen days in a dark space at 50–60°F (10–16°C) with 85–95% humidity before moving them to long-term storage. Curing thickens and toughens the skin, which cuts down on moisture loss and rot over months of storage.
After curing, move potatoes somewhere dark and cool, between 35°F and 40°F (2–4°C) with high humidity: a root cellar, unheated basement, or insulated garage all works. Store them in something with airflow, like a wicker basket, a cardboard box with ventilation holes, or a paper sack, and check the batch every two to three weeks for rot or sprouting. Potatoes stored above 45°F (7°C) sprout within one to two months. Below freezing, they turn sweet and mushy from starch converting to sugar and lose their culinary quality entirely.
Damaged or bruised potatoes from harvesting don’t store well, so eat those within a week rather than adding them to the storage batch. Properly cured, undamaged maincrop potatoes stored at the right temperature and humidity will last four to six months.
FAQs
Do potatoes need full sun to grow well?
Yes. Potato plants need six to eight hours of direct sunlight daily for strong tuber production. Shaded plants grow taller but yield fewer, smaller potatoes.
Can grocery store potatoes be planted instead of seed potatoes?
Yes, if they’re organic and unsprayed, though yields run lower than certified seed potatoes and disease risk goes up since store-bought potatoes skip certification screening.
How many potatoes grow from one seed potato piece?
One healthy seed piece typically produces five to ten tubers, depending on variety, spacing, soil fertility, and how consistent the watering has been through the season.
Why do some potato plants never flower?
Some early varieties skip flowering entirely without it affecting tuber development. Foliage die-back is still a reliable harvest signal either way.
Is it safe to eat a potato with a small green spot?
No. Cut away all green portions before cooking. The green marks concentrated solanine, a toxin that causes illness even in small amounts.
Conclusion
Growing potatoes successfully comes down to four decisions made at the right time: choosing certified seed potatoes suited to your region’s growing season, planting on schedule relative to your last frost date, hilling consistently to protect developing tubers from sunlight, and curing the harvest properly before long-term storage. Track your USDA zone timing, rotate the garden bed every three to four years, and check soil pH before planting, and you’ll sidestep the disease and rot problems behind most first-year crop failures. Full vegetable garden, raised bed, or a few containers on the patio, the basic routine stays the same. Get that right, and a 2.5-pound bag of seed potatoes turns into a harvest that carries you through winter.