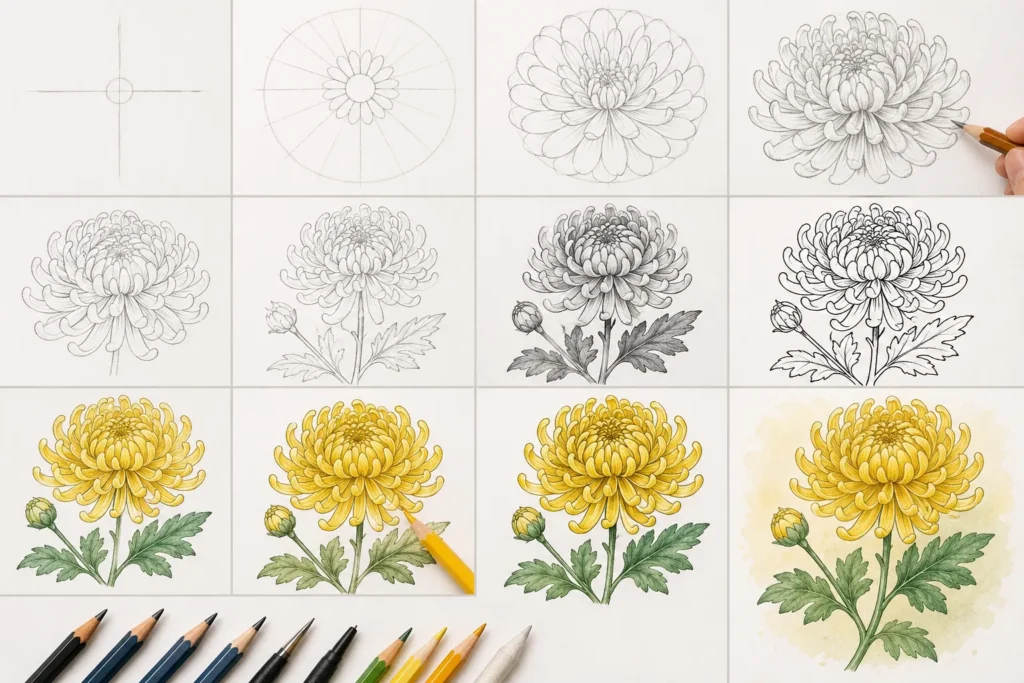
Drawing a chrysanthemum starts with one small circle and builds outward in layers — each ring of petals slightly larger than the last. The flower looks complex, but its structure is completely logical once you understand how disc florets form the center and ray florets build the bloom. This guide covers every level: beginner pencil sketches, realistic shading, ink line art, watercolor technique, and tattoo-style design.
Chrysanthemums (Chrysanthemum morifolium) bloom in late summer through autumn. If you want to draw from a live specimen, knowing when chrysanthemums bloom and how to grow them gives you access to a fresh model every fall — far better than drawing from photos alone.
Understand the Chrysanthemum’s Structure Before You Draw
Every good drawing starts with understanding what you are drawing. A chrysanthemum is not one flower — it is a composite of hundreds of tiny individual flowers called florets.
Disc Florets: The Center
The center of a chrysanthemum contains tightly packed disc florets — small tubular flowers grouped in a rounded cluster. In most varieties, this center is slightly raised, forming a dome or dense ball. In fully double-bloomed types, the disc florets are hidden entirely beneath multiple petal layers.
Ray Florets: The Petals
Each “petal” you see is actually an individual ray floret — a single elongated flower with one strap-shaped petal. A single chrysanthemum bloom has anywhere from 40 to 300+ ray florets arranged in 3 to 10 overlapping rings around the center. This layered architecture is what makes the flower look so full and complex.
5 Main Chrysanthemum Shapes for Drawing
- Pompon / Ball: Perfectly round, all petals inward-curving — looks like a sphere. Best for beginners.
- Decorative / Incurve: Wide dome shape with petals curving inward at tips. The most common garden mum.
- Spider mum: Long, thin tubular petals radiating outward like spider legs. Dramatic and graphic.
- Daisy / Single: One flat ring of petals with visible center. Easiest structure to draw realistically.
- Ogiku (large Japanese): Massive, irregular petals that curl and cascade. Advanced — best drawn from a live reference.
Drawing Tools You Need
The right tools make a significant difference in the final result. Here are the 4 essential setups for different drawing styles:

For Pencil Sketch
- HB pencil — for light guide circles and structure lines
- 2B pencil — for petal outlines and medium shading
- 4B or 6B pencil — for deep shadows in the center and petal overlaps
- Kneaded eraser — for lifting highlights off petals
- Smooth cartridge paper or Bristol board (100–150 gsm / 3.5–5.3 oz)
For Ink Line Art
- 0.1 mm fineliner — for detailed petal veins and center texture
- 0.3 mm fineliner — for petal outlines
- 0.5 mm fineliner — for stem and bold outer lines
- White gel pen — for highlight dots on petals
For Watercolor
- Round watercolor brush, size 4 — for petals
- Round watercolor brush, size 1 — for fine details and veins
- Cold-press watercolor paper, 300 gsm (140 lb) minimum
- Watercolor paints: yellow ochre, permanent rose, burnt sienna, sap green, ivory black
For Digital Drawing
- Procreate (iPad) or Clip Studio Paint — most popular for floral illustration
- Soft round brush for petals, hard round for ink-style line work
- Reference photo or live specimen open on a second screen
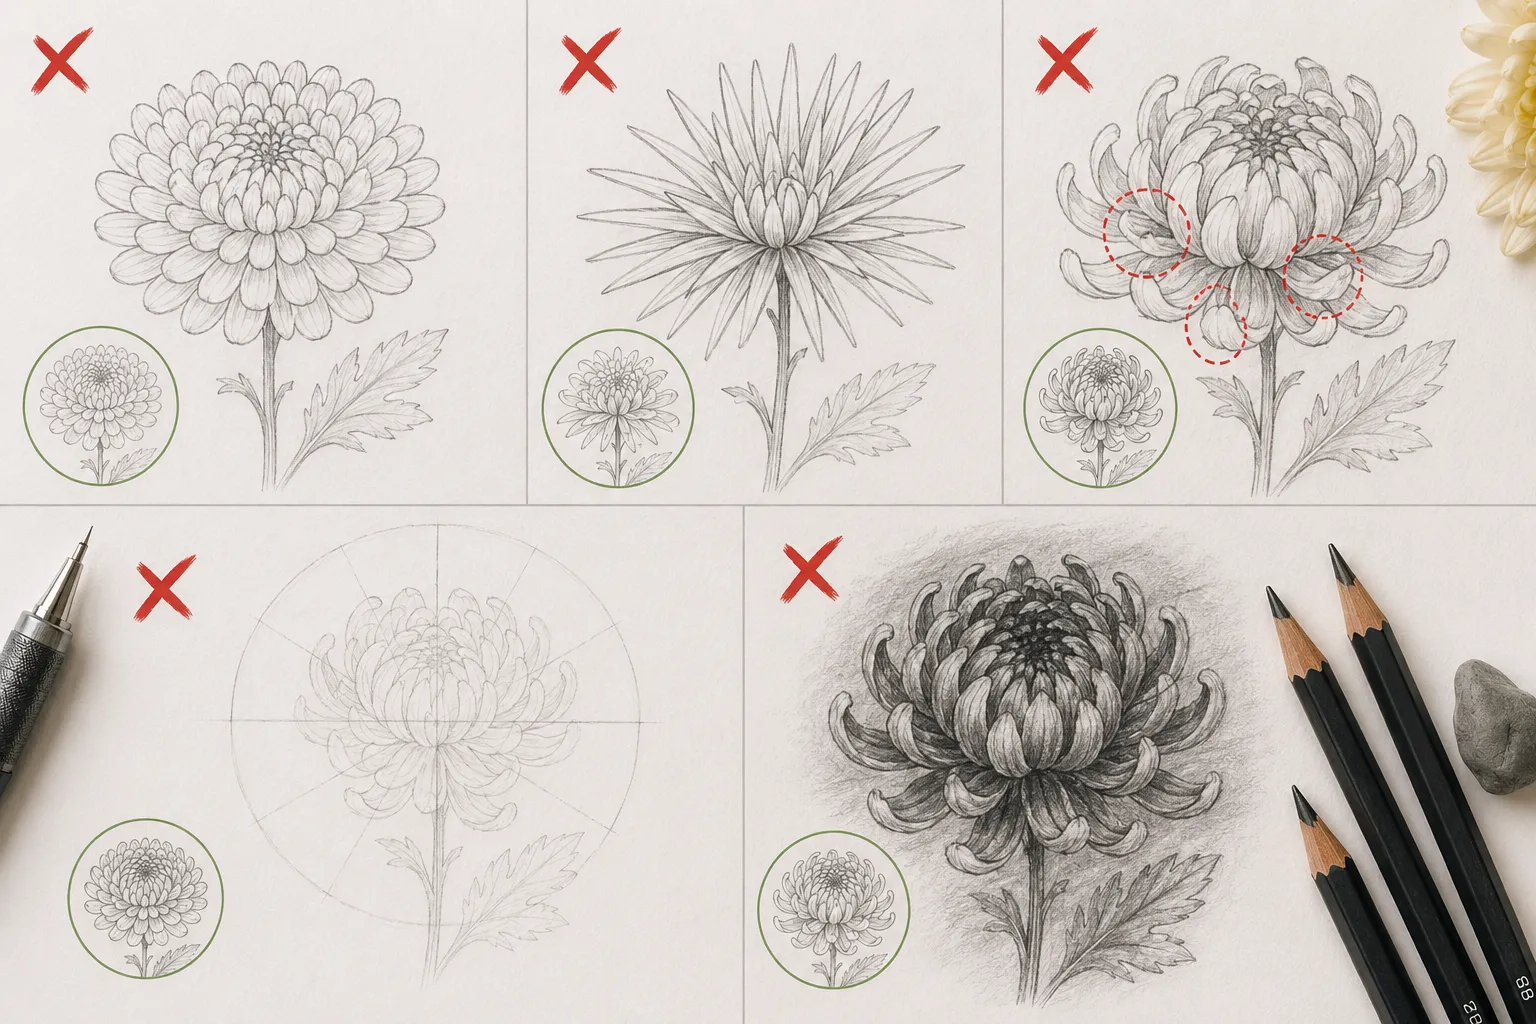
How to Draw a Chrysanthemum: Step-by-Step for Beginners
This method works for the decorative incurve style — the most recognizable garden chrysanthemum. Complete these 8 steps in order. Do not skip the guide circle in Step 1 — it controls the final proportions.
Step 1: Draw the Guide Circle
Draw a light circle, approximately 6–8 cm (2.4–3.1 inches) in diameter, using your HB pencil. Press lightly — this gets erased later. Mark the exact center point with a small dot. This circle defines the outer edge of your finished bloom.
Step 2: Sketch the Center Cluster
Inside the center, draw a small irregular oval, roughly 1.5–2 cm (0.6–0.8 inch) wide. Add short overlapping curved lines inside it to suggest tightly packed disc florets. This area will be the darkest part of your finished drawing.
Step 3: Draw the First Ring of Inner Petals
Draw 8 to 10 short, narrow petals directly around the center cluster. Each petal should be 1.5–2 cm (0.6–0.8 inch) long, slightly curved, and pointed at the tip. Vary the angle — tilt some left, some right, some straight up. No two petals should be identical.
Step 4: Add the Second Petal Ring
Draw a second ring of petals between and behind the first ring. These petals are 2–3 cm (0.8–1.2 inch) long and slightly wider. Position each one in the gap between two inner petals so they appear to grow from a deeper layer.
Step 5: Build the Third and Fourth Rings
Each new ring of petals is longer and wider than the previous one. By the fourth ring, petals should reach the edge of your guide circle. Some outer petals curve slightly downward — this creates the natural drooping weight of a real bloom. Add 10–14 petals per outer ring.
Step 6: Erase the Guide Circle
Gently erase your original circle. The outer petal tips define the flower edge now. Clean up any crossed lines inside the center cluster.
Step 7: Add the Stem and Leaves
Draw a gently curved stem extending downward from the flower base. Chrysanthemum stems are firm, not wispy — draw two parallel lines 3–4 mm apart. Add 2 to 3 lobed leaves along the stem. Each leaf has 5 pointed lobes and a central midrib with branching veins.
Step 8: Add Petal Detail Lines
Draw one or two light lines running from the base to the tip of each petal — these are the midribs. On wider outer petals, add 1 to 2 side veins. This step takes the drawing from flat to dimensional without any shading.
How to Shade a Chrysanthemum Realistically
Shading is what separates a flat outline from a three-dimensional drawing. A chrysanthemum has 3 distinct tonal zones:
Zone 1: The Dark Center
The center cluster is always the darkest area — no direct light reaches deep into the disc florets. Build this area with 4B or 6B pencil, using small circular strokes. Leave a tiny highlight spot on one side of the center to suggest a slight dome shape.
Zone 2: Inner Petal Shadows
Inner petals cast shadows onto the petals directly below them. Shade the base of each visible petal with a 2B pencil, blending softly toward the tip. The shadow is darkest where petals overlap. Use a blending stump or fingertip to smooth gradients.
Zone 3: Outer Petal Highlights
Outer petals catch the most light and should remain lightest. Leave the top surface of outer petals almost untouched. Add only the lightest 2H pencil tone to suggest soft curves. Use a kneaded eraser to lift small highlight stripes along the center of each exposed outer petal.
Light direction matters. Pick one light source — upper left is standard — and keep every shadow and highlight consistent with that single direction throughout the drawing.
How to Draw a Chrysanthemum in Ink
Ink line art produces crisp, graphic results — ideal for botanical illustration style prints and tattoo reference designs. The key rule: work from the center outward and never go back over dried ink.
Ink Drawing Process
- Complete a full light pencil sketch first using the 8-step method above
- Let the pencil sketch dry if you traced over another image — graphite smears under wet ink
- Start inking at the center cluster using a 0.1 mm pen — small overlapping curved strokes to suggest dense florets
- Ink the innermost petal ring next, using clean confident strokes — do not sketch or scratch with ink
- Work outward ring by ring, increasing pen weight to 0.3 mm for middle petals and 0.5 mm for outer edges
- Add hatching lines inside deep petal overlaps for shadow — parallel lines 0.5–1 mm apart
- Ink the stem and leaves last using 0.5 mm pen for outlines and 0.1 mm for leaf veins
- Erase all pencil lines only after the ink is fully dry — minimum 5 minutes for fineliner
Stippling for Texture
Stippling — small dots applied with a 0.1 mm pen — creates organic texture in the center cluster and on leaf surfaces. Apply dots densely in shadow areas and sparsely on highlighted surfaces. This technique is widely used in botanical illustration and Japanese-style chrysanthemum art.
How to Paint a Chrysanthemum in Watercolor
Watercolor suits chrysanthemums because the soft bleeding edges mirror the delicate petal structure. Work wet-on-wet for soft petal transitions and wet-on-dry for crisp veins and details.
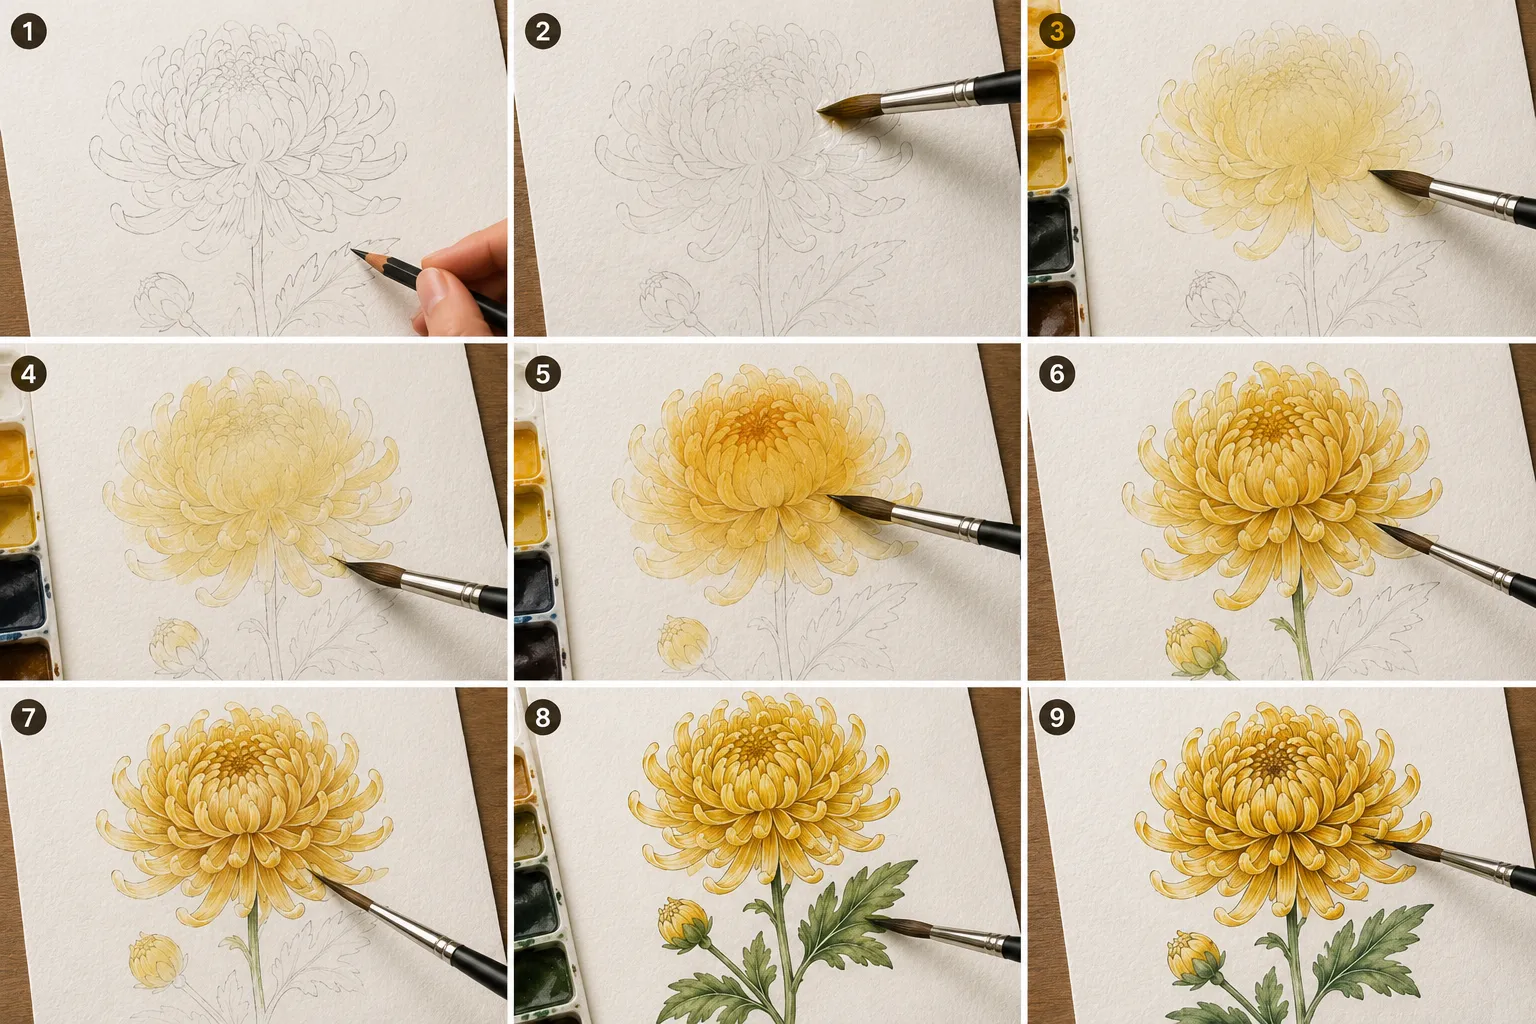
Watercolor Step-by-Step
- Complete a light pencil outline on dry watercolor paper — use HB pencil, very light pressure
- Apply a wet wash over the entire flower head — clean water only, no paint
- Drop your lightest petal color (diluted yellow ochre or pale rose) into the wet surface — let it spread naturally
- Tilt the paper slightly to guide color flow toward the outer petals
- Let dry completely — 15 to 20 minutes depending on humidity
- Apply a second, more saturated wash only to the inner petals and center — this builds the darker center naturally
- Paint individual petal details with a size 1 brush on dry paper — single confident strokes per petal
- Mix sap green and ivory black for the stem and leaves — paint with clean confident strokes, not scrubbing
- Add the darkest shadows last: center cluster, petal base overlaps, and underside of outer petals
Common Watercolor Mistakes
- Overworking wet paint — apply and leave it, do not go back while wet
- Using paper lighter than 300 gsm (140 lb) — it buckles and ruins gradients
- Painting all petals the same value — vary light and dark within each ring for depth
Drawing a Chrysanthemum in Tattoo Style
The chrysanthemum is one of the most tattooed flowers in Japanese and East Asian art traditions. Japanese-style kiku tattoo design features bold outlines, strong contrast, and stylized petal shapes that differ significantly from botanical realism.
Japanese (Irezumi) Style
Japanese tattoo chrysanthemums have thick, solid black outlines and bold curved petals with no subtle shading gradients. Each petal is drawn as a clean, defined shape with 2–3 internal lines suggesting structure. The center is a small tight spiral or dot cluster.
- Outer petals are wider and rounder than botanical proportions — stylization is expected
- Petals often curl at the tip, pointing backward
- Bold black ink with solid black fill in petal overlaps and center
- Often paired with waves, dragons, or phoenixes in larger compositions
Watercolor Tattoo Style
Watercolor tattoo drawings use loose, free brushstroke edges around a clean line drawing. Draw the chrysanthemum in clean ink line art first. Then add color washes extending beyond the petal outlines — the paint deliberately bleeds outside the lines. No black shading fills.
Minimalist / Fine Line Style
Fine line chrysanthemum drawings use a single 0.1 mm pen weight throughout, with no fill, no shading, and no variation in line thickness. The entire drawing is outline-only. This style works best with the daisy or pompon chrysanthemum shape — simpler structures read clearly at small scales.
If you are planning a chrysanthemum tattoo and want to understand the flower’s structure in more detail, reading about chrysanthemum varieties and petal types helps you choose the right style for your design.
8 Pro Tips for Better Chrysanthemum Drawings
- Draw from a real flower: A fresh cut chrysanthemum from the garden gives you accurate petal curvature, center texture, and light response that photos flatten
- Vary petal length within each ring: Natural flowers never have perfectly even petals. Make some 10–15% shorter or longer for realism
- Draw petals in pairs: Each petal pairs with the one directly opposite on the flower. Drawing opposite pairs keeps your bloom balanced
- Start loose, finish tight: Sketch the full composition lightly first. Add detail only after the overall shape and proportions feel right
- Use negative space: The gaps between petals define the flower as much as the petals themselves. Draw the gaps, not just the petals
- Keep your center dark: Beginners often make the center too light. A dark center creates visual depth that pulls the whole drawing together
- Rotate your paper: Turn your paper as you draw each ring — it is easier to draw curves moving toward you than away from you
- Reference 3 angles: Find a front-facing view, a 3/4 view, and a side profile of your chrysanthemum variety. Draw all 3 before attempting a final composition
5 Common Chrysanthemum Drawing Mistakes
1. Making All Petals the Same Size
Petals within each ring vary in length and width even on the same flower. Uniform petals look artificial. Vary each petal’s length by 10–20% and tilt them in slightly different directions.
2. Drawing Petals Too Straight
Every chrysanthemum petal curves — either inward, outward, or laterally. Straight petals produce a stiff, flat result. Practice drawing single curved petals in isolation before placing them on the flower.
3. Ignoring Petal Overlap Logic
Petals in front must cover the base of petals behind them. Beginners often float all petals at the same level. Decide which petal is in front at every overlap point and erase the hidden portion of the petal behind.
4. Skipping the Guide Circle
Drawing without the guide circle produces asymmetric, lopsided blooms. The guide circle takes 5 seconds to draw and saves the entire composition. Never skip it for final work.
5. Too Much Pressure with Dark Pencils
Pressing hard with 4B or 6B pencils leaves permanent grooves in the paper that cannot be erased. Build dark tones through multiple light layers. Glazing — thin dark layer over thin dark layer — produces richer blacks than a single heavy stroke.
Frequently Asked Questions
How long does a chrysanthemum drawing take?
A basic pencil sketch takes 20–30 minutes. A fully shaded realistic drawing takes 2–4 hours. A detailed watercolor or ink botanical illustration takes 4–8 hours. Time drops significantly with practice — most artists halve their drawing time after completing 5 to 10 chrysanthemum studies.
Which chrysanthemum is easiest to draw?
The single daisy-type chrysanthemum is easiest — one flat ring of petals around a visible center. The pompon style is second easiest because its round shape has a clear guiding geometry. Spider mums and ogiku types are the most difficult due to irregular, cascading petal structures.
Should I draw from photos or real flowers?
Real flowers are better. Photos flatten depth, alter color temperature under artificial light, and compress the three-dimensional petal structure. A fresh chrysanthemum in a glass of water gives you direct observation of how petals curve, overlap, and catch light — information no photo fully captures.
Can I use a chrysanthemum drawing as a tattoo reference?
Yes — your original drawing makes the best custom tattoo reference. Inform your tattoo artist of the style you want: Japanese irezumi, fine line, watercolor, or realistic botanical. Bring 2 to 3 reference images alongside your own sketch so the artist can adapt the design for skin texture and placement.
How do I draw chrysanthemum leaves correctly?
Chrysanthemum leaves have 5 lobes with toothed edges and a prominent midrib. Sketch the midrib as a slightly curved line first. Then draw the 5 lobes around it — 2 on each side and 1 at the tip. Add secondary veins branching off the midrib at 45-degree angles. The leaf surface has a slight texture — suggest this with short, irregular hatching lines.
Final Thoughts
A chrysanthemum drawing succeeds when you understand its structure first and build it in layers — guide circle, center cluster, inner rings, outer rings, stem, leaves, detail, and shading — in that exact order. The flower looks complicated from a distance. Up close, it is a logical, repeating pattern of curved petals each following the same basic shape.
Every chrysanthemum variety offers a different drawing challenge. Start with the pompon or decorative style to build confidence with layered petal rings. Move to spider mums once you have control over curved line work. The botanical illustration and Japanese tattoo styles each have their own vocabulary — ink weight, stippling, negative space, bold fills — that become intuitive after a few studies.
The most useful thing you can do before your next drawing session is observe a real flower. Grow your own chrysanthemums and study the live bloom at every stage — tight bud, half-open, and fully open. Our complete chrysanthemum growing and care guide covers exactly which varieties to grow and when they bloom, so you have a fresh drawing subject every autumn.