Chrysanthemums bloom in fall when almost every other garden flower is done. Plant the right variety in the right zone, pinch twice in summer, and mums return year after year without much fuss. Buy the wrong type or skip those 2 pinching sessions, and you end up with a leggy plant producing 3 blooms instead of 300.
This guide covers everything: soil preparation, planting depth, watering, fertilizing, pinching schedules by zone, overwintering, propagation, and 4 common problems. All measurements use both US and metric units throughout.
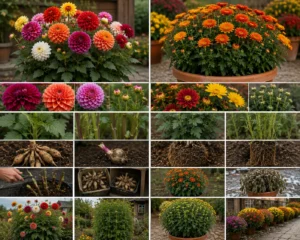
Garden Mums vs Florist Mums: Pick the Right One
The most important decision before planting is the mum type. Confusing garden mums with florist mums is the top reason chrysanthemums fail to return the following year.
Garden mums (hardy mums) are bred for cold tolerance and outdoor performance. These are true perennials in USDA Zones 5-9 and survive winter in the ground. Garden mums develop a spreading root system with basal shoots at the base. Common flower forms include single, decorative, and pompon. Buy garden mums in spring — the plants need a full growing season to establish roots before their first winter.
Florist mums are bred for greenhouse production, uniform color, and cut-flower displays. Florist mums have shallow roots and no cold hardiness. A florist mum left in the garden after the first hard frost is dead — no mulching saves it. Use florist mums indoors or as single-season color in containers.
The plant tag is the only reliable guide. Look for USDA hardiness zone information on the label. If no zone is listed, assume florist mum. Buy from a specialty nursery in spring for the widest selection of true garden mums.
Before choosing a variety, review every official class to match bloom form to your garden design: chrysanthemum varieties.
USDA Hardiness Zones for Chrysanthemum
Garden mums grow in USDA Zones 4-9. Zone determines whether mums survive winter, how much mulch the plants need, and when to start pinching each spring.
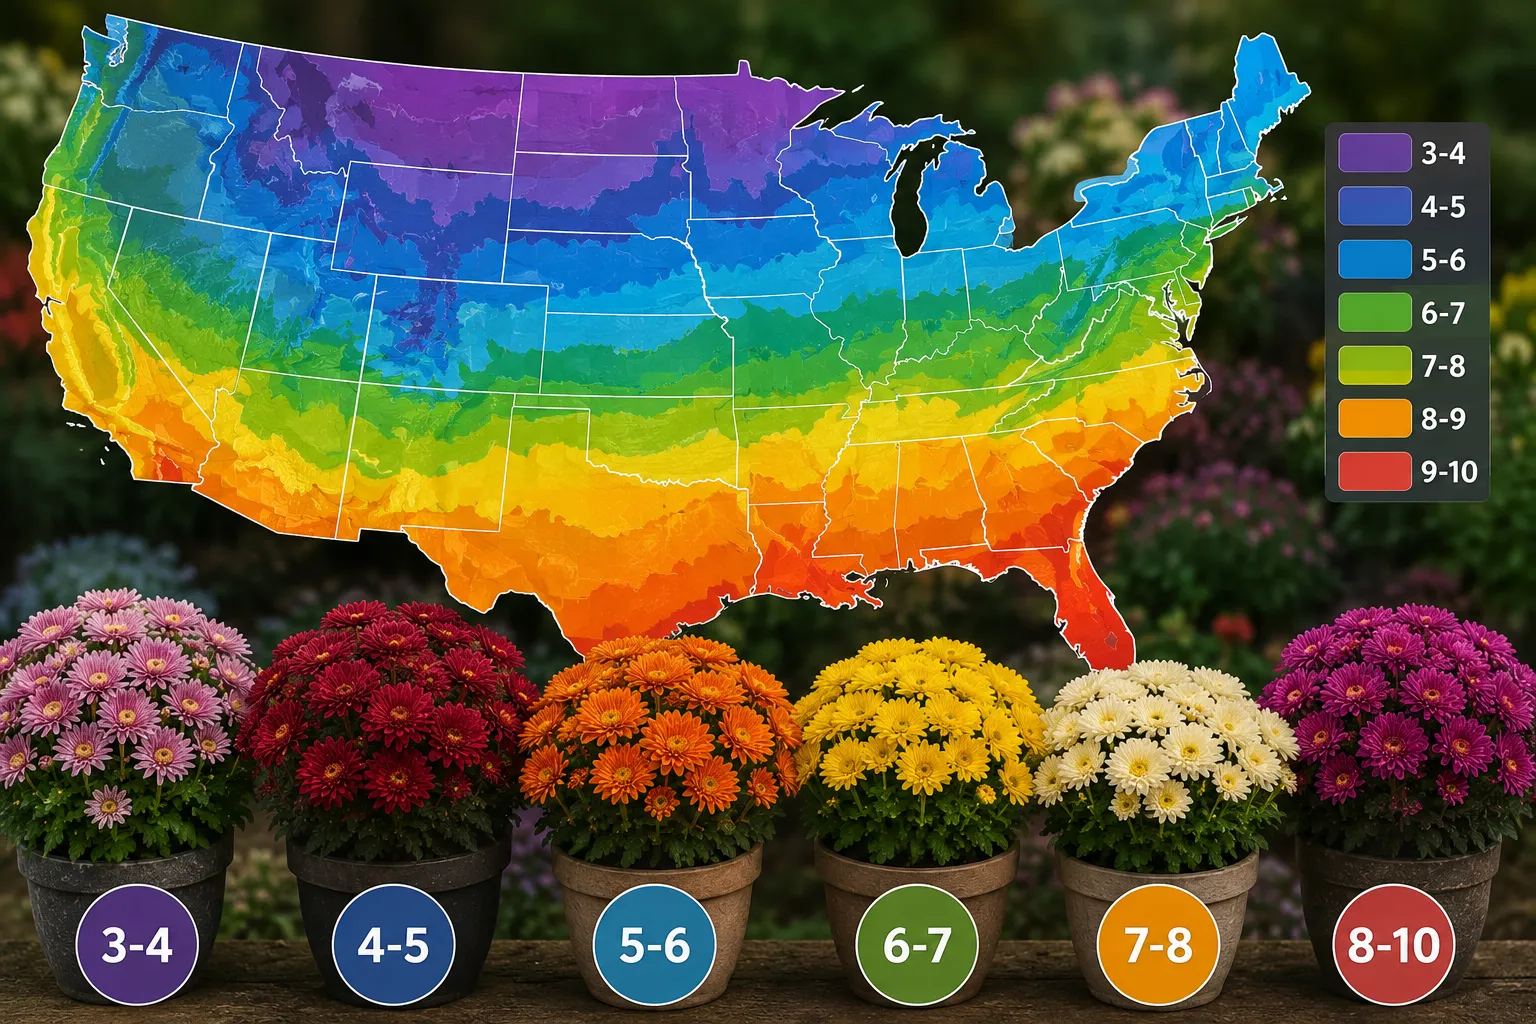
| Zone | Min Temp | Example States | Winter Survival | Mulch Depth |
| 4 | -30 to -20°F (-34 to -29°C) | Minnesota, Montana | With heavy mulch | 4-6 in / 10-15 cm |
| 5 | -20 to -10°F (-29 to -23°C) | Illinois, Ohio, Colorado | Reliable with mulch | 3-4 in / 7-10 cm |
| 6 | -10 to 0°F (-23 to -18°C) | Virginia, Tennessee | Reliable | 2-3 in / 5-7 cm |
| 7 | 0 to 10°F (-18 to -12°C) | Georgia, N. Carolina | Very reliable | Light mulch only |
| 8-9 | 10 to 30°F (-12 to -1°C) | Texas, Florida, Pacific NW | Excellent | Optional |
Zone 4 gardeners can grow mums as perennials, but mulching after the ground freezes is non-negotiable. In Zones 8-9, the problem is summer heat above 80°F (27°C), which slows bud formation — not cold.
Soil Preparation
Chrysanthemums need well-drained, fertile soil with a pH of 6.0-6.5. Roots rot in waterlogged soil within 2 weeks. Test drainage by filling a 12-inch (30 cm) deep hole with water and timing how long it takes to drain. Water still sitting after 30 minutes means drainage improvement is needed before planting.
To Prepare Soil Before Planting
- Dig the bed 12 inches (30 cm) deep
- Work in 3-4 inches (7-10 cm) of compost or well-rotted manure
- Add peat moss on sandy soils to improve moisture retention
- Install underground drainage tile on heavy clay that stays wet
- Test pH and adjust with lime to raise or sulfur to lower
For container growing, mix 2 parts compost, 2 parts garden soil, 1 part coarse sand or perlite, and 1 part sphagnum moss. This ratio drains freely while retaining enough moisture for active root growth.
When and How to Plant Chrysanthemum
Plant garden mums in spring, 2-3 weeks after the last frost date for your zone. Spring planting gives roots 5-6 months to establish before the first hard freeze. Fall planting works in Zones 7-9 if done early — roots need at least 6 weeks of active growth before cold slows them.
Planting Depth and Spacing
- Dig a hole slightly wider than the root ball
- Set the crown at soil level — burying the crown causes rot
- Firm soil around roots to close air pockets
- Water deeply immediately after planting
- Bushy compact varieties: 24-30 in (60-75 cm) apart
- Standard upright varieties: 12-18 in (30-45 cm) apart
A consistent watering routine from the first day improves root establishment. The watering schedules at Zoned Garden provide zone-specific plans for flowering plants.
How to Water Chrysanthemum
Water when the top 1 inch (2.5 cm) of soil feels dry — roughly every 2-3 days during summer heat. Inconsistent watering is the second most common cause of poor blooming after skipped pinching.
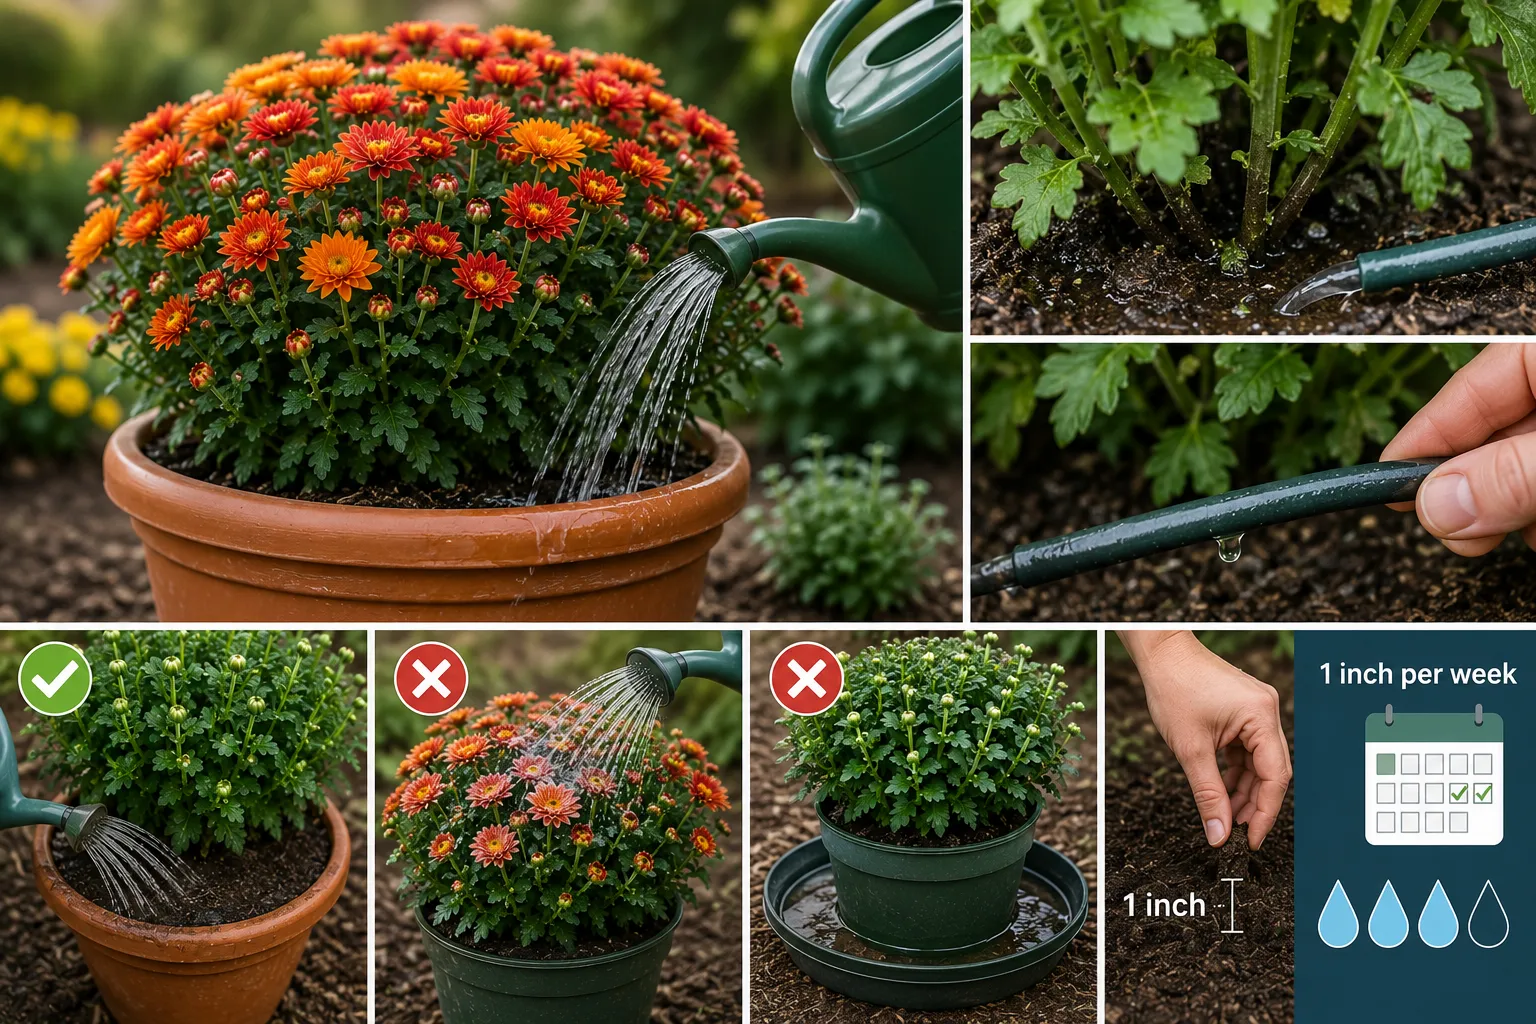
4 Watering Rules That Improve Bloom Count
- Water at the base, not overhead — wet foliage triggers leaf spot fungus
- Water deeply to reach roots 6 inches (15 cm) down, not frequent shallow sprinkles
- Reduce watering frequency in fall as temperatures drop below 60°F (15°C)
- Check container mums daily in temperatures above 75°F (24°C) — pots dry out fast
A 2-inch (5 cm) layer of mulch around the base retains moisture, moderates soil temperature, and cuts watering frequency by about 30%.
Fertilizing Chrysanthemum
Use a balanced NPK fertilizer (10-10-10) from spring through midsummer, then switch to a low-nitrogen formula (5-10-5) in August. High nitrogen in late summer produces leafy growth instead of flower buds.
| Season | Fertilizer Type | Frequency | Purpose |
| Early spring | 10-10-10 balanced | Every 3-4 weeks | Build stems and leaves |
| Late spring to July | 10-10-10 balanced | Every 3-4 weeks | Develop plant structure |
| August | 5-10-5 low nitrogen | Every 3-4 weeks | Trigger bud formation |
| September onward | Stop feeding | None | Harden plant for fall |
Liquid fish emulsion and compost tea work as organic alternatives — apply every 3 weeks from spring through late July, then stop. Over-fertilizing past August delays blooming and produces soft growth that frost damages first.
Pinching: The Single Most Important Skill
Pinching means removing the top 1 inch (2.5 cm) of each stem tip to force the plant to branch sideways. One uncut stem produces 1 bloom. One pinched stem eventually grows 8-12 bloom-bearing branches. Skip pinching and the plant stays tall, thin, and produces a fraction of its potential flowers.
Pinching Schedule by USDA Zone
- Zones 4-5: First pinch when stems reach 6 in (15 cm) — usually late May. Second pinch in late June. Stop by July 4.
- Zones 6-7: First pinch mid-May. Second pinch early July. Stop by July 15.
- Zones 8-9: First pinch early May. Second pinch mid-July. Stop by August 1.
Pinching after the stop date pushes bloom time past the first frost and the plant dies before opening. Use clean scissors or fingernails. Pinch just above a leaf node — 2 new side shoots emerge from that point and both eventually flower.
For exhibition-quality single blooms on decorative and incurve varieties, disbud instead of pinch. Disbudding removes all side buds around the central bud so every drop of energy goes into 1 large flower per stem.
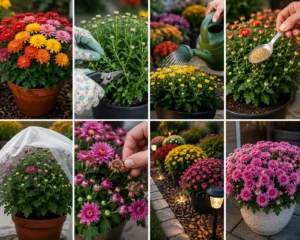
Growing Chrysanthemum in Pots
Use containers 12-16 inches (30-40 cm) wide and at least 12 inches (30 cm) deep. Shallow pots crowd roots and stop bud formation by midsummer.
Container Care Checklist
- Choose a pot with at least 3 drainage holes — pots waterlog faster than garden beds
- Use the 4-part soil mix from the soil section above
- Place in a spot receiving 6+ hours of direct sun daily
- Feed with liquid fertilizer every 2 weeks — nutrients flush out with each watering
- Move pots to a sheltered spot or unheated garage before the first hard freeze in Zones 4-6
- Repot or divide every 2 years when roots circle the container bottom
Deadheading and End-of-Season Pruning
Deadhead spent blooms every 3-5 days by cutting the flower stem back to the next set of leaves. Regular deadheading extends the bloom period by 2-4 weeks by redirecting energy from seed production to new bud formation.
For single-flowered types: keep the central bud and remove all surrounding side buds to channel energy into 1 large bloom. For spray types: remove only the central bud and let the surrounding 4-6 buds develop into a natural cluster.
After the first hard frost kills the foliage, cut stems to 4 inches (10 cm) above soil level. Leave those short stumps standing through winter — they shelter the basal buds that produce next year’s growth.
How to Overwinter Chrysanthemum
In Zones 5-9, chrysanthemums overwinter in the ground with mulch applied after the ground freezes. Mulching before the ground freezes traps warmth and delays cold hardening — wait until after the first 2-3 hard frosts.
5 Overwintering Steps
- Cut stems to 4 in (10 cm) after frost kills the foliage
- Wait until the ground freezes before applying mulch
- Apply 3-6 in (7-15 cm) of straw, shredded leaves, or evergreen boughs
- Remove mulch gradually in early spring as temperatures consistently reach 40°F (4°C)
- Divide the clump every 2-3 years in spring to maintain full bloom production
In Zone 4, after the last frost in spring, lift plant clumps and rinse roots. Inspect for healthy basal shoots — these produce the new season’s growth. Replant outer sections at the original depth and water well.
In Zones 3 and colder: grow chrysanthemums as annuals, or dig the entire clump in fall, pot in damp soil, and store at 32-45°F (0-7°C) in an unheated basement or garage until spring.
Propagating Chrysanthemum: 3 Methods
Chrysanthemums propagate by basal cuttings, stem cuttings, and division. Division is most practical for home gardeners. Cuttings suit anyone who wants to multiply a specific variety exactly.
Method 1: Basal Cuttings (Best Quality)
- Take basal cuttings in spring when new shoots reach 3-4 in (7-10 cm)
- Cut cleanly at soil level with a sharp knife
- Remove lower leaves, keeping 2-3 leaves at the top
- Insert into moist perlite or seed-starting mix
- Roots develop in 3-4 weeks at 60-65°F (15-18°C)
Method 2: Stem Cuttings (Summer Propagation)
- Take 4-5 in (10-12 cm) tip cuttings from healthy stems in early summer
- Strip leaves from the bottom half of each cutting
- Dip the cut end in rooting hormone powder
- Insert into warm moist soil — roots develop readily in warm conditions
- Pot up once roots fill the cutting tray, usually within 3 weeks
Method 3: Division (Every 2-3 Years)
- Lift the entire clump in early spring after the last frost
- Pull or cut the clump into sections, each with 3-5 healthy shoots
- Discard the woody central section of old clumps — it blooms poorly
- Replant outer sections at the same depth as the original clump
- Water well and apply mulch to hold moisture during establishment
Division applies to most flowering garden shrubs. The same technique works for the plants covered in the propagating garden shrubs guide.
4 Common Problems and Fixes
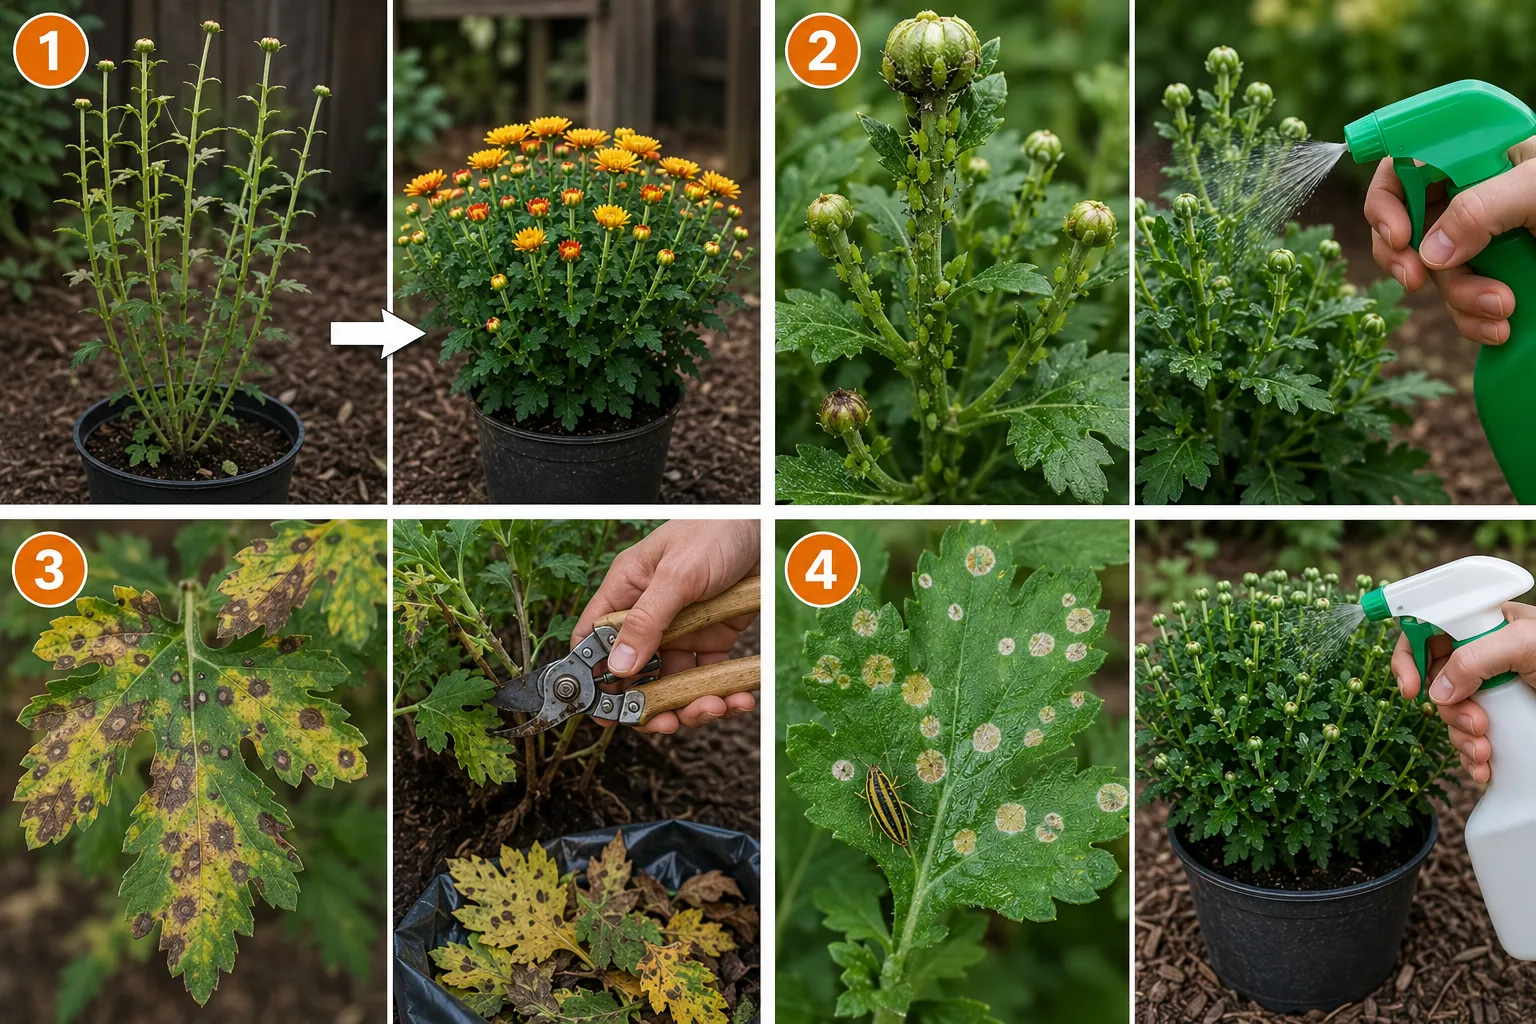
Problem 1: Leggy Stems, Few Flowers
Cause: Pinching skipped or done too late.
Fix: Pinch stems to 6 in (15 cm) in spring and follow the zone schedule above. If the plant is already leggy, cut all stems back by half in early June and start the normal pinching schedule from that point.
Problem 2: Aphid Colonies on Stems and Buds
Cause: Aphids colonize soft new growth, especially in warm dry spells.
Fix: Blast colonies with a strong jet of water first. For persistent infestations, apply insecticidal soap or neem oil every 5-7 days until colonies clear. Note: the aromatic foliage naturally deters deer and rabbits — but not aphids.
Problem 3: Brown Leaf Spots (Septoria Leaf Spot)
Cause: Overhead watering or rain splash deposits fungal spores on leaves. Septoria leaf spot is the most common fungal disease on chrysanthemums.
Fix: Switch to base watering immediately. Remove infected leaves and dispose of them — don’t compost. Apply copper-based fungicide every 7-10 days during wet periods. Space plants at minimum distances to improve air circulation.
Problem 4: Round Spots from Four-Lined Plant Bug
Cause: Four-lined plant bugs create numerous small, perfectly circular spots on leaves in spring. Damage looks like fungal spots but the circular uniformity identifies insects as the cause.
Fix: Damage is rarely severe enough to affect flowering and no treatment is usually necessary. For heavy infestations, apply pyrethrin-based insecticide in early morning when bugs move slowly.
Chrysanthemum as Cut Flowers
Chrysanthemum blooms last 10-21 days in a vase — often longer than on the plant. Cut stems in the early morning when blooms are fully open. Cut at a 45-degree angle, strip leaves below the waterline, and place immediately in clean water with floral preservative.
Spray chrysanthemums form multiple blooms per stem and suit cutting best. Single large-bloom decorative varieties produce fewer stems but each bloom reaches 4-6 inches (10-15 cm) in diameter, making them strong focal flowers in arrangements.
Change vase water every 2 days and recut stems by 0.5 inch (1.3 cm) at each change. Blooms last longest below 70°F (21°C), away from direct sun and heat vents.
Toxicity
Chrysanthemums are mildly toxic to dogs, cats, and horses according to ASPCA guidelines. The plant contains pyrethrins and related compounds that cause vomiting, drooling, and skin irritation in pets that chew the plant. Place containers out of reach and plant garden beds in areas where pets have limited access. Chrysanthemums are not toxic to humans.
Frequently Asked Questions
Do chrysanthemums come back every year?
Yes — garden mums return annually in USDA Zones 5-9 when planted in spring and mulched after the first hard frost. Florist mums are single-season plants and do not return. The garden mum vs florist mum distinction determines year-over-year performance entirely.
How much sun do chrysanthemums need?
6 hours of direct sun daily is the minimum for strong blooming. Plants in partial shade grow but produce fewer flowers and stretch toward the light. Full sun — 6-8 hours — produces compact, densely bloomed plants. Move container mums to track the sun position if necessary.
When do chrysanthemums bloom?
Chrysanthemums bloom from late summer through fall — August through November depending on variety. Early-season varieties peak in August. Mid-season varieties bloom September through October. Late-season varieties flower October through November, sometimes through light frosts.
Can I grow chrysanthemum from seed?
Yes — some species grow from seed, but most garden varieties propagate vegetatively to preserve exact flower form and color. Start seeds indoors 6-8 weeks before the last frost. Collect seeds when they turn brown on the plant. Seed-grown plants may differ from the parent in color and form.
Why are my mums not blooming?
4 causes stop mums from blooming: (1) Pinching stopped too late — past August 1 in northern zones. (2) Too much nitrogen fertilizer in late summer — switch to 5-10-5 by August. (3) Less than 6 hours of sun daily stops bud formation. (4) Clumps not divided for 3+ years exhaust soil nutrients and produce fewer blooms each season.
Start Growing This Season
Garden mums are one of the most reliable fall flowers you can grow. Get the variety right, pinch twice in summer, and mulch in fall — the same plants return fuller every year.
Find your exact USDA hardiness zone before planting to confirm which varieties survive your winters: find your grow zone.
Not sure which chrysanthemum class fits your garden style? Review all 13 official NCS types with bloom photos and zone notes: chrysanthemum varieties.
For care guidance on other flowering plants and landscape shrubs, browse the full library: shrub care guides.Happy growing.