QUICK ANSWER
To propagate shrubs, take 4–6 inch (10–15 cm) softwood stem cuttings in late spring or early summer, strip the lower leaves, dip the cut end in rooting hormone (IBA), and insert into a moist perlite-peat mix. Cover with plastic to hold humidity. Roots form in 4–8 weeks. For woody shrubs in winter, use hardwood cuttings instead. Layering and division work with zero cutting skills required.
Propagating shrubs is the fastest, cheapest way to fill your garden. Instead of spending $15–$40 per plant at a nursery, you multiply what you already have — for free. One mature forsythia gives you 20 new plants. One established hydrangea produces dozens of rooted cuttings every summer.
Most gardeners overthink this. The basics are simple: cut a stem, give it moisture, warmth, and indirect light, and wait. The 5 methods below cover every shrub type, every season, and every skill level.
Choose the method that matches your shrub and your timing. Each method section answers directly: what to cut, when to cut it, and what to do with it step by step.
Why Propagating Shrubs Works: The 3-Minute Science
Propagated shrubs are clones — genetically identical to the parent plant. Color, size, bloom time, and hardiness all carry over exactly. That’s the main advantage over seeds, which produce variable offspring.
Every stem cutting forms roots through a process called callus formation. The cut surface seals with a layer of undifferentiated cells (callus), then adventitious roots push out from the callus and buried nodes. Rooting hormone speeds this up by supplying synthetic auxins — indolebutyric acid (IBA) being the most effective — which signal cells to differentiate into root tissue.
Vegetative propagation also skips the juvenile phase. A shrub grown from seed may take 3–5 years to bloom. A cutting from a mature, flowering parent plant often blooms within its first or second season.
USDA ZONE NOTE
Propagation timing is zone-dependent. Softwood cutting windows run 2–4 weeks earlier in Zones 8–9 than in Zones 4–5. Base your schedule on your local last frost date and current growth stage — not the calendar month alone.
5 Methods to Propagate Shrubs: Quick Comparison
The right method depends on 3 factors: shrub type (deciduous vs. evergreen), season, and how many plants you need.
| Method | Best season | Skill level | Success rate | Time to roots |
| Softwood cuttings | Late spring–early summer | Beginner | 60–85% | 4–8 weeks |
| Semi-hardwood cuttings | Mid-summer–early fall | Beginner | 50–75% | 6–10 weeks |
| Hardwood cuttings | Late fall–early winter | Beginner | 40–70% | 8–16 weeks |
| Layering (simple/air) | Spring or fall | Beginner | 80–95% | 6–12 weeks |
| Division / suckers | Spring or fall | Beginner | 90–99% | Immediate |
Layering and division give the highest success rates because the new plant stays attached to the parent until roots form. Cuttings are faster and produce more plants per session.
Method 1: Softwood Cuttings (Best for Most Deciduous Shrubs)
Softwood cuttings are the most productive propagation method for deciduous shrubs. One parent plant yields 10–30 cuttings per session. Use this method from late spring through early July, when new growth is flexible but snaps cleanly when sharply bent — not limp, not stiff.
Shrubs That Root Best from Softwood Cuttings
These 10 shrubs respond reliably to softwood propagation:
- Forsythia — roots in 3–4 weeks, extremely fast
- Hydrangea (bigleaf, smooth, panicle) — roots in 4–6 weeks
- Weigela — roots in 4–5 weeks
- Spirea — roots in 3–5 weeks
- Lilac — roots in 5–8 weeks; use young basal shoots
- Ninebark (Physocarpus) — roots in 4–6 weeks
- Dogwood (Cornus) — roots in 4–7 weeks
- Viburnum — roots in 6–8 weeks
- Butterfly bush (Buddleia) — roots in 2–4 weeks, fastest on this list
- Elderberry (Sambucus) — roots in 4–6 weeks
Tools and Materials
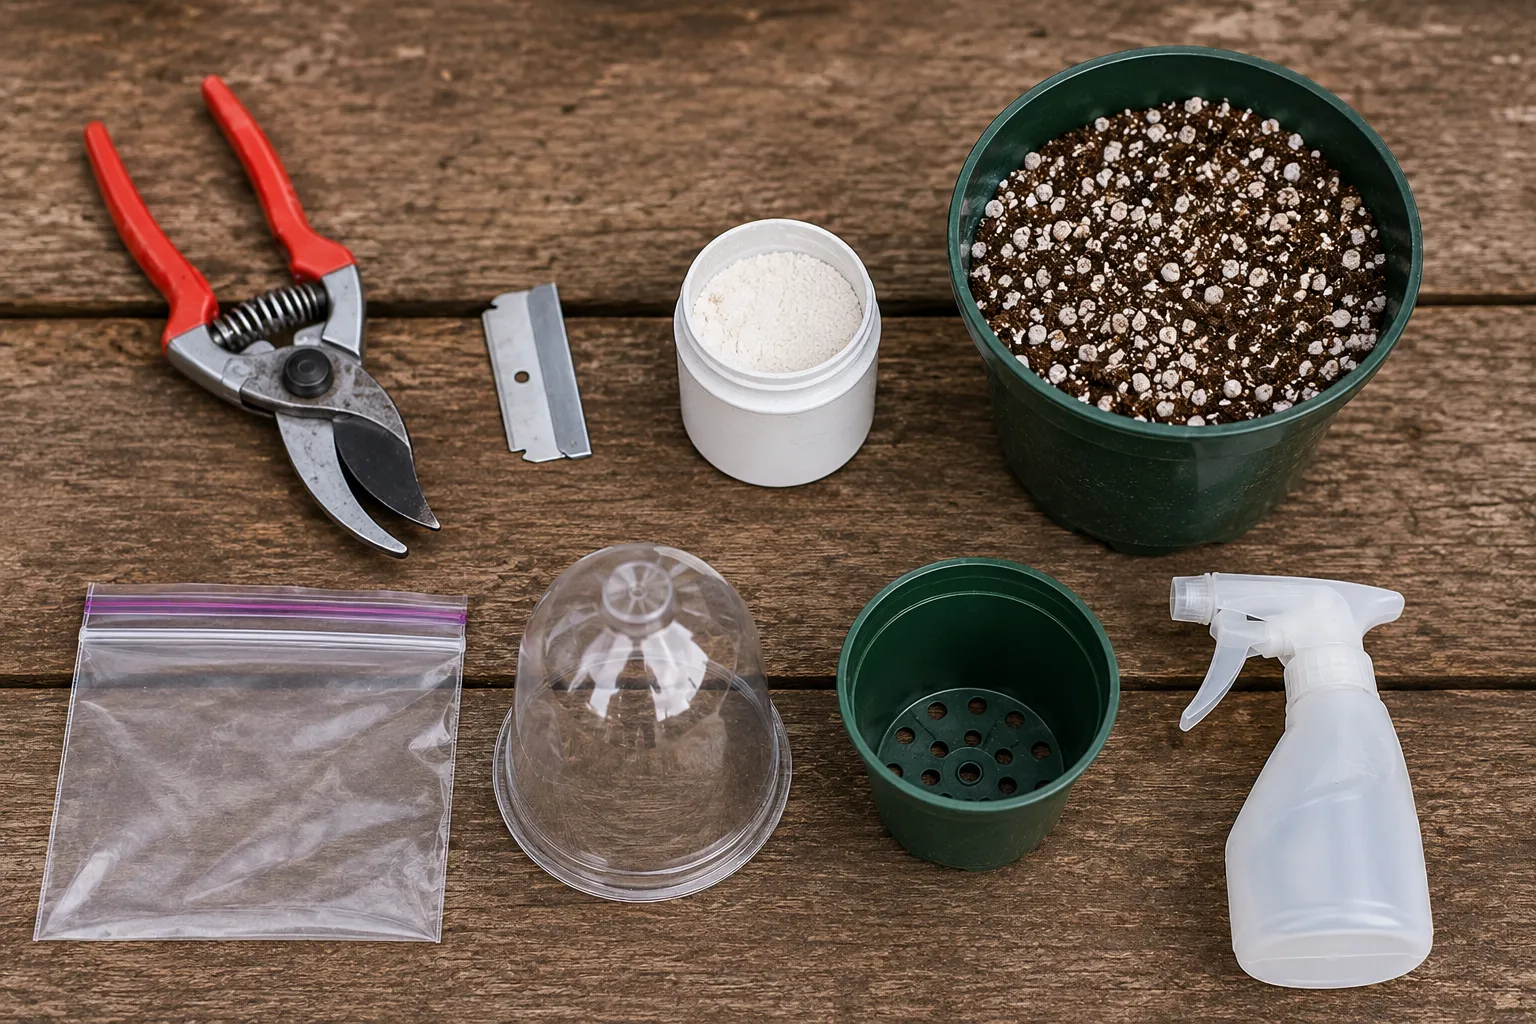
- Sharp bypass pruners or a clean, single-edge razor blade
- Rooting hormone powder (IBA — 0.1% to 0.3% concentration)
- Rooting medium: 50/50 perlite and peat moss, or 100% perlite for fast-draining option
- 4-inch (10 cm) pots with drainage holes
- Clear plastic bag or humidity dome
- Spray bottle
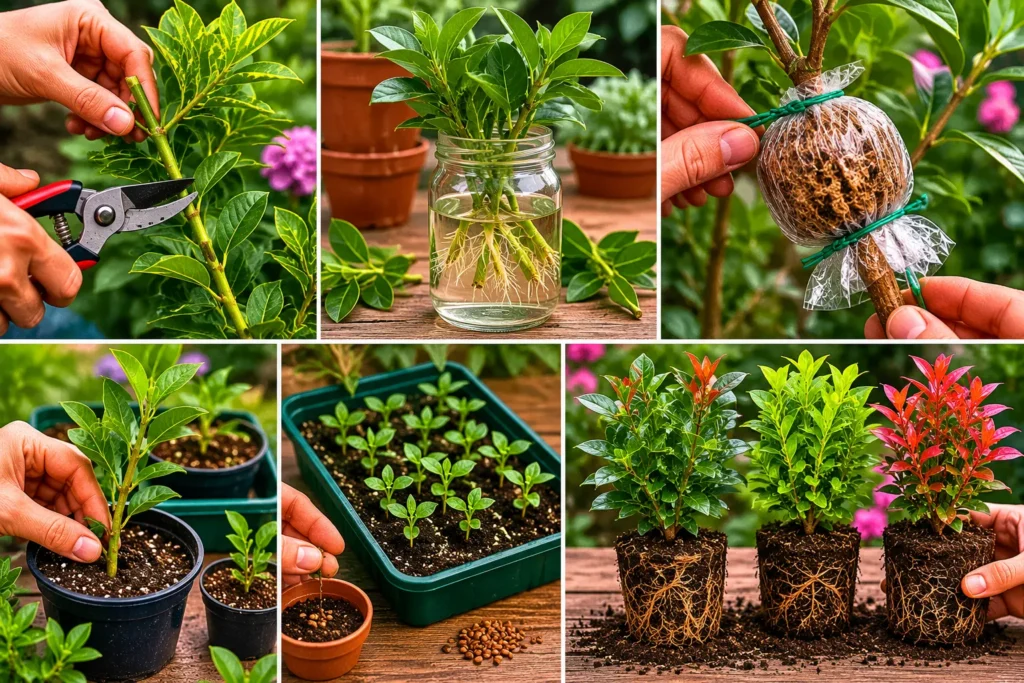
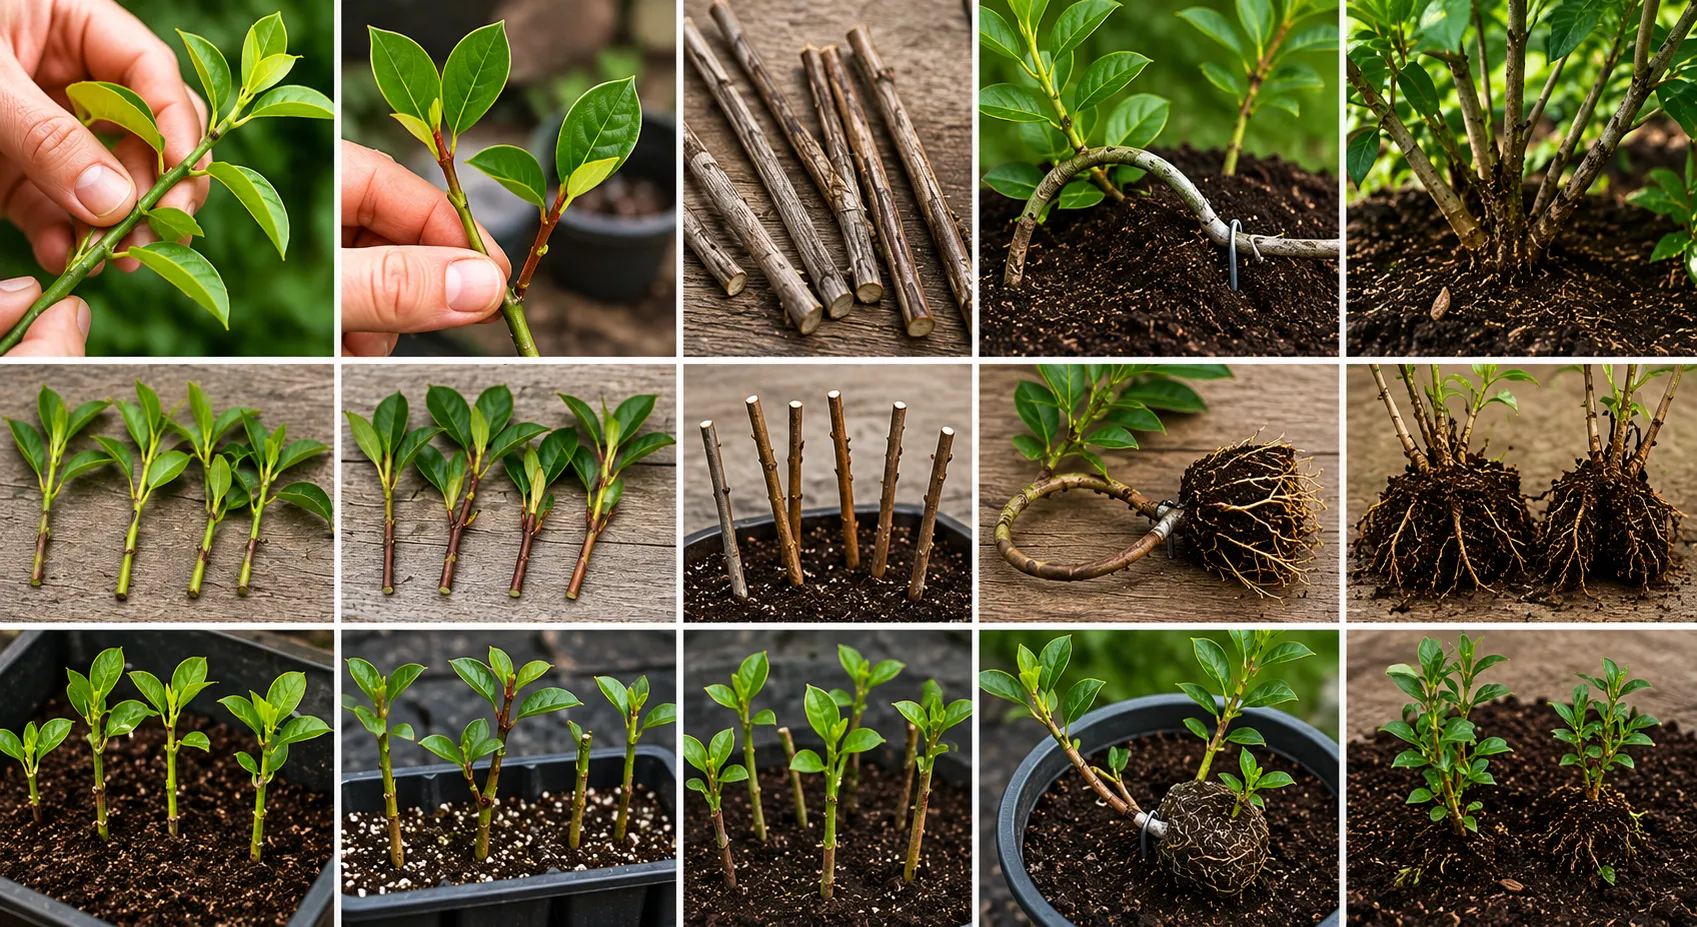
Step-by-Step: Softwood Cuttings
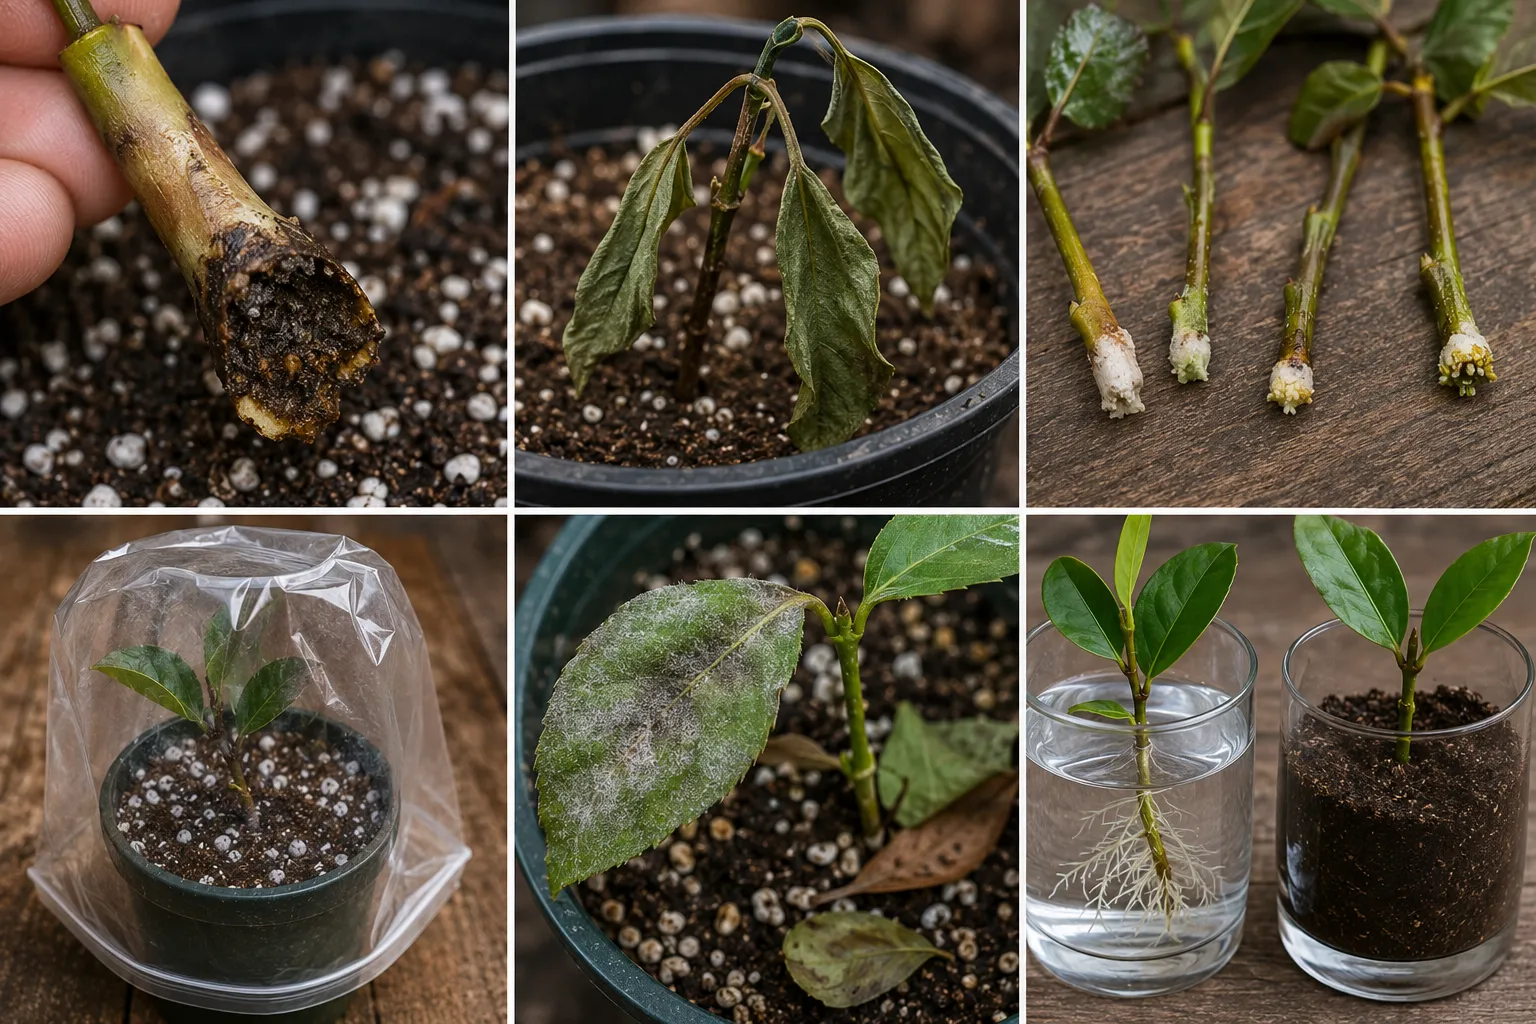
- Select a stem from the current season’s growth — flexible, not flowered, roughly pencil thickness.
- Cut a 4–6 inch (10–15 cm) length just below a leaf node using a clean blade. A diagonal cut increases rooting surface area.
- Strip all leaves from the bottom half of the cutting. Leave 2–4 leaves at the top.
- Wound the bottom inch (2.5 cm) by scraping bark lightly on one side — this exposes more cambium and improves hormone uptake.
- Dip the cut end into rooting hormone powder. Tap off the excess — excess hormone slows rooting.
- Insert cuttings 2 inches (5 cm) deep into moist rooting medium. Space 2 inches apart so leaves don’t touch.
- Cover with a clear plastic bag or dome. Mist the inside if humidity drops. Keep plastic off the leaves.
- Place in bright indirect light. Avoid direct sun — it overheats cuttings before roots form.
- Check for roots at 4 weeks by gently tugging. Resistance means roots are forming.
- Pot into 50% soil, 50% perlite when roots reach 1 inch (2.5 cm). Harden off before outdoor placement.
ROOTING SPEED TIP
Bottom heat of 65–75°F (18–24°C) at the soil level cuts rooting time by 30–40% for most shrubs. A seedling heat mat under the tray works well. Keep air temperature slightly cooler than soil temperature.
Method 2: Semi-Hardwood Cuttings (Best for Evergreen Shrubs)
Semi-hardwood cuttings use stem material that is partially mature — flexible at the tip but firm at the base. Take them from mid-summer through early fall. This method works best for evergreen shrubs and broadleaf evergreens that don’t respond well to softwood propagation.
Shrubs Best Propagated from Semi-Hardwood
- Camellia — semi-hardwood cuttings in late summer give best results
- Boxwood (Buxus) — September is optimal, roots well in 6–8 weeks
- Holly (Ilex) — late summer into fall
- Azalea and rhododendron — semi-hardwood taken in July–August
- Euonymus — late summer cuttings root quickly
- Pieris — late summer, hormone required
- Osmanthus — August–September
Key Differences from Softwood Method
- Use the top 4–6 inches (10–15 cm) of partially mature stems — not the softest tip growth
- Keep all leaves on the upper cutting intact; only remove those that will be buried
- Rooting takes longer: 6–10 weeks vs. 4–8 weeks for softwood
- Semi-hardwood cuttings tolerate lower humidity better than softwood — a vented dome works better than sealed plastic
CAMELLIA TIP
Camellia semi-hardwood cuttings taken in late July through August root more reliably than spring softwood. Use 3–4 inch (8–10 cm) cuttings from strong side shoots. Wound the base on two sides, not just one. Expect 8–12 weeks before roots are strong enough to pot up.
Method 3: Hardwood Cuttings (Best for Dormant-Season Propagation)
Hardwood cuttings use fully mature, dormant wood taken from late fall through early winter. The plant is not actively growing, which means cuttings tolerate neglect and low humidity far better than softwood. This is the easiest method for beginners because timing is forgiving — any point from leaf drop through late February works for most species.
Shrubs That Root Well from Hardwood
- Forsythia — roots easily from 6–8 inch (15–20 cm) dormant canes
- Dogwood — hardwood works as well as softwood for most Cornus species
- Elderberry — excellent hardwood propagator, no hormone needed
- Blueberry — hardwood in December–January, longer rooting time
- Hydrangea (panicle and smooth types) — hardwood taken in late fall
- Viburnum — responds to hardwood with good hormone application
- Rhododendron — slow to root but reliable from hardwood
Step-by-Step: Hardwood Cuttings
- Cut 6–10 inch (15–25 cm) sections of current-season wood (stems that grew this year) after leaf drop.
- Make the top cut diagonal, 1 inch (2.5 cm) above a bud. Make the bottom cut flat, just below a bud. This lets you tell top from bottom when planting.
- Bundle 5–10 cuttings together if storing. Wrap in damp newspaper and refrigerate at 35–40°F (2–4°C) for 3–4 weeks to encourage callus formation before planting. This step is optional but improves success rates.
- Prepare a pot with 50/50 perlite and coarse sand. Insert cuttings with 2–3 buds above soil and 1–2 below.
- Place in an unheated garage, cold frame, or sheltered outdoor spot through winter. Hardwood cuttings root slowly from the ground up as temperatures rise in spring.
- Check for roots in April–May. Most hardwood cuttings root by late spring.
CUTTING STORAGE
Hardwood cuttings harvested in November can be stored in a plastic bag with damp peat at 35–40°F (2–4°C) for up to 3 months. Pot them up in February for spring rooting. This splits labor across the slow season.
Method 4: Layering (Highest Success Rate, Zero Cutting Skills Required)
Layering succeeds where cuttings fail because the stem stays attached to the parent plant while rooting. The parent plant supplies water and carbohydrates continuously — so the propagule never experiences transplant stress until it has a fully developed root system. Success rates of 80–95% are typical.
Simple Layering: Step-by-Step
Simple layering works on shrubs with long, flexible branches that reach the ground — forsythia, viburnum, rhododendron, magnolia, spirea, and climbing roses all layer well.
- Select a healthy, flexible stem from the outer edge of the plant. New growth from this season works best.
- Bend the stem to the ground and mark where it touches the soil — this is the burial point. The stem tip should extend 6–8 inches (15–20 cm) beyond this point.
- At the burial point, wound the underside of the stem: make a 1-inch (2.5 cm) angled cut partway through the stem, or strip a 1-inch ring of bark. Dust the wound with rooting hormone powder.
- Dig a 3–4 inch (8–10 cm) hole at the burial point. Bury the wounded section, bending the stem tip upward out of the soil. Secure with a landscape pin or bent wire to hold the stem in place.
- Cover with soil and press firmly. Water well. Keep the soil consistently moist.
- New roots form in 6–12 weeks. Test by gently tugging — resistance confirms roots. Cut the stem connecting to the parent plant, wait 2 more weeks, then dig and transplant.
Air Layering: For Shrubs Without Low Branches
Air layering works on shrubs with brittle or upright wood that cannot be bent to the ground. Rhodendron, camellias, magnolias, and gardenias respond well.
- Select a healthy stem 12–18 inches (30–45 cm) from the shoot tip.
- Remove leaves in a 4-inch (10 cm) zone around the chosen spot.
- Make 2 parallel cuts completely around the stem, 1 inch (2.5 cm) apart. Remove the bark strip between the cuts — this is called girdling. Apply rooting hormone to the exposed wood.
- Wet a large handful of sphagnum moss (approximately 2 cups / 475 ml) until saturated, then squeeze out excess water. Pack around the wounded area in a 3-inch (8 cm) ball.
- Wrap with clear plastic film, securing tightly above and below the moss ball. No gaps — the moss must stay moist for weeks.
- Roots appear through the plastic in 6–8 weeks for most shrubs. Once visible, cut the stem just below the rooted section and pot immediately.
SPHAGNUM MOSS MOISTURE
The moss ball in air layering must stay moist for the full rooting period. Clear plastic lets you monitor moisture without unwrapping. If the moss appears pale or dry at the edges, inject water through a small pinhole using a syringe.
Method 5: Division and Suckers (Instant New Plants with No Rooting Wait)
Division and sucker separation produce fully rooted plants immediately. No rooting period, no humidity management, no hormone required. The trade-off: each division produces only 1–3 new plants per session, not the 10–30 a cutting session yields.
Shrubs Propagated by Division
- Spirea — lift and divide clumps every 3–4 years
- Forsythia — outer clumps separate cleanly with a spade
- Dwarf ornamental grasses used as shrub substitutes
- Kerria japonica — spreads by stems that root where they touch soil
- Snowberry (Symphoricarpos) — produces thick sucker networks
Sucker-Producing Shrubs
These 5 shrubs spread naturally by sending up root suckers — new shoots from underground lateral roots:
- Aronia (chokeberry) — suckers freely, dig with 4–6 inches (10–15 cm) of attached root
- Lilac — suckers around the base; only use suckers from own-root plants, not grafted stock
- Sumac (Rhus) — aggressive suckering, easy separation
- Bay laurel (Laurus nobilis) — produces basal suckers
- Species roses — own-root roses sucker freely and produce true-to-type offspring
Step-by-Step: Division
- Work in early spring before new growth emerges, or in fall after first frost. Both timing windows give roots time to establish before temperature extremes.
- Water the parent plant deeply 24 hours before dividing. Moist soil holds root systems together better than dry soil.
- Use a sharp spade to cut through the outer edge of the clump. For suckers, trace the root 4–6 inches (10–15 cm) from the stem and cut clean.
- Lift the division with as much root mass as possible. Do not shake off all the soil — root contact with familiar soil particles helps re-establishment.
- Replant at the same depth as the original. Water immediately and deeply. Mulch with 2–3 inches (5–8 cm) of organic material to retain moisture.
LILAC SUCKER WARNING
Only divide suckers from own-root lilacs. Grafted lilacs — common in nursery stock — produce suckers from the rootstock, not the scion. Those suckers grow into a completely different plant, often a wild-type species. Check your lilac’s base: own-root plants have uniform bark from the ground up; grafted plants show a visible union point.
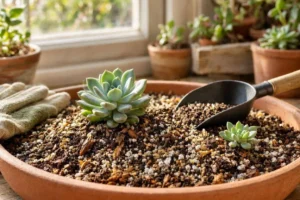
Best Rooting Medium for Shrub Cuttings
The rooting medium must drain fast and stay moist — not wet. Soil from the garden fails at this: it compacts, drains poorly, and introduces pathogens that attack cut stems. Use one of these 4 options:
| Medium | Drainage | Moisture retention | Best for |
| 100% perlite | Excellent | Low–medium | Softwood cuttings, fast-rooting shrubs |
| 50/50 perlite + peat moss | Good | Medium–high | Most shrubs, general use |
| 50/50 perlite + coarse sand | Excellent | Low | Hardwood cuttings, winter propagation |
| 50/50 coir + perlite | Good | Medium–high | Sustainable peat-free alternative |
Never use potting soil straight from the bag as a rooting medium. Most potting mixes have too much organic material and retain excessive moisture around cut stems, promoting rot before roots form. Mix any potting soil 1:1 with perlite if it is the only option available.
Sterilize your rooting medium by watering with boiling water 24 hours before use if you have had disease problems in previous propagation attempts. Let it cool and drain completely before inserting cuttings.
Rooting Hormone: When to Use It and When to Skip It
Rooting hormone increases success rates by 20–40% for difficult-to-root shrubs. For easy rooters like forsythia, butterfly bush, and elderberry, it is optional. For slow rooters like camellia, lilac, and rhododendron, it is recommended.
| Shrub | Hormone needed? | IBA concentration | Notes |
| Forsythia | Optional | 0.1% | Roots without hormone in 3–4 weeks |
| Butterfly bush | No | — | Fastest-rooting common shrub |
| Hydrangea | Optional | 0.1–0.3% | Roots without, but hormone speeds it up |
| Lilac | Yes | 0.3% | Difficult without hormone; use fresh stem tips |
| Rhododendron | Yes | 0.3–0.8% | Wound and hormone both required |
| Camellia | Yes | 0.3% | Semi-hardwood only; softwood rarely works |
| Boxwood | Optional | 0.1–0.3% | September cuttings root well with light hormone |
Use powder form for layering — it adheres to wounded surfaces without washing off. Liquid forms work for cuttings when applied as a quick dip (5 seconds in diluted solution). Gel forms combine the benefits of both.
Never exceed the labeled concentration. High IBA concentrations inhibit rooting rather than promoting it. More is not better with auxin-based hormones.
Propagation Timing: What to Do Every Month of the Year
| Month | Zone 5–6 action | Zone 7–9 action |
| January–February | Store hardwood cuttings, check for callus | Start semi-hardwood cuttings in cold frame |
| March–April | Pot up overwintered hardwood cuttings | Begin air layering, check stored cuttings |
| May | Take first softwood cuttings (forsythia, spirea) | Softwood window fully open for most shrubs |
| June | Peak softwood cutting month, set up simple layers | Peak softwood, semi-hardwood starts mid-month |
| July | Late softwood, semi-hardwood starts late July | Semi-hardwood month: camellia, boxwood, holly |
| August | Semi-hardwood: azalea, rhododendron, camellia | Semi-hardwood fully active |
| September | Semi-hardwood: boxwood, euonymus, pieris | Divide suckering shrubs, last semi-hardwood |
| October–November | Begin hardwood cuttings after leaf drop | Simple layering for evergreen shrubs |
| December | Collect and store hardwood cuttings | Hardwood cuttings in mild areas, cold frame |
How to Care for Shrub Cuttings After Planting
The 3 most common reasons cuttings fail are overwatering, low humidity, and direct sun exposure. Correct all 3 from day one:
Watering
Keep the rooting medium evenly moist, not saturated. Press the medium with a finger: it should feel like a wrung-out sponge. Standing water in the bottom of the tray causes stem rot within days. Empty drainage trays after each watering.
Humidity
Cuttings transpire water through their leaves but have no roots to replenish it. High humidity — 80–90% — prevents wilting during the rooting period. A clear plastic bag or dome maintains humidity without sealing out all air. Poke 4–6 small holes for ventilation to prevent fungal issues.
Remove the humidity cover for 1 hour daily starting at week 3. This hardens the cuttings gradually before full removal at week 5–6.
Light
Place cuttings in bright, indirect light only — never direct sun until roots form. A north or east-facing window, or outdoor shade under 40–50% shade cloth, works well. Direct sun raises cutting temperature faster than roots can supply water, causing rapid collapse.
Temperature
Air temperature of 65–75°F (18–24°C) is optimal for most shrub cuttings. Soil temperature 5–10°F (3–5°C) warmer than air temperature accelerates root development. Below 60°F (15°C), rooting slows dramatically. Above 85°F (29°C) air temperature, increase humidity monitoring frequency.
Fertilizing
Do not fertilize cuttings during rooting. Fertilizer salts stress unrooted cuttings and burn tender new roots. Wait until cuttings are potted into a soil mix and showing active new leaf growth before applying any fertilizer — start at half strength.
6 Reasons Shrub Cuttings Fail (And How to Fix Each One)
1. Stem Rot at the Base
Cause: Overwatering or contaminated rooting medium. Rot fungi attack the cut surface before callus seals it.
Fix: Use fresh perlite. Ensure pots drain freely. Keep medium moist, not wet. Dip cutting base in rooting hormone — IBA has mild antifungal properties.
2. Wilting Collapse Within 48 Hours
Cause: Low humidity or direct sun. The cutting cannot supply water to leaves without roots.
Fix: Immediately raise humidity with a plastic cover. Move out of any direct sun. Mist leaves twice daily until the cover is in place.
3. No Roots After 10 Weeks
Cause: Wrong timing, wrong wood maturity, or incorrect IBA concentration for the species.
Fix: Check the cutting by examining the base — a white callus is present but no roots means the medium may be too wet or too cold. Increase bottom heat. For slow-rooting species like camellia or rhododendron, expect 12–16 weeks.
4. Roots Form but Cuttings Die at Transplant
Cause: Transplant shock from moving directly from high-humidity propagation conditions to open air.
Fix: Harden off over 10–14 days: remove the humidity cover for 1 hour on day 1, 2 hours on day 2, increasing daily until the cover stays off fully.
5. Fungal Mold on Leaves or Medium Surface
Cause: Too little air circulation inside the humidity dome.
Fix: Increase ventilation holes in the plastic cover. Remove any fallen leaves immediately — they decompose fast and seed fungal growth. Use a diluted neem oil spray (1 tsp / 1 quart water, or 5 ml / 1 liter) if mold spreads to live tissue.
6. Cuttings Root in Water but Die in Soil
Cause: Water roots are structurally different from soil roots — they are long, unbranched, and poorly adapted to soil conditions.
Fix: Never root cuttings in water for long-term propagation. Use a perlite or perlite-peat medium from the start. If water rooting has already occurred, transition very gradually: fill the water container with diluted perlite slurry over 1 week before potting.
Frequently Asked Questions
Can you propagate shrubs by putting cuttings in water?
No — water propagation produces structurally weak roots that fail when transplanted to soil. Water roots lack the branching and cell wall density of roots formed in a solid medium. Use perlite or a perlite-peat mix for all shrub cuttings.
How long do shrub cuttings take to root?
Softwood cuttings root in 4–8 weeks. Semi-hardwood cuttings take 6–10 weeks. Hardwood cuttings root slowly over winter and are ready by spring — approximately 12–16 weeks. Layered stems root in 6–12 weeks. Division produces immediate root systems.
Do you need rooting hormone to propagate shrubs?
No for easy rooters like forsythia, butterfly bush, and elderberry. Yes for difficult species like camellia, lilac, and rhododendron. Rooting hormone increases success rates by 20–40% for most shrubs and cuts rooting time by 1–2 weeks even on easy species.
What is the easiest shrub to propagate?
Butterfly bush (Buddleia) is the easiest shrub to propagate — softwood cuttings root in 2–4 weeks with no hormone required. Forsythia, elderberry, and spirea also root reliably without hormone in 3–5 weeks from softwood cuttings.
Can you propagate shrubs in fall?
Yes — fall is the correct season for 3 methods: semi-hardwood cuttings (early fall), hardwood cuttings (late fall after leaf drop), layering (fall works for evergreen shrubs), and division (fall is ideal for most clump-forming shrubs). Softwood propagation closes in fall as growth hardens off.
When is the best time to take shrub cuttings?
Late spring through early July is the best time for softwood cuttings from deciduous shrubs. For evergreen shrubs, late July through September gives the best results from semi-hardwood. Hardwood cutting season runs from leaf drop in November through February.
Can you propagate evergreen shrubs the same way as deciduous ones?
No — evergreen shrubs propagate best from semi-hardwood or hardwood cuttings, not softwood. Softwood on evergreens often fails because the leaves continue transpiring water faster than the cut stem can supply it. Use later-season wood with higher starch content and established cuticle.
Conclusion: Which Method to Choose
Propagating shrubs is not as complicated as it seems — you just need the right method, the right timing, and a little patience. If you are in spring or early summer, softwood cuttings are the best option for deciduous shrubs.
For evergreens, semi-hardwood cuttings work best from mid-summer through fall, and hardwood cuttings from dormant wood in late fall are completely beginner-friendly. If you want to skip the cutting process altogether, simple layering gives you an 80–95% success rate — just pin a branch to the ground and roots form on their own.
And if you have a clump-forming shrub, division gives you instant new plants with zero waiting time. The most important thing is getting your timing right — bend a stem with your fingers, and if it flexes easily but snaps cleanly with a sharp bend, that is your perfect window.
Follow the steps in this guide and 80% of your cuttings will root on the first try — no need to spend money at the nursery ever again.