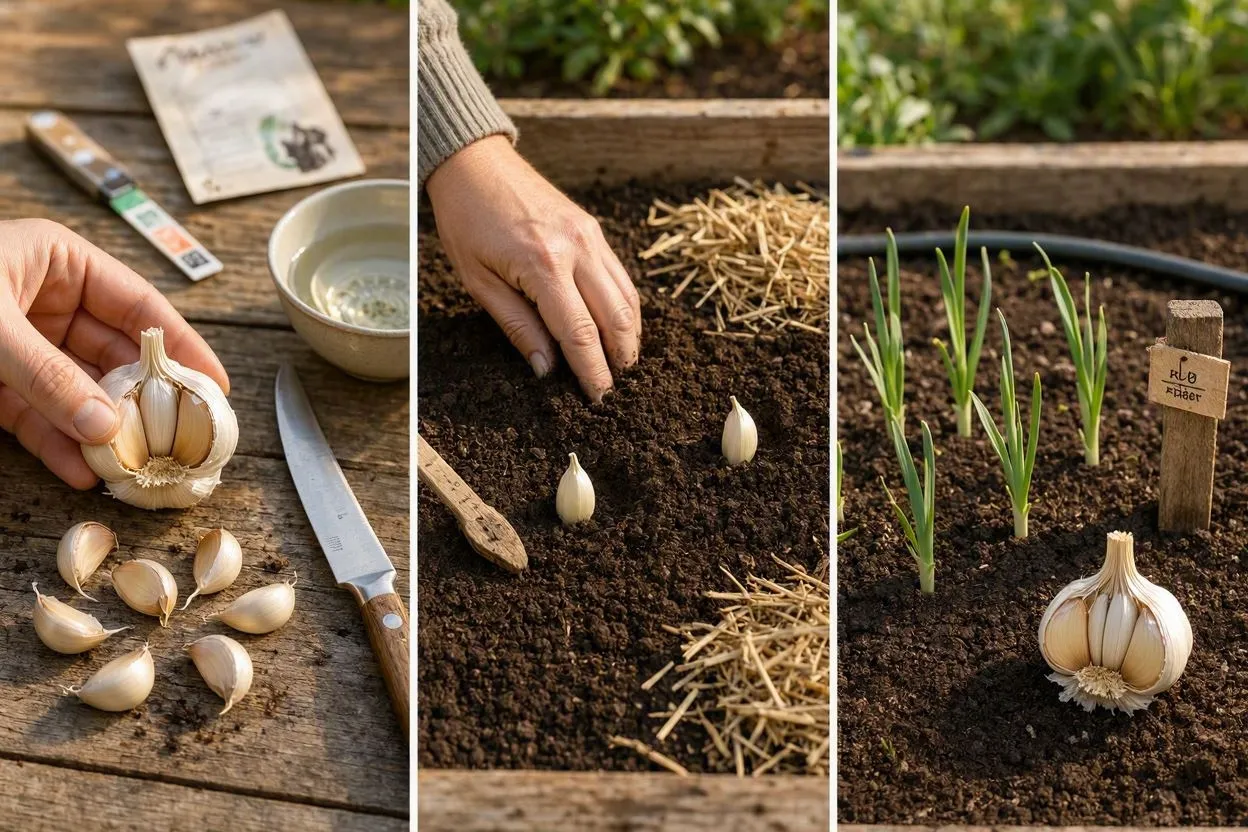
Plant one clove pointed-side up, 2 inches deep, in well-drained soil sometime in fall, and you’ll be pulling a full bulb out of the ground 8 to 10 months later, once about half the leaves have browned. It’s one of the easiest crops to add to a home vegetable garden, since a single clove does all the work. Each clove you separate from a bulb grows into its own new bulb underground, usually packed with 5 to 12 cloves depending on the variety. Most home gardeners in the U.S. get their cloves in the ground sometime between late September and mid-November, then dig up the finished bulbs the following June or July.
What You Actually Need to Start Gardening With Garlic
You’ll need seed garlic (not the stuff from the grocery store), garden soil with a pH between 6.0 and 7.0 that drains well, a planting bed that gets at least 6 hours of direct sun, and ground that won’t stay frozen solid all winter. Past that, a trowel or hori-hori knife, some compost, and mulch (straw or shredded leaves) covers the basics for this garden crop.
Timing is the part people mess up. Plant too early and the clove sprouts before winter even arrives, burning energy it needs later. Plant too late and it never gets its roots down before the ground freezes. A gardener in Minnesota and one in Georgia are working from completely different calendars, which the zone breakdown further down covers.
Choosing Your Garlic Variety
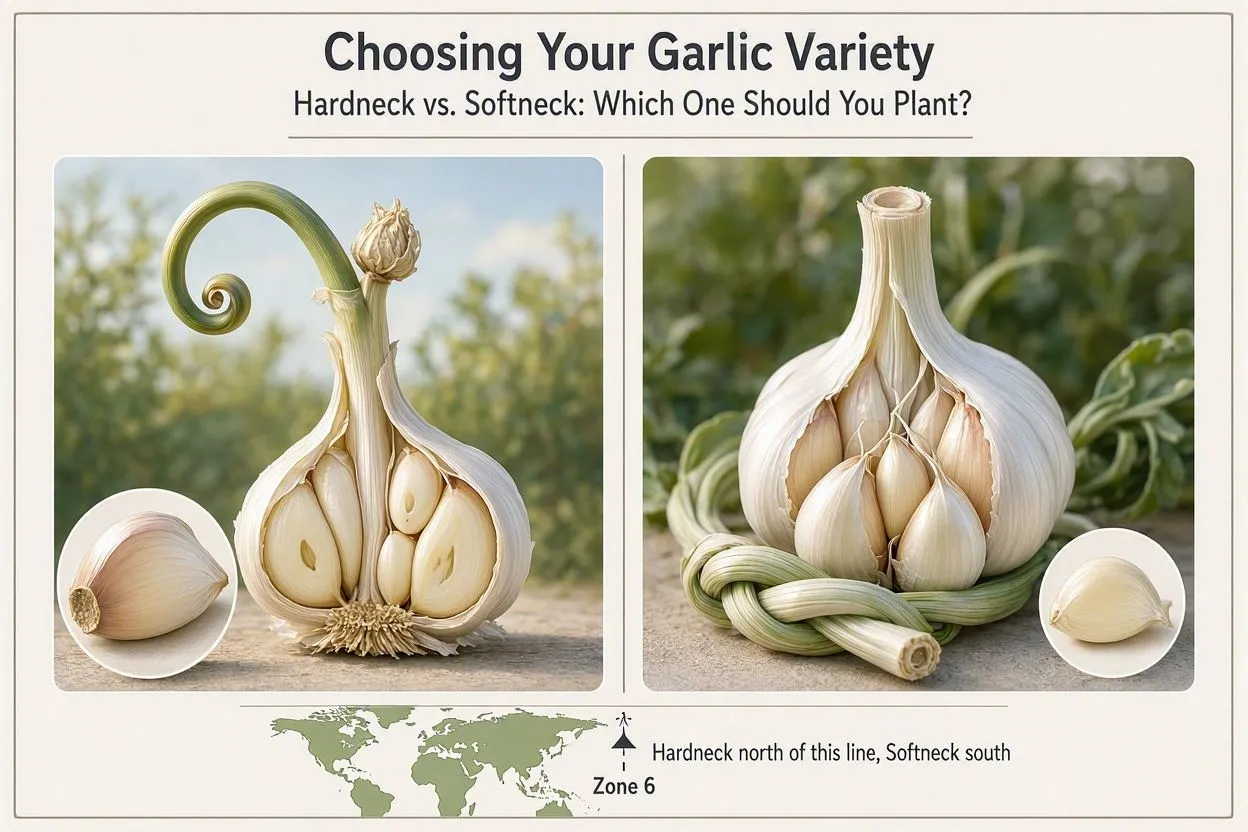
Hardneck vs. Softneck: Which One Should You Plant?
The split roughly follows USDA zone 6: hardneck for cold climates, softneck for warm ones. North of that line, hardneck varieties form better bulbs, because they need a longer, colder dormant stretch to trigger bulbing in the first place.
Hardneck garlic grows a stiff central stem that sends up a curling flower stalk, called a scape, in late spring. A single ring of 4 to 12 large cloves forms around that stem. Music, German Red, and Chesnok Red are solid picks for zones 3 through 6, where winters routinely drop below zero. You can’t braid hardneck garlic for storage, so most growers keep it in mesh bags instead, where it lasts 4 to 6 months in a cool pantry.
Softneck garlic skips the flower stalk and stays flexible enough to braid. Bulbs tend to hold more cloves, often 10 to 20 in overlapping layers, though individual cloves run smaller than hardneck. California Early, Inchelium Red, and Silver White handle the milder winters of zones 7 through 10 fine, without needing much cold exposure. It also keeps longer than hardneck: 6 to 8 months under good storage conditions.
Can You Just Plant Grocery Store Garlic?
Not really. Most commercial bulbs get treated with a sprout inhibitor, and a lot of them are grown in countries whose climate doesn’t match your garden. A grocery-store bulb might still sprout roots after weeks in your pantry, but what comes up tends to be small, weak bulbs compared to what certified seed garlic produces.
Organic grocery-store garlic sometimes skips the inhibitor and can work if you’re in a pinch. Still, seed garlic from a local nursery or a specialty seed-garlic supplier comes disease-tested and matched to your climate zone, which grocery-store bulbs never are. A seed clove is cheap relative to what it produces, a single clove grows into a bulb worth several times its cost at harvest, so the price difference barely matters against the payoff.
When to Plant, by USDA Zone
Aim for 2 to 6 weeks before the ground freezes. That lands somewhere between late September and mid-November depending on where you live. Cold-climate gardeners plant earlier in that window; warm-climate gardeners plant later, or skip fall entirely and go with spring instead.
- Zones 3–4: late September to early October
- Zones 5–6: mid-October
- Zones 7–8: late October to mid-November
- Zones 9–10: November through December, sometimes as late as January in the mildest spots
Gardeners in zones 9 and 10 will sometimes refrigerate their cloves for 6 to 8 weeks before planting. It simulates the cold spell garlic needs to actually form a bulb, rather than staying one fused clump underground. Spring planting is always a fallback if fall planting slips past you, though the bulbs you get will run smaller than fall-planted ones.
Preparing the Soil
Garlic wants loose, well-drained soil with plenty of compost worked in, at a pH of 6.0 to 7.0. Heavy clay holds too much moisture around the clove and invites rot, so raised beds or heavily amended plots beat compacted native soil every time.
Work 2 to 3 inches of finished compost into the top 6 inches of soil a week or two before you plant. A soil test kit from your local extension office is inexpensive and tells you exactly what to add: sulfur to bring pH down, lime to bring it up. Skip any bed that grew onions, leeks, shallots, or chives in the past four years. Garlic shares pests and diseases with the rest of the allium family, and planting into that history just invites trouble.
Planting a Garlic Clove in Your Garden Bed, Step by Step
Break the bulb apart within 24 hours of planting. Keep the papery skin on each clove intact, and set them pointed-end up, 2 inches deep, 4 to 6 inches apart.
- Separate the bulb into cloves right before planting. Doing it too early lets moisture escape from each clove and cuts into your eventual yield.
- Toss anything with soft spots, mold, or a papery skin that’s already split.
- Dig a hole or furrow 2 inches deep for each clove, spacing them 4 to 6 inches apart within a row.
- Space rows 8 to 12 inches apart so the bulbs have room to fill out.
- Set each clove flat-end down, pointed-end up. Roots grow from the flat base, and the shoot pushes up from the tip.
- Backfill and firm the soil gently over each clove. Don’t compact the bed.
- Water once, right after planting, to settle everything in.
A healthy, thumbnail-sized clove can grow into a bulb weighing 2 to 3 ounces by harvest. Smaller cloves still grow, just into noticeably lighter bulbs. One grower’s side-by-side comparison found the largest cloves yielded roughly double the bulb weight of the smallest ones, so it’s worth saving your biggest cloves for planting and using the smaller ones in the kitchen.
How Much Water Does Garlic Need in the Garden?
About 1 inch a week during active spring growth, tapering to nothing for the last 2 weeks before harvest. Overwater right before harvest and bulbs split or rot in storage. Underwater during bulb formation in May and June and you’ll cap how big they get.
Fall watering should stay minimal: one deep soak right after planting, then let rainfall handle the rest through winter dormancy unless it’s an unusually dry stretch. Once shoots come up in spring, check the soil 2 inches down and only water if that layer feels dry. A drip system running every other day for 20 to 25 minutes keeps things consistent without waterlogging the bed.
Mulching and Winter Care
Wait until after the first hard frost to cover your newly planted garlic with 3 to 4 inches of straw or shredded leaf mulch, not right after planting. Mulch too early and you trap warmth in the soil, which can push the clove to sprout prematurely and weaken it heading into winter.
Straw insulates roots against the freeze-thaw cycles that heave cloves partway out of the ground. Shredded leaves work as a free substitute, though they mat down faster and may need topping off by midwinter. Pull the mulch back gradually each spring as soil temperatures climb past 40°F and green shoots start pushing through. Leave it too long and it’ll smother the new growth instead of protecting it.
Spring Care: Fertilizing and Removing Scapes
Fertilize twice in spring: once with a nitrogen-heavy feed when shoots hit 4 inches tall, and again in early May as bulbs start swelling. Garlic pulls more nitrogen from the soil than most other vegetables during its growing window, so don’t skip either round.
Blood meal, feather meal, or a balanced organic fertilizer around 4-4-4 all work for the first feeding. The second, timed to early May’s longer days, supports the bulb as it swells. Hardneck varieties send up a curling scape in late May or early June, cut it once it’s formed a full loop, 6 to 10 inches long. Leave the scape in place and the plant redirects energy into flowering instead of the bulb. Removing it at the right stage is commonly reported to noticeably increase bulb size. Don’t toss the trimmings. Scapes are edible and good grilled, chopped into a stir-fry, or pickled.
Common Garden Pests and Diseases That Affect Garlic
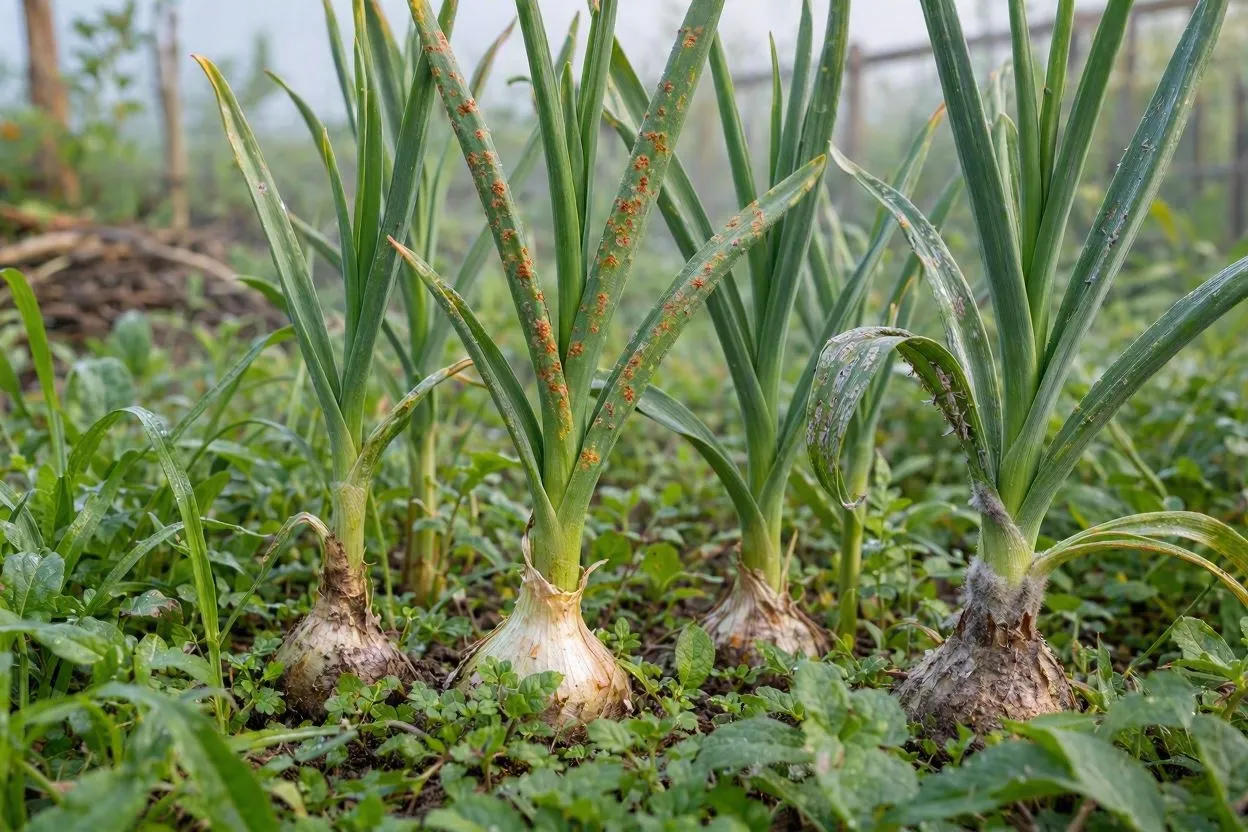
Garlic holds up better than most vegetables, though rust, botrytis rot, onion thrips, and stem nematodes account for most of the problems gardeners report. Honestly, weeds are a bigger threat than any insect or pathogen for most home growers, since garlic’s narrow leaves compete poorly against fast growers for light and nutrients.
Garlic rust shows up as orange-to-rust pustules on the leaves, usually from high humidity and poor airflow. Pulling infected foliage helps, and some growers still get a solid bulb yield even with visible rust present. Botrytis rot takes hold in poorly drained soil and rots cloves before they even sprout, which makes drainage your single best defense. A 3- to 5-year crop rotation, paired with companion planting near roses or fruit trees, cuts down on both pest pressure and disease carryover season to season.
Knowing When Garlic Is Ready to Harvest From the Garden
Garlic’s ready when the bottom third to half of the leaves have browned while the top stays green, usually 8 to 10 months after a fall planting. Pull it too early and you get undersized bulbs with cloves that never filled out. Wait too long and the wrapper splits, which cuts your storage window down fast.
Most of the U.S. hits that harvest window between late June and late July, though warmer zones can finish as early as mid-June. Dig up one test bulb before pulling the whole crop and slice it open to check whether the cloves have actually filled the skin. Stop watering 2 weeks before your expected harvest date so the soil can dry out and reduce mold risk during curing. Loosen the soil with a garden fork rather than yanking on the stem, working the fork in a few inches out from the base of the plant so you don’t stab or split the bulb. Pull on wet or compacted soil and you’ll snap the neck clean off the bulb.
Curing and Storing Garlic
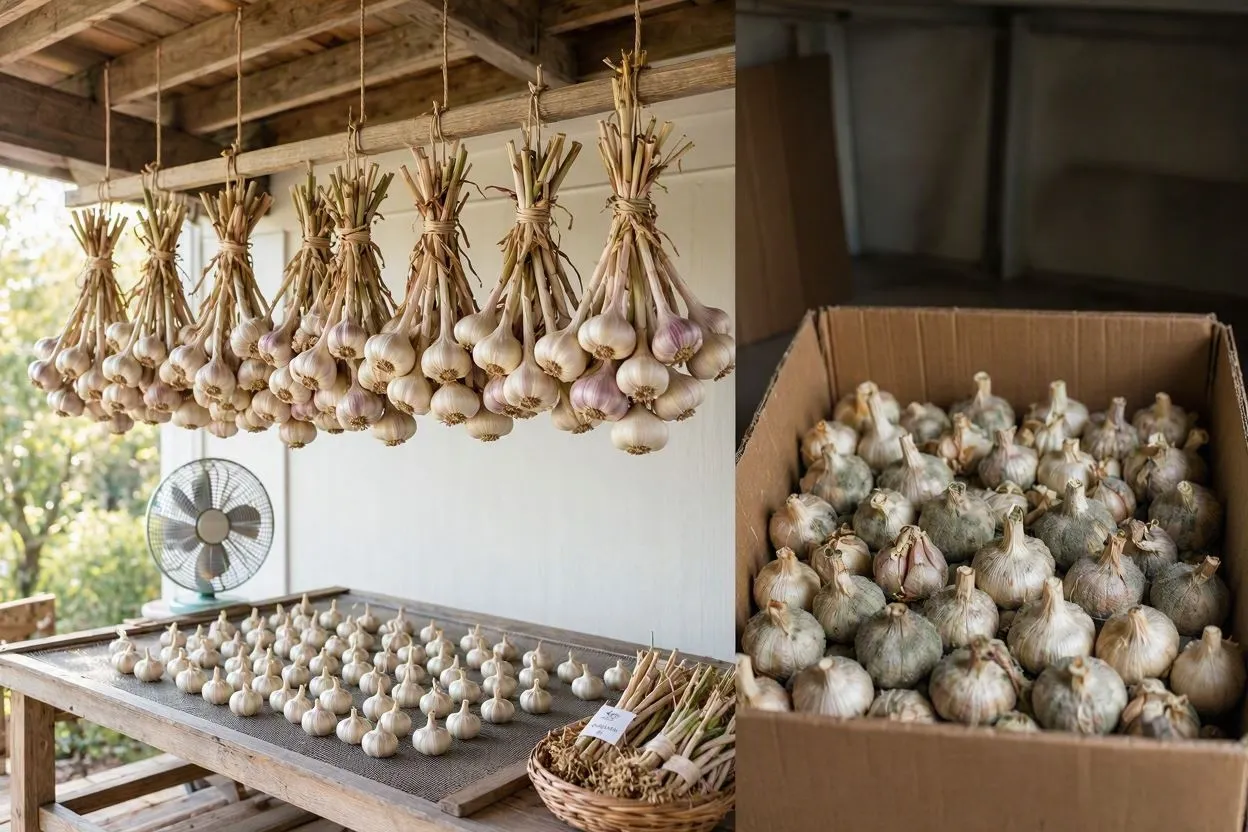
Cure your harvest by hanging or laying it out in a shaded, well-ventilated space for 2 to 4 weeks before you trim roots and stems. Skip the cure and store it right away, and it won’t last: uncured bulbs still hold excess moisture that invites mold.
Bundle 5 to 10 stalks together and hang them from a rafter, or spread the bulbs in a single layer on a mesh screen with a fan running nearby. A garage or covered porch works as long as it stays between 70°F and 80°F and direct sun doesn’t hit the drying bulbs. Once the outer wrapper feels papery and dry, trim the roots close to the base and cut stems to about 1 inch above the bulb for hardneck varieties, or braid the stems for softneck. Store the finished garlic somewhere cool and dark, between 55°F and 65°F, at 60% to 70% humidity. Hardneck holds for 4 to 6 months under those conditions; softneck goes 6 to 8.
FAQs
Can you grow garlic from a single clove?
Yes. One clove planted correctly grows into a full bulb with 5 to 12 new cloves, depending on the variety.
How long does it take to grow garlic from a clove?
Fall-planted garlic takes 8 to 10 months to mature. Spring-planted garlic is faster, reaching harvest in roughly 90 days.
Do you plant the whole garlic clove, or peel it first?
Plant it with the papery skin on. Peeling exposes the clove to rot and pests underground.
How deep should a garlic clove be planted?
2 inches deep, pointed end up, in loosened, well-drained soil.
Will garlic grow if planted in spring instead of fall?
Yes, though the bulbs come out smaller than what you’d get from fall planting.
Conclusion
Growing garlic from a clove comes down to a handful of decisions: picking a variety suited to your zone, planting at the right depth and time, keeping up with water and nutrients through two very different growth phases, and reading the leaves correctly when harvest rolls around. One clove in the ground this fall gets you a full bulb, and a dozen more cloves for next year’s garden planting, by next summer.