Mulching is the practice of spreading a layer of material — organic or inorganic — over bare soil to protect it, retain moisture, suppress weeds, and regulate soil temperature. Gardens that use mulch consistently require up to 50% less watering and spend 80% less time fighting weeds than unmulched beds.
You don’t need a complicated system. You need the right material, the right depth, and basic timing. This guide covers all three — plus the mistakes that damage plants even when gardeners think they’re doing everything right.
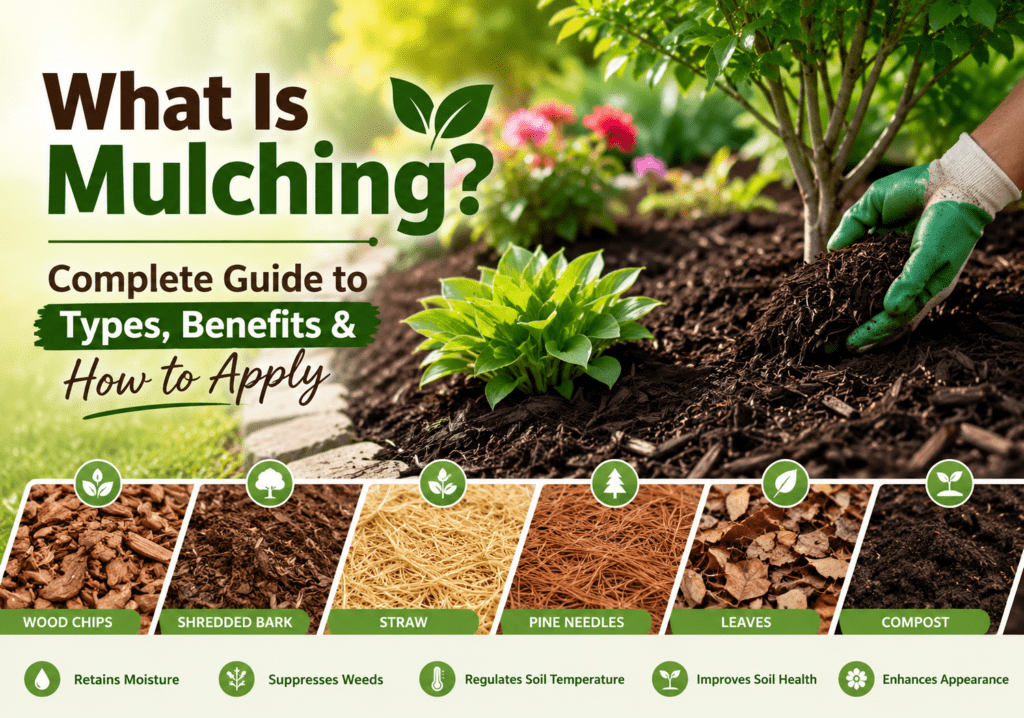
What Is Mulching?
Mulching means covering the soil surface with a protective layer of material, typically 2–3 inches (5–8 cm) deep, placed around plants, trees, and garden beds. The material can be organic (wood chips, bark, straw, compost) or inorganic (gravel, landscape fabric, rubber).
The word ‘mulch’ comes from the German molsch, meaning soft or beginning to decay — which describes exactly what good organic mulch does over time. It sits on top of your soil, breaks down slowly, and feeds the ground beneath it while protecting everything above it.
Mulching is not the same as composting. Compost gets dug into the soil. Mulch sits on top of the soil and works as a surface layer. Both improve soil health, but they serve different purposes at different stages.
7 Main Types of Mulch — Organic & Inorganic
Mulch falls into 2 broad categories: organic mulch, which decomposes and feeds your soil, and inorganic mulch, which lasts longer but adds no nutrients.
Choosing the wrong type wastes money and can harm plants. Here’s what each type does and where each works best.
Organic Mulches
1. Shredded Bark and Wood Chips
Shredded bark and wood chips are the most widely used mulch for garden beds, trees, and shrub borders. Cedar and cypress bark decompose the slowest — cedar lasts 3–4 years before needing replenishment. Wood chips from arborists decompose faster, within 1–2 years, but cost nothing if you source them locally.
Use bark mulch in perennial beds and around trees and shrubs. Avoid it in vegetable gardens where you plant and replant every season — moving and replacing wood chips each spring becomes a major chore.
Best depth: 3–4 inches (8–10 cm) around trees. 2–3 inches (5–8 cm) in perennial beds.
2. Straw Mulch
Straw mulch insulates soil better than almost any other organic option and breaks down within a single season, adding organic matter back to the ground. It works best in vegetable gardens. Place it between rows of tomatoes, peppers, beans, and squash to keep soil cool and cut watering frequency.
One caution: use straw, not hay. Hay contains seed heads that germinate in your beds and create a weed problem worse than the one you started with. Clean wheat straw or oat straw is the right choice.
Best depth: 4–6 inches (10–15 cm) for effective weed suppression in vegetable gardens.
3. Grass Clippings
Dry grass clippings make a free, nitrogen-rich mulch for vegetable beds and annual flower gardens. The nitrogen releases into the soil as clippings decompose — a useful slow-release feed for heavy feeders like corn, squash, and tomatoes.
Apply clippings in thin 1–2 inch (2.5–5 cm) layers. Thick, wet clumps of fresh clippings mat down, block water from reaching the soil, generate heat, and smell. Let clippings dry on the lawn first before collecting and applying.
Never use grass clippings treated with broadleaf herbicides. Those chemicals carry over into the mulch and can damage vegetable crops weeks after application.
4. Shredded Leaves (Leaf Mould)
Shredded leaves are one of the best free mulches available for most home gardeners. Whole leaves mat down and repel water. Shredded leaves break apart easily, allow rainfall through, and decompose in a single season, releasing nutrients directly into the soil.
Run your lawn mower over a pile of leaves twice before applying. This shredding step takes 10 minutes and makes the difference between mulch that works and mulch that sits on top like a wet blanket.
Best depth: 2–3 inches (5–8 cm). Shred before applying — whole leaves create water-shedding mats.
5. Compost
Compost is the most nutrient-rich organic mulch, delivering measurable improvements to soil organic carbon levels. A 2024 peer-reviewed study published in Sustainability found that compost-treated soil increased organic carbon by 6.81% compared to 1.24% in untreated control plots over a 3-year crop rotation.
Apply 1–2 inches (2.5–5 cm) of compost as the first layer, then cover with a secondary mulch like wood chips or straw. The compost feeds the soil; the outer layer slows evaporation and suppresses weeds.
The main limitation: most gardeners can’t produce enough compost to mulch large areas. Use it strategically — top-dress vegetable beds and high-value perennials first.
Inorganic Mulches
6. Gravel and Stone
Gravel and crushed stone create a permanent, low-maintenance mulch layer that lasts indefinitely without replacement. Gravel drains freely, so it suits plants that need excellent drainage — succulents, Mediterranean herbs like lavender and rosemary, and alpine plants.
The trade-off: gravel absorbs heat in summer and radiates it back into the soil. In hot climates, this can stress roots. Use light-colored gravel to reflect heat rather than absorb it.
Best depth: 2–3 inches (5–8 cm) for effective weed suppression and drainage.
7. Landscape Fabric
Landscape fabric suppresses weeds for 2–4 years when used correctly, but performs poorly when combined with organic mulch placed on top. Organic mulch layered over fabric doesn’t mix with soil, so weed seeds germinate in the organic layer on top rather than in the soil below.
Iowa State University Extension research confirms that landscape fabric used under organic mulch eventually leads to weed growth on top of the fabric and prevents the organic mulch from improving soil fertility.
Use landscape fabric under gravel or stone in permanent installations — driveways, paths, and gravel beds — not under wood chip mulch in garden beds.
5 Proven Benefits of Mulching
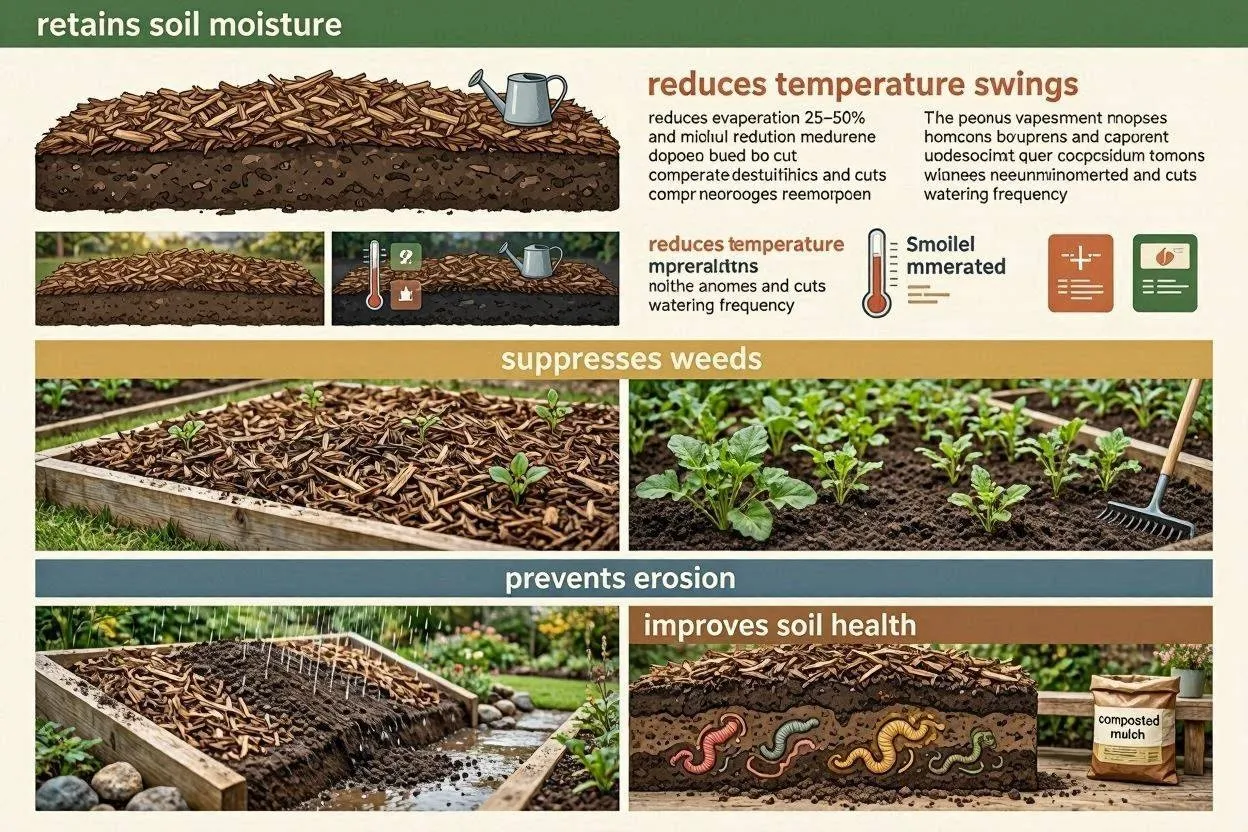
Mulching isn’t one thing — it delivers 5 distinct, measurable benefits simultaneously.
1. Retains Soil Moisture
Mulch reduces soil evaporation by 25–50%, which directly cuts watering frequency. The layer acts as a physical barrier between moist soil and dry air, blocking wind and direct sun from pulling moisture out of the ground.
In practical terms: beds mulched with 3 inches (8 cm) of wood chips typically need watering once per week in summer heat. Unmulched beds in the same conditions may need watering every 2–3 days.
2. Suppresses Weeds
A 2–3 inch (5–8 cm) mulch layer blocks 80–95% of weed germination by cutting off light. Weed seeds need light and moisture to germinate. Mulch denies both.
The key: apply mulch to weed-free soil. Mulching over existing weeds slows some growth but doesn’t eliminate established root systems. Pull or hoe weeds first, then mulch.
3. Regulates Soil Temperature
Mulch insulates soil, keeping it 10°F (5.5°C) cooler in summer and 10°F (5.5°C) warmer in winter compared to bare soil.
This temperature buffer protects roots during heat waves and frost. In USDA zones 4–6, a 3–4 inch (8–10 cm) mulch layer over perennial beds prevents the freeze-thaw cycles that heave shallow-rooted plants out of the ground over winter.
4. Improves Soil Structure Over Time
Organic mulch improves soil organic carbon levels, drainage, and microbial activity as it decomposes over 1–3 seasons. As the mulch breaks down, earthworms and soil microbes pull it into the soil, creating channels that improve water infiltration and aeration.
This compounds over time. A bed mulched consistently for 3–5 years develops noticeably darker, looser, more fertile soil than an unmulched bed — without tilling or digging.
5. Prevents Soil Erosion
Mulch absorbs the impact of rain droplets that would otherwise dislodge soil particles and carry them away. On slopes and raised beds, this protection becomes critical. Rain hitting bare soil compacts the surface, creates a crust, and causes runoff. Mulch dissipates that force and keeps soil in place.
How to Apply Mulch — Step by Step
To apply mulch correctly, follow these 5 steps in order.
- Clear the area first. Remove all weeds — roots included. Hand-pull or use a hoe. Mulching over weeds slows them but doesn’t stop established plants with deep roots.
- Optional: apply a compost base. Spread 1 inch (2.5 cm) of finished compost directly on the soil surface before mulching. This gives soil microbes an immediate food source as the upper mulch layer decomposes.
- Apply mulch to the correct depth. Use 2–3 inches (5–8 cm) for most garden beds. Don’t exceed 4 inches (10 cm) — deep mulch blocks oxygen and water from reaching roots. See the depth chart below.
- Keep mulch away from stems and trunks. Leave a 2–3 inch (5–8 cm) gap between the mulch layer and the base of every plant, shrub, and tree. Mulch piled against stems traps moisture against bark, invites rot, and creates insect habitat directly at the base of the plant.
- Top-dress annually. Most organic mulches need a light refresh every 12–18 months to maintain the correct depth as material decomposes and settles. Check depth in spring — if less than 1.5 inches (4 cm) remains, add a fresh layer.
| Quick Tip: Calculating Mulch Volume
Use the formula: Area (sq ft) × Depth (inches) ÷ 324 = Cubic yards needed. For a 200 sq ft bed at 3 inches deep: 200 × 3 ÷ 324 = 1.85 cubic yards. For metric: Area (m²) × Depth (cm) ÷ 100 = Cubic metres needed. Use the Garden Area Calculator at ZonedGarden.com to measure irregularly shaped beds before ordering. |
Mulch Depth: Exact Numbers by Plant Type
The correct mulch depth varies by plant type, material, and goal. Too shallow and weeds push through. Too deep and roots suffocate.
| Plant Type | Depth (inches) | Depth (cm) |
| Perennials and annuals | 1–2 inches | 2.5–5 cm |
| Shrubs and roses | 2–3 inches | 5–8 cm |
| Trees (circle radius 4 ft / 1.2 m) | 3–4 inches | 8–10 cm |
| Vegetable gardens | 2–3 inches | 5–8 cm |
| Vegetable gardens (straw) | 4–6 inches | 10–15 cm |
| Native plant restoration (wood chips) | up to 8 inches | up to 20 cm |
| Pine needles on slopes | 4–6 inches | 10–15 cm |
When to Apply Mulch — Best Timing by Season
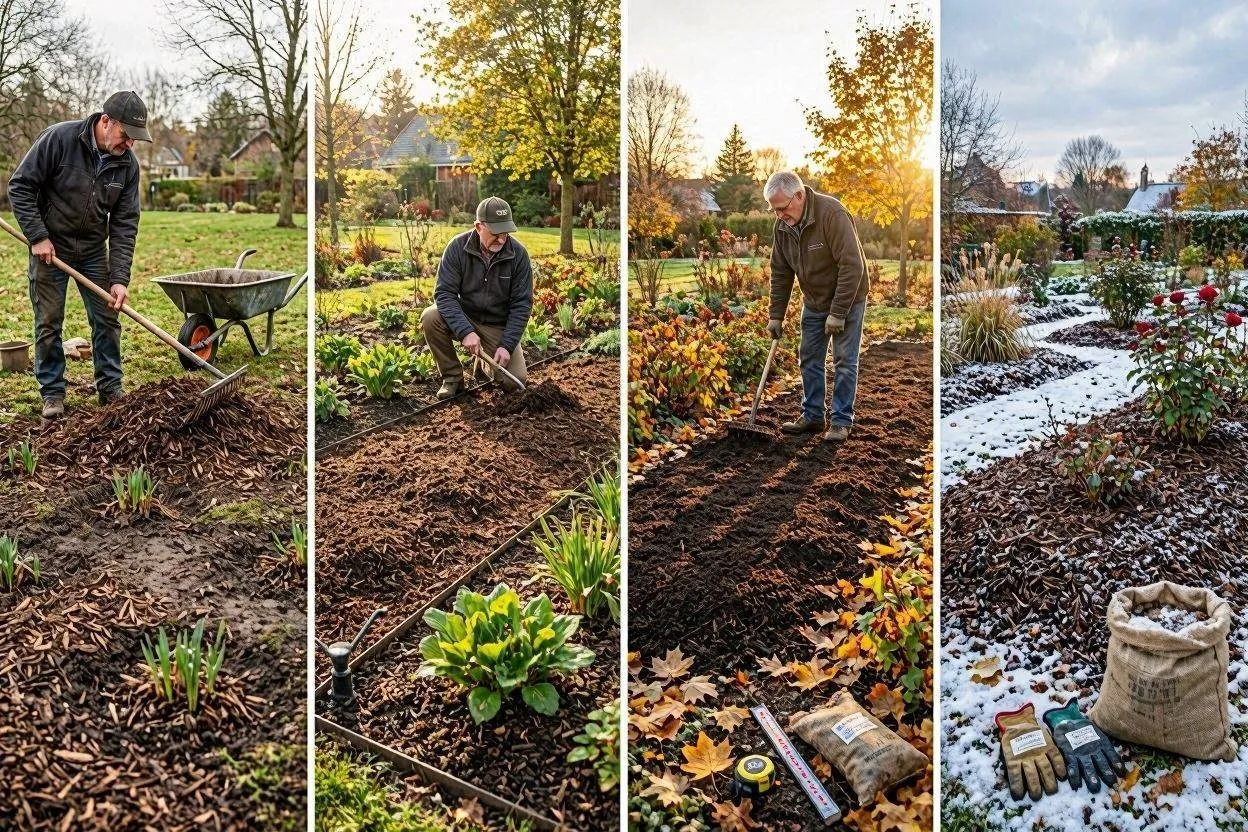
The best time to apply mulch for most plants is mid-spring, after soil has warmed but before summer heat peaks. A second application in late autumn protects roots over winter.
Spring Application (March–May)
Wait until soil temperature reaches 55–60°F (13–16°C) before mulching in spring. Mulching cold soil too early locks in the chill and slows perennial emergence by 2–3 weeks. Once soil warms and perennials push through 2–3 inches (5–8 cm) of growth, apply mulch around them.
Spring mulching targets: perennial flower beds, vegetable gardens before planting, and newly planted trees and shrubs.
Autumn Application (October–November)
Apply autumn mulch after the first hard frost — once plants enter dormancy but before the ground freezes solid. The goal is insulation, not warmth. Mulching too early in autumn keeps soil too warm, delays dormancy, and exposes tender new growth to early frosts.
In the Northern Hemisphere, the right window is typically mid-October through late November, depending on your USDA zone. For zone-specific timing, check the growing guides for your area at ZonedGarden.com.
Autumn mulching targets: perennial beds in zones 4–6, newly planted bulb beds, and exposed tree root zones.
Summer Top-Dressing
Thin spots in mulch during summer don’t need a full refresh — top-dress with 0.5–1 inch (1.5–2.5 cm) of fresh material to maintain coverage around high-traffic areas and paths where mulch moves quickly.
5 Mulching Mistakes That Damage Plants

These 5 errors are the most common reason mulching fails — or actively harms the garden.
Mistake 1: Building Mulch Volcanoes
A mulch volcano is a mound of mulch piled high against a tree trunk. This single mistake kills more established trees than any pest or disease in home landscapes. Bark holds moisture against bark, invites fungal rot, attracts wood-boring insects, and can girdle the trunk over time — cutting off the flow of water and nutrients.
The fix: pull mulch back 2–3 inches (5–8 cm) from any trunk or stem. The root flare — the point where the trunk widens at ground level — should be visible at all times.
Mistake 2: Applying Mulch Too Deep
Mulch deeper than 4 inches (10 cm) suffocates soil by blocking oxygen exchange and preventing water from penetrating to roots. Fine-textured mulches like sawdust compact faster than coarser materials and cause this problem even at 3 inches.
Check existing mulch depth before adding more. If 3 inches already sit in the bed, don’t top-dress — rake and redistribute the existing layer instead.
Mistake 3: Mulching Over Wet Grass Clippings
Fresh, wet grass clippings mat into a solid layer that sheds water like a tarp. Water runs off rather than soaking through. Let clippings dry on the lawn first, then apply in layers no deeper than 1–2 inches (2.5–5 cm) with time to dry between applications.
Mistake 4: Ignoring Cocoa Shell Mulch Around Pets
Cocoa shell mulch contains theobromine — the same compound in chocolate that is toxic to dogs. Cocoa shells smell attractive to dogs and can cause seizures, cardiac problems, and death if consumed in quantity. Use cedar bark or pine straw in any garden accessible to dogs.
Mistake 5: Mulching Too Early in Spring
Mulch applied before soil warms in spring traps cold in the soil and delays plant emergence by 2–3 weeks. Shallow-rooted perennials — hostas, daylilies, astilbes — struggle to push through cold, mulch-covered soil. Wait for soil temperatures above 55°F (13°C) and for spring shoots to emerge before applying the season’s mulch layer.
Planning Your Mulch Project at ZonedGarden.com
Before ordering mulch, measure your beds accurately. Use the ZonedGarden Garden Area Calculator to calculate square footage or square metres instantly — the tool converts automatically between US and metric units, which matters when ordering from suppliers who quote by the square metre.
Mulching around specific plants requires understanding each plant’s root and moisture needs. If you’re mulching around deciduous flowering shrubs like peonies, read the Bush Peonies Complete Growing Guide — peony roots sit at a specific depth that affects how close you can safely mulch to the crown.
For trees with ornamental bark — like crepe myrtles — mulch placement around the root zone is particularly important. See the Crepe Myrtle Bark Care Guide for guidance on protecting root zones while avoiding bark moisture issues.
Frequently Asked Questions
What is the best mulch for garden beds?
Shredded hardwood bark or wood chips are the best general-purpose mulch for most garden beds. Wood chips suppress weeds for 2–4 years, regulate temperature, and decompose slowly to improve soil structure. For vegetable gardens, use straw or shredded leaves — materials that break down in a single season and add nutrients back quickly.
How deep should mulch be?
Apply mulch 2–3 inches (5–8 cm) deep for most plants. Use 3–4 inches (8–10 cm) around trees. Never exceed 4 inches (10 cm) — deep mulch blocks oxygen exchange and traps too much moisture against roots. For perennials and annuals, 1–2 inches (2.5–5 cm) is enough.
Does mulch attract termites?
Mulch does not attract termites to an area where termites don’t already exist. Iowa State University Extension confirms no evidence that mulching with wood chips increases termite incidence. However, mulch kept directly against a home’s foundation does give existing termites a hidden path. Keep all mulch at least 6 inches (15 cm) away from foundations, siding, and windowsills.
When should I replace mulch?
Replace or top-dress organic mulch when the layer thins to less than 1.5 inches (4 cm). Bark mulch needs replenishing every 2–4 years. Wood chips need replenishing every 1–2 years. Grass clippings and shredded leaves break down within a single season. Inorganic mulches like gravel rarely need replacement — just occasional raking and cleaning.
Can I use mulch in a vegetable garden?
Yes — straw, grass clippings, and shredded leaves all work well in vegetable gardens. Avoid wood chips and bark in vegetable beds. Wood mulch ties up nitrogen in the soil during decomposition, which competes with vegetable crops. Straw mulch is the most practical option: it insulates soil, suppresses weeds, and decomposes by season’s end to feed next year’s planting.
Final Thoughts
Mulching is the highest-return task in any garden. One afternoon of work — spreading 2–3 inches of the right material over your beds — saves dozens of hours of watering and weeding throughout the season, while building soil that grows stronger plants year after year.
Start with the beds that need water most frequently. Choose an organic mulch matched to your plants and climate. Apply it at the correct depth, keep it away from stems, and top-dress annually. That’s it.