Most tomato problems start in the soil. Early blight, blossom end rot, fruit cracking, and inconsistent watering stress — mulch solves or reduces all 4.
The catch: wrong mulch, wrong timing, or wrong application depth makes things worse. Fresh grass clippings mat and suffocate roots. Mulch applied too early locks cold soil in place and delays harvest by 2–3 weeks. Mulch touching the stem causes crown rot.
This guide ranks 8 mulch types for tomatoes by actual results — moisture retention, disease prevention, yield impact, and cost. It also covers the exact timing, depth, and 5 mistakes that turn helpful mulch into a problem.
Why Tomatoes Need Mulch More Than Most Vegetables
Tomatoes are heavy feeders with shallow root systems that extend only 6–12 inches deep in most garden soils. These roots are exposed to soil temperature swings, moisture fluctuations, and soil-splash pathogens every time it rains or you water from above.
The result without mulch: blossom end rot from inconsistent moisture, early blight from fungal spores splashing onto lower leaves, and fruit cracking when dry soil gets suddenly drenched.
Mulch creates a stable microclimate around tomato roots — consistent moisture, regulated temperature, and a physical barrier between soil-borne pathogens and plant foliage. Studies on organic mulch in tomato beds show:
- 30% increase in yield compared to unmulched plants (straw and leaf mulch trials)
- 40–60% reduction in soil evaporation during peak summer heat
- 50% reduction in early blight and septoria leaf spot incidence from soil splash prevention
- 2–3 week growing season extension in USDA zones 4–6 with proper mulch application timing
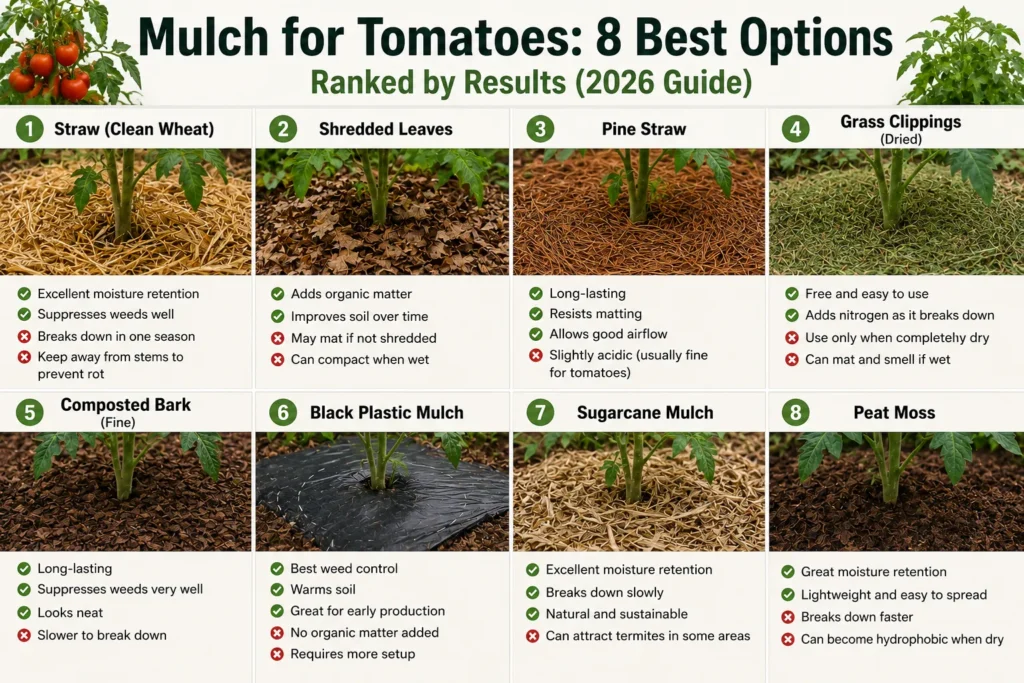
8 Mulch Types for Tomatoes: Quick Comparison
| Mulch Type | Cost | Disease Prevention | Moisture Retention | Weed Suppression | Fertility Boost | Best Use Case |
| Straw | $5–8/bale | ★★★★★ | ★★★★☆ | ★★★★☆ | ★★☆☆☆ | Main garden beds — best all-rounder |
| Compost | $3–8/bag | ★★★★☆ | ★★★☆☆ | ★★☆☆☆ | ★★★★★ | Established plants, heavy feeders |
| Shredded Leaves | Free | ★★★★☆ | ★★★★☆ | ★★★★☆ | ★★★☆☆ | Budget mulching, bed building |
| Black Plastic | $0.10–0.20/sq ft | ★★★★★ | ★★★★★ | ★★★★★ | None | Cool climates, early season warmth |
| Red Plastic | $0.15–0.25/sq ft | ★★★★★ | ★★★★★ | ★★★★★ | None | Yield maximization, research-backed |
| Grass Clippings | Free | ★★★☆☆ | ★★★☆☆ | ★★★☆☆ | ★★★★☆ | Thin top-layer supplement only |
| Wood Chips | $0–50/cubic yard | ★★★☆☆ | ★★★★★ | ★★★★★ | ★★☆☆☆ | Paths between rows, not direct contact |
| Pine Needles | $3–6/bale | ★★★★☆ | ★★★★☆ | ★★★☆☆ | ★★☆☆☆ | Acid-loving varieties, pH adjustment |
8 Mulch Types for Tomatoes: Full Analysis
1. Straw — Best All-Round Mulch for Tomatoes
Straw is the top-rated mulch for tomatoes among experienced vegetable growers because it balances disease prevention, moisture retention, weed suppression, and cost in one material.
Straw costs $5–8 per bale. One bale covers 100–150 sq ft (9.3–14 m²) at a 3-inch depth — enough for 8–12 tomato plants. Straw decomposes slowly through the growing season, maintains consistent soil moisture, and creates a light-colored surface that reflects excess summer heat rather than absorbing it.
Critical: use straw, not hay. Hay is cut grass and contains thousands of weed seeds. Straw is the stalk left after grain harvest — wheat, oat, or barley straw. Straw has minimal seeds. Spreading hay around tomatoes guarantees a weed problem within 2 weeks.
- Apply 3–4 inches (7.5–10 cm) deep after soil reaches 65°F (18°C)
- Keep 2 inches (5 cm) clear of the main stem
- One application lasts the full growing season — straw decomposes slowly enough to stay effective through harvest
- Biocide warning: some commercial straw is treated with aminopyralid or clopyralid — persistent herbicides that damage tomatoes. Ask the supplier before buying. Untreated organic straw is the safe choice.
2. Compost — Best for Soil Building and Heavy Feeders
Compost is the only mulch that feeds tomatoes while protecting the soil, making it ideal for heavy feeders that deplete soil nutrients through a long growing season.
Apply 1–2 inches (2.5–5 cm) of fully finished compost as a top-dress mulch after transplanting. Compost does not suppress weeds as effectively as straw — use compost as the base layer, then add 2 inches of straw on top for a combination approach.
Use the Zoned Garden compost calculator to estimate exactly how many bags your tomato beds need before buying.
- Do not use fresh or unfinished compost as mulch. Fresh compost with visible food scraps generates heat during decomposition and can burn roots at close range
- Fully finished compost is dark, crumbly, and smells like earth — not like food
- Homemade compost is better than bagged compost — bagged products often contain high nitrogen from poultry byproducts that promotes leaf growth at the expense of fruit
3. Shredded Leaves — Best Free Mulch
Shredded leaves work as well as straw for moisture retention and disease prevention, and cost nothing — the main reason experienced gardeners collect and shred autumn leaves for use the following growing season.
The same rules apply as general leaf mulch: shred before applying. Whole leaves mat together and form a water-repelling barrier. Shredded leaves stay permeable. Shred using a lawn mower, leaf blower vacuum, or string trimmer in a trash can.
For a deeper guide on shredding methods and application depths by garden zone, see the complete leaves as mulch guide.
- Avoid black walnut leaves — juglone in black walnut leaves is toxic to tomatoes and persists in soil for 1–2 years after decomposition
- Do not use diseased leaves — leaves with visible fungal spots carry pathogens directly into tomato beds
- Apply 2–3 inches (5–7.5 cm), same as straw
4. Black Plastic Mulch — Best for Cool Climates and Early-Season Warmth
Black plastic mulch raises soil temperature by 5–10°F (3–6°C), which matters in USDA zones 3–6 where late springs keep soil cold and delay tomato establishment by 2–3 weeks.
Black plastic absorbs solar radiation and transfers heat directly into the root zone. This warming effect means transplants establish faster and root systems develop more aggressively in the first 4 weeks after planting.
The limitation: black plastic does not decompose, cannot be worked into soil, and does not improve soil fertility. Remove and dispose of plastic at end of season. In hot climates (zones 8–10), black plastic overheats soil above 95°F (35°C) during summer peak — which damages roots. Use straw or light-colored mulch instead in warm regions.
- Install plastic before transplanting — cut holes for each plant
- Use drip irrigation or soaker hose underneath plastic — surface watering cannot penetrate
- Costs $0.10–0.20 per sq ft ($1.08–2.15 per m²) — more expensive than organic options but reusable for 1–2 seasons
5. Red Plastic Mulch — Best for Maximizing Yield
Red plastic mulch increases tomato yields by 12–20% compared to black plastic and unmulched beds in multiple controlled studies, including research from USDA Agricultural Research Service.
Red plastic reflects specific wavelengths of far-red light back up into the plant canopy. This reflected light spectrum triggers growth responses in tomato plants that increase fruit set and size — a mechanism black plastic cannot replicate.
Red plastic has small perforations that allow water penetration, unlike standard black plastic. This reduces the need for drip irrigation installation beneath the mulch layer.
- Best choice for gardeners focused specifically on maximum yield over convenience or soil building
- Same installation process as black plastic — lay before transplanting, cut planting holes
- Costs $0.15–0.25 per sq ft — slightly more than black plastic
- Less effective in zones 8–10 where soil overheating is a risk
6. Grass Clippings — Best Used Thin as a Supplement
Grass clippings work as a supplemental mulch layer in 1-inch (2.5 cm) applications only — not as a primary mulch. Applied thicker than 1 inch, fresh clippings mat into a dense, water-repelling layer that excludes oxygen from soil and generates heat as it decomposes.
Clippings dry and compress within 3–5 days, reducing weed suppression effectiveness quickly. Apply thin layers regularly throughout the season rather than one thick application at transplant time.
- Herbicide contamination is the main risk. Clippings from lawns treated with broadleaf herbicides — especially aminopyralid or clopyralid — will kill tomato plants. These herbicides persist through mowing and composting. Do not use chemically treated clippings in any vegetable garden
- Only use clippings from untreated, organic lawns
- Let clippings dry for 24–48 hours before applying — fresh wet clippings heat up rapidly and can burn young transplants
7. Wood Chips — Best for Paths Between Rows, Not Direct Contact
Wood chips work well as path mulch between tomato rows but create a nitrogen depletion risk when applied directly around tomato plants. Fresh wood chips have a carbon-to-nitrogen (C:N) ratio of 200:1 to 500:1 — as soil microbes break this down, they consume soil nitrogen that tomatoes need for growth.
For beds with established tomatoes: if using wood chips, apply a nitrogen fertilizer alongside the mulch to compensate. Alternatively, use aged wood chips that have partially decomposed — these have a lower C:N ratio and cause less nitrogen competition.
- Aged wood chips (composted 6–12 months) are safe for direct bed application
- Fresh wood chips are better used for garden paths where nitrogen competition does not affect food crops
- Cedar wood chips have some natural insect-repelling properties — useful for beds with slug pressure
8. Pine Needles — Best for Adjusting Soil pH
Pine needles are slightly acidic (pH 3.5–4.5 fresh, neutralizing to pH 6.0 after decomposition) and suit tomatoes well because tomatoes prefer soil at pH 6.0–6.8.
Pine needles decompose more slowly than straw or leaves — a 2-inch layer applied in spring often persists through winter. This slow decomposition makes pine needles low-maintenance but means they contribute less organic matter to soil per season compared to faster-decomposing mulches.
- Best choice for raised beds where soil pH needs slight acidification
- Good option for gardens where acid-loving companion plants like marigolds grow alongside tomatoes
- Pine needles stay light and do not compact — maintain good air circulation around plant bases
When to Mulch Tomatoes: Exact Timing by USDA Zone
The single most common mulching mistake is applying mulch too early. Cold, unmulched soil warms faster than mulched soil — every week of cold soil delays tomato establishment.
The rule: mulch after soil reaches 65°F (18°C) at 2-inch depth, not by calendar date.
| USDA Zone | Soil Reaches 65°F (18°C) | Apply Mulch By | Primary Purpose |
| Zone 3–4 | Mid–Late June | Late June | Retain warmth already built, protect from cold nights |
| Zone 5–6 | Late May–Early June | Early June | Moisture retention, early blight prevention |
| Zone 7–8 | Early–Mid May | Mid May | Weed suppression, moisture, disease barrier |
| Zone 9–10 | April or earlier | After transplant (April) | Moisture retention in dry, hot conditions |
Soil temperature varies by microclimate — raised beds warm 2–3 weeks earlier than ground-level beds. Check with a soil thermometer 2 inches deep before mulching, regardless of zone.
How to Apply Mulch Around Tomatoes: Step-by-Step
- Wait for soil temperature. Confirm soil is 65°F (18°C) at 2-inch depth before applying any mulch.
- Weed the bed. Remove existing weeds from root level — mulch slows new weeds but does not kill established ones with deep taproots.
- Water the soil. Mulch retains moisture already in soil — it does not move water from surface to dry soil below. Apply mulch over moist, watered ground.
- Apply at correct depth. Organic mulches (straw, leaves, compost): 2–3 inches (5–7.5 cm). Plastic mulch: install flat against soil surface before transplanting.
- Leave 2 inches (5 cm) clear around each stem. Mulch touching the stem traps moisture against bark and causes crown rot and slug damage.
- Extend mulch to the drip line. Mulch the full root zone — 12–18 inches (30–45 cm) radius around each plant. Stopping at 6 inches leaves most roots unprotected.
- Top up mid-season. Organic mulches decompose and compress. Inspect depth at 6-week intervals and replenish if below 2 inches (5 cm).
How Mulch Prevents the 3 Most Common Tomato Diseases
Early Blight (Alternaria solani)
Early blight overwinters in soil as fungal spores. Rain and overhead irrigation splash these spores from soil onto lower tomato leaves — where they colonize and spread up the plant, causing the characteristic dark bullseye lesions that destroy foliage from the bottom up.
A 3-inch mulch layer physically prevents this splash. Raindrops hit mulch instead of bare soil — the spores never become airborne. ISU Extension research shows a 2–3 inch mulch layer applied in early June reduces early blight incidence significantly in home gardens.
Straw, shredded leaves, and compost all work. Plastic mulch creates a complete physical barrier. None of these prevent late blight, which arrives via wind-blown spores, but all reduce early blight — the more common and more manageable of the two.
Septoria Leaf Spot
Septoria leaf spot (Septoria lycopersici) spreads identically to early blight — soil-borne spores splash onto lower foliage. The same 3-inch mulch layer that prevents early blight also blocks septoria splash. The two diseases often appear together, and mulch controls both with a single application.
Blossom End Rot
Blossom end rot is not a disease — it is a calcium deficiency caused by inconsistent water uptake. Tomato plants absorb calcium dissolved in water. When soil fluctuates between drought and flood, calcium transport stops, and the developing fruit shows the characteristic dark, leathery rot at the blossom end.
Mulch directly prevents blossom end rot by stabilizing soil moisture. A consistent 2–3 inch mulch layer reduces evaporation by 40–60%, keeping the root zone evenly moist between waterings. Adding calcium to soil rarely fixes blossom end rot — fixing irrigation consistency does. Mulch is the simplest tool for that consistency.
Paired with proper plant care practices that maintain root health and consistent growth conditions, mulch makes blossom end rot rare rather than routine.
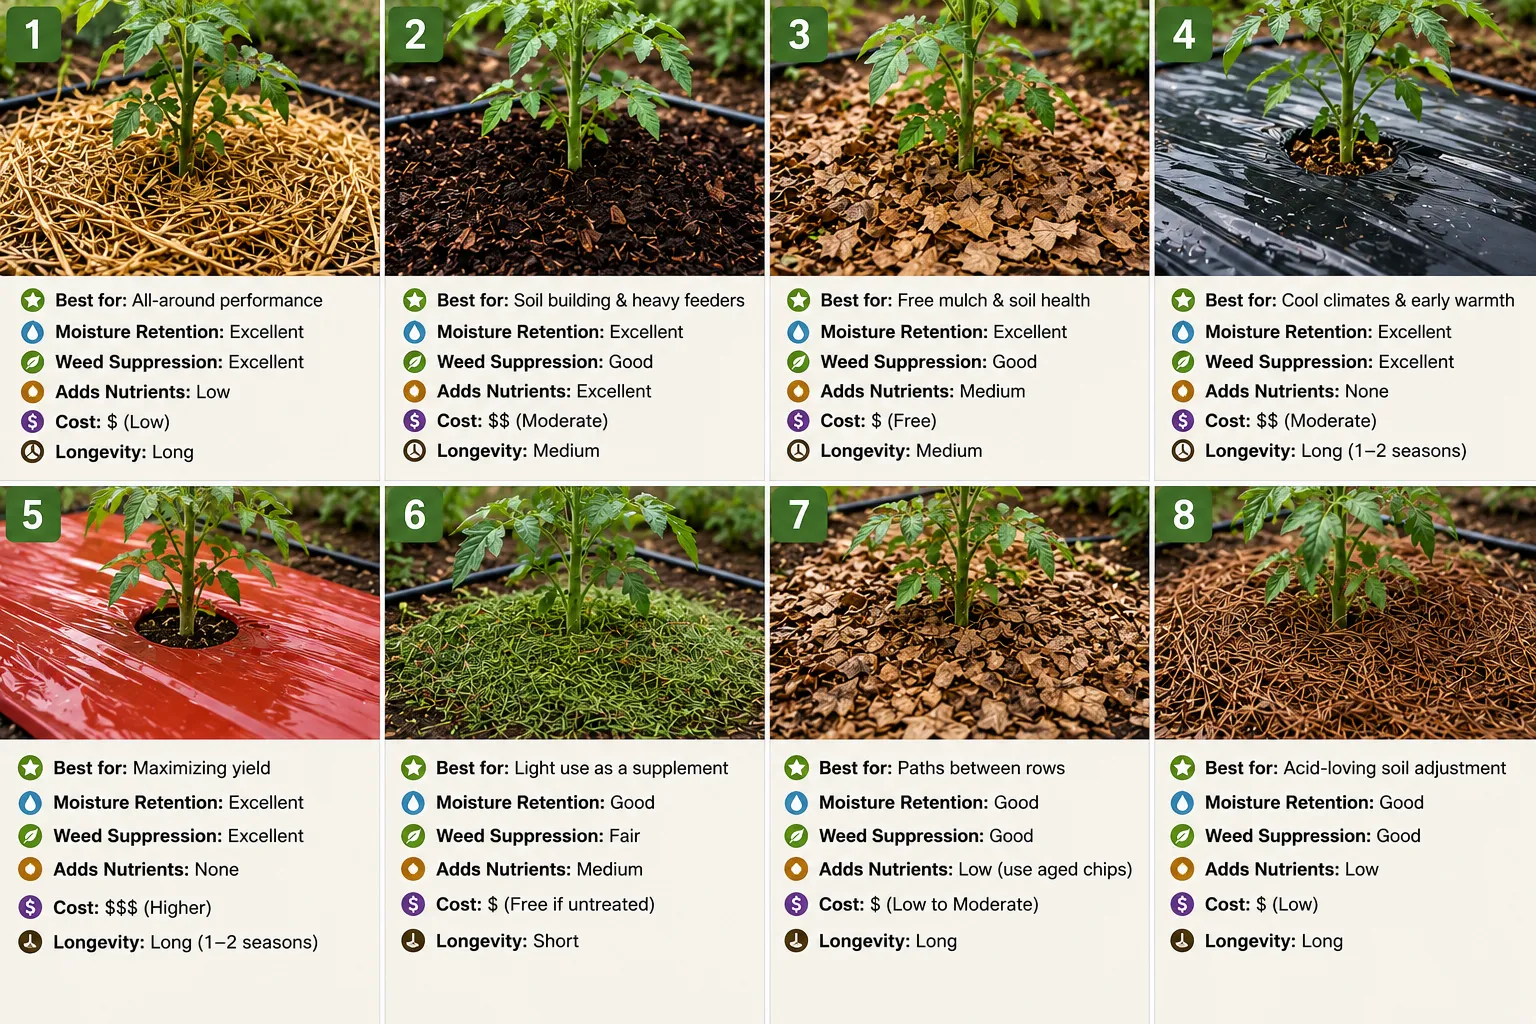
5 Mulching Mistakes That Damage Tomato Plants
Mistake 1: Mulching Before Soil Warms
Cold soil under mulch stays cold. Mulch applied before soil reaches 65°F (18°C) locks in low temperatures, delays root development, and can set back transplants by 2–3 weeks. Always check soil temperature before applying any mulch.
Mistake 2: Piling Mulch Against the Stem
Mulch touching the main stem traps moisture against bark, creating ideal conditions for crown rot, fungal collar rot, and slug nesting. Keep a 2-inch (5 cm) gap around every tomato stem — always. This rule applies to all mulch types including plastic.
Mistake 3: Using Hay Instead of Straw
Hay contains weed seeds — typically thousands per bale. Spread hay around tomatoes and you will spend the season pulling weeds from within your mulch. Straw is the correct material: it is the grain stalk after harvest, with minimal seeds. Ask specifically for straw when buying.
Mistake 4: Using Herbicide-Treated Grass Clippings
Aminopyralid and clopyralid are broadleaf herbicides that persist through mowing, composting, and even animal digestion. Clippings from treated lawns carry these herbicides into tomato beds, where symptoms appear as twisted, cupped new growth that looks like virus damage. There is no cure — the plants must be removed. Only use clippings from certified untreated lawns.
Mistake 5: Mulching Too Thick
Organic mulch deeper than 4 inches (10 cm) suffocates soil oxygen, prevents water penetration, and encourages roots to grow upward into the mulch layer rather than downward. Surface roots in mulch are vulnerable to drought, frost, and mechanical damage. Stay within 2–3 inches (5–7.5 cm) for all organic mulches around tomatoes.
Mulching Tomatoes in Containers and Raised Beds
Container Tomatoes
Container tomatoes benefit most from mulch because containers lose moisture 3–5x faster than ground-level beds. The limited soil volume means moisture swings are extreme — one missed watering can trigger blossom end rot in containers where it rarely occurs in-ground.
Apply 1 inch (2.5 cm) of compost or coconut coir as a mulch layer on top of container soil. Do not exceed 1 inch — deep mulch in containers reduces available soil volume and restricts drainage through the pot.
- Compost or coconut coir are the best container mulch materials — both retain moisture without compacting
- Avoid straw in containers — straw creates air pockets that dry out faster than surrounding soil
- Use garden area calculator to measure container surface area and calculate exact mulch quantities needed
Raised Beds
Raised beds warm faster than ground-level beds and dry out faster too — which makes mulch more valuable in raised beds than in-ground gardens. The improved drainage that makes raised beds excellent for tomatoes also means moisture leaves the root zone quickly without mulch protection.
Apply 2–3 inches (5–7.5 cm) of straw or shredded leaves. In raised beds, compost as a base layer under straw gives both fertility and moisture retention.
For detailed raised bed soil preparation guidance, the bush peonies growing guide covers soil depth, organic amendment, and drainage principles that apply to all deep-rooted vegetable beds including tomatoes.
Frequently Asked Questions
When should I put mulch around tomato plants?
Mulch tomatoes after soil consistently reaches 65°F (18°C) at 2-inch depth — not by calendar date. In most of USDA zones 5–6, this means late May to early June. Zones 7–8: mid-May. Zones 3–4: late June. Apply too early and you lock cold soil in place, delaying establishment.
How much mulch does a tomato plant need?
Apply 2–3 inches (5–7.5 cm) of organic mulch in a 12–18 inch (30–45 cm) radius around each plant, leaving a 2-inch (5 cm) gap at the stem. One bale of straw covers 8–12 plants at this depth. Check depth every 6 weeks and replenish when it drops below 2 inches.
Is straw or compost better mulch for tomatoes?
Straw is better for weed suppression, disease prevention, and consistent moisture. Compost is better for soil fertility. Use both: apply 1 inch of finished compost as a base layer, then 2 inches of straw on top. This combination delivers disease prevention, moisture retention, and steady nutrient release through the season.
Can I use wood chips as mulch for tomatoes?
Yes, but only aged wood chips that have partially decomposed for 6–12 months. Fresh wood chips have a very high carbon-to-nitrogen ratio and temporarily deplete soil nitrogen as microbes break them down, which starves tomato plants. Aged chips have lower C:N ratios and are safe for direct bed application.
Does mulch prevent blossom end rot?
Yes — mulch is one of the most effective blossom end rot prevention tools because it stabilizes soil moisture. Blossom end rot is caused by inconsistent calcium uptake, which is caused by inconsistent watering. Mulch reduces evaporation by 40–60%, keeping moisture stable between waterings and maintaining the consistent water flow that carries calcium to developing fruit.
Can I mulch tomatoes in pots?
Yes — apply 1 inch (2.5 cm) of compost or coconut coir on top of container soil. Container tomatoes lose moisture faster than in-ground plants and are more prone to blossom end rot from moisture swings. Mulch is more important in containers than in beds, not less. Do not exceed 1 inch depth — deeper mulch reduces effective soil volume in containers.
Should I remove mulch at the end of the season?
Remove plastic mulch — it does not decompose. Work organic mulch (straw, compost, shredded leaves) into the soil at end of season. Spent organic mulch adds organic matter to soil and improves next season’s beds. Do not leave diseased plant debris in the mulch layer — remove and dispose of any material from plants that showed blight or other disease.
Does red plastic mulch actually increase tomato yields?
Yes — multiple controlled studies, including USDA Agricultural Research Service trials, show red plastic mulch increases tomato yields by 12–20% compared to black plastic and unmulched beds. Red plastic reflects specific far-red light wavelengths back into the plant canopy, triggering fruit-set responses in tomato plants. The effect is real and measurable, not anecdotal.
Related Guides on Zoned Garden
- Leaves as Mulch: Complete Guide — shredding methods, application depths by zone, and 4 common leaf mulch mistakes that damage gardens.
- Compost Calculator — calculate exactly how many bags of compost your tomato beds need, in cubic feet, cubic yards, and litres.
- Garden Area Calculator — measure tomato bed area accurately so you buy the right amount of mulch — not one bag short or two bags over.
- Bush Peonies Growing Guide — soil preparation, organic amendment, and drainage principles that apply to all deep-rooted garden plants.
- Chrysanthemum Problems Guide — how consistent moisture and soil health prevent the fungal and root rot problems that mulch guards against.
The Bottom Line
Straw is the best mulch for most tomato growers — disease prevention, moisture retention, weed suppression, and low cost in one material. Add a compost base layer under the straw if your soil needs fertility support.
The timing matters as much as the material. Mulch after soil reaches 65°F (18°C), not before. Apply at 2–3 inches. Keep 2 inches clear of each stem. Top up every 6 weeks.
These 4 rules — right material, right temperature, right depth, right clearance — cover 90% of what determines whether mulch helps or harms your tomato crop.