Every fall, gardeners bag millions of pounds of leaves and leave them on the curb. That’s a mistake.
Fallen leaves are free organic mulch. Shredded and applied correctly, leaves suppress weeds, lock in soil moisture, regulate soil temperature, and build soil fertility over time — everything expensive bagged mulch promises to do.
This guide covers 7 proven benefits of using leaves as mulch, 3 shredding methods ranked by speed, correct application depths by garden type, and 4 mistakes that cause leaf mulch to harm instead of help.
What Is Leaf Mulch?
Leaf mulch is fallen leaves — shredded or whole — spread on top of garden soil as a protective and nutrient-building layer. As leaves decompose, beneficial soil microbes and fungi break down organic matter into humus, which improves soil texture and feeds plant roots.
Leaf mulch differs from leaf mold. Leaf mulch is fresh or partially decomposed leaves applied directly to beds. Leaf mold is fully decomposed leaf material — dark, crumbly, and rich — that results from leaving a leaf pile undisturbed for 12–24 months. Both benefit the garden, but leaf mulch delivers results faster.
The best source of leaf mulch is deciduous trees: oak, maple, beech, birch, and elm. These shed leaves every autumn and produce high-carbon, low-nitrogen material that decomposes slowly and suppresses weeds effectively.
7 Proven Benefits of Using Leaves as Mulch
1. Suppresses Weeds Without Chemicals
A 2–3 inch (5–7.5 cm) layer of shredded leaves blocks 70–80% of weed germination by preventing sunlight from reaching weed seeds in the soil. Unlike synthetic herbicides, leaf mulch improves the soil while killing weeds.
Whole unshredded leaves provide some weed suppression but risk matting, which creates anaerobic pockets that can harbor pests. Always shred for best results.
2. Retains Soil Moisture
Leaf mulch reduces soil surface evaporation by up to 60%, cutting watering frequency in most climates. This matters most during dry summer weeks when surface soil dries out within 24–48 hours of watering without mulch cover.
For vegetable gardens and flower beds where consistent moisture drives plant health, a leaf mulch layer maintains that moisture between watering cycles.
3. Regulates Soil Temperature
Leaf mulch insulates soil — keeping it 8–13°F (4–7°C) warmer in winter and 10°F (5.5°C) cooler in summer compared to bare soil.
In USDA zones 4–6, this insulation protects shallow-rooted perennials and bulbs from freeze-thaw cycles that heave roots out of the ground. In zones 8–10, summer cooling keeps soil from baking dry during heat waves, which stresses root systems and reduces plant uptake of water and nutrients.
4. Improves Soil Fertility Over Time
As leaves decompose, beneficial bacteria and fungi release nitrogen, phosphorus, potassium, and micronutrients directly into the root zone. A 3-inch (7.5 cm) leaf mulch layer applied in autumn fully decomposes by late spring, adding 0.5–1 lb (0.23–0.45 kg) of nitrogen per 100 sq ft (9.3 m²) to garden beds.
This natural fertilization reduces the need for synthetic inputs. Gardens with regular organic amendments — including leaf mulch — require 30–40% less supplemental fertilizer compared to unamended beds.
5. Increases Soil Porosity
Leaf mulch worked into clay-heavy soil breaks up compacted layers, increasing pore space and drainage. In sandy soils, decomposing leaf material adds organic matter that holds water and nutrients longer.
Working shredded leaves 3–4 inches (7.5–10 cm) into vegetable bed soil before planting season improves root penetration, which directly increases crop yield. Studies on vegetable plots show 15–25% higher yields in beds with leaf-amended soil versus unamended controls.
6. Feeds Beneficial Soil Organisms
Leaf litter supports earthworms, ground beetles, and soil microbes that form the foundation of healthy garden soil. Earthworm populations increase 3–5x in beds with consistent organic mulch cover versus bare soil.
Pollinators and beneficial insects, including ground-nesting bees and beetles, overwinter in leaf litter. Removing all leaf cover from garden beds eliminates overwintering habitat for beneficial insects that control pest populations naturally.
7. Costs Nothing
Leaf mulch is free for anyone with deciduous trees. Bagged wood chip mulch costs $4–$9 per cubic foot ($140–$320 per cubic yard). A mature oak tree drops 200–400 lbs (90–180 kg) of leaves per autumn — enough to mulch 500–1,000 sq ft (46–93 m²) of garden beds at a 3-inch depth.
Instead of paying for mulch delivery and bagging leaves for landfill pickup, one shredding session converts yard waste into a full season’s mulch supply.
Leaf Mulch vs. Other Organic Mulches
| Mulch Type | Cost | Weed Suppression | Moisture Retention | Soil Fertility Boost | Best For |
| Shredded Leaves | Free | High | High | High (slow release) | Beds, trees, vegetables |
| Wood Chips | $4–9/cu ft | Very High | Very High | Low (ties nitrogen) | Trees, shrubs, paths |
| Straw | $5–8/bale | Medium | High | Low | Vegetable rows |
| Grass Clippings | Free | Low | Medium | High (fast release) | Thin top layer only |
| Compost | $3–8/bag | Low | Medium | Very High | Soil amendment |
| Pine Straw | $2–5/bale | Medium | High | Low (acidic) | Acid-loving plants |
How to Shred Leaves for Mulch: 3 Methods Ranked
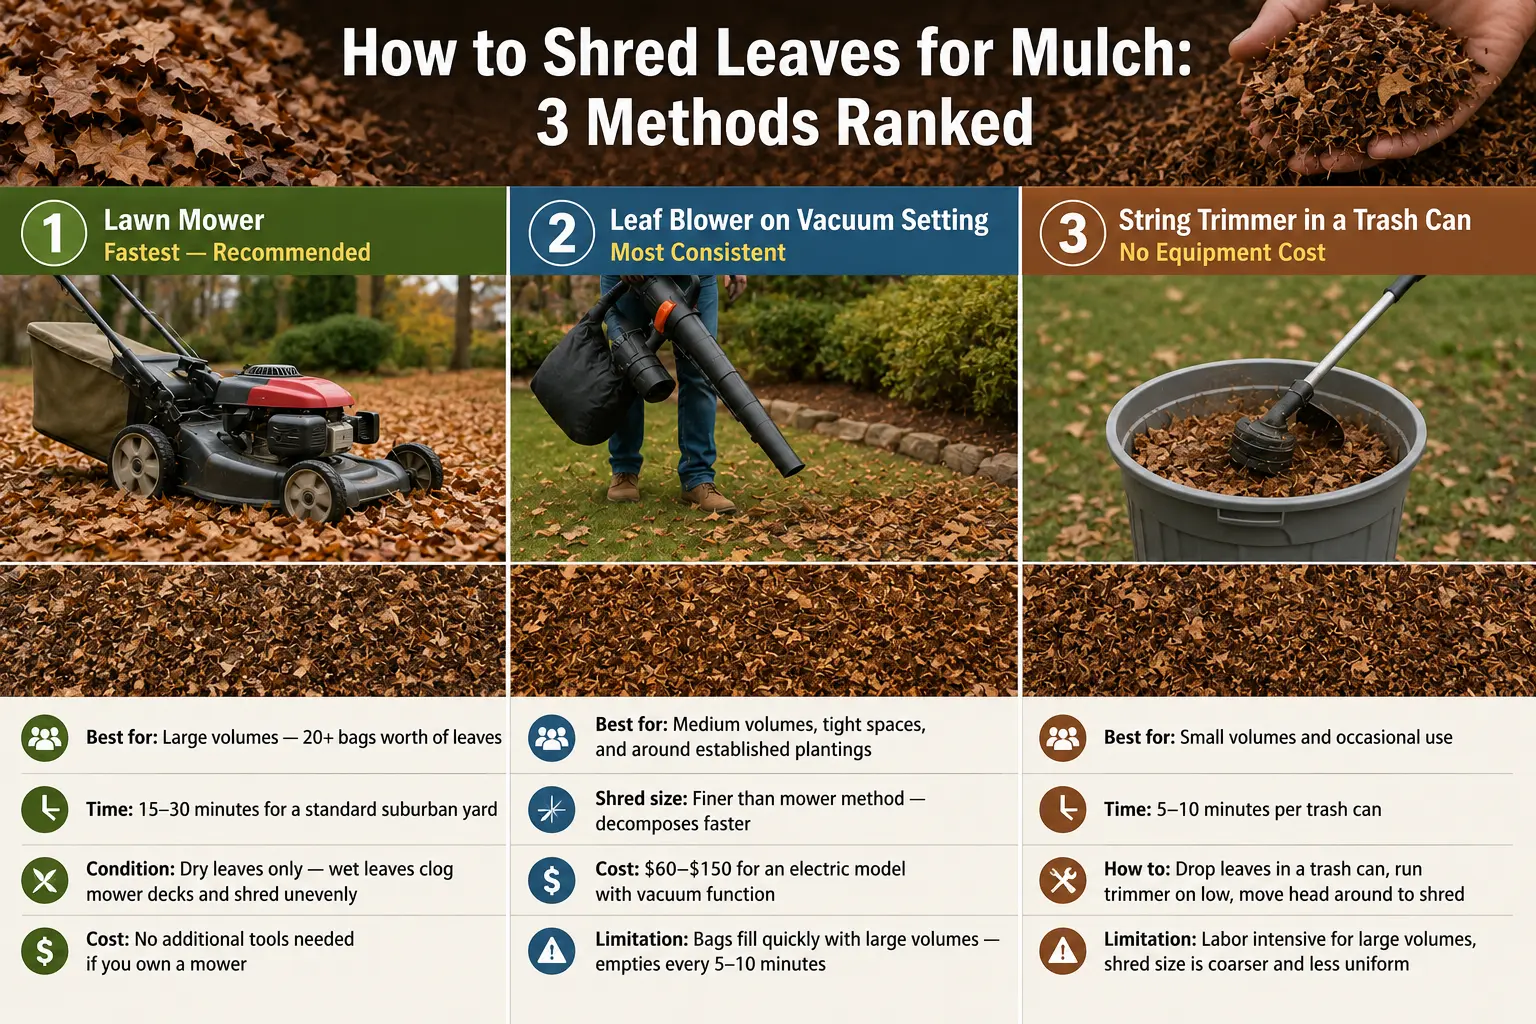
Shredding leaves before mulching solves the 2 biggest problems with whole leaves: matting and slow decomposition. Shredded leaves break down 3–4x faster than whole leaves and do not form the water-repelling mat that smothers plant crowns.
Method 1: Lawn Mower (Fastest — Recommended)
Run a mulching mower over dry leaves at the lowest deck setting. Leaves shred into dime-sized pieces in a single pass. Bag the shredded material or leave the fine pieces on the lawn to decompose in place.
- Best for: Large volumes — 20+ bags worth of leaves
- Time: 15–30 minutes for a standard suburban yard
- Condition: Dry leaves only — wet leaves clog mower decks and shred unevenly
- Cost: No additional tools needed if you own a mower
Method 2: Leaf Blower on Vacuum Setting (Most Consistent)
Electric leaf blowers with a vacuum function shred leaves into a bag through internal blades, producing uniform small pieces. This method works on slightly damp leaves that a mower would struggle with.
- Best for: Medium volumes, tight spaces, and around established plantings
- Shred size: Finer than mower method — decomposes faster
- Cost: $60–$150 for an electric model with vacuum function
- Limitation: Bags fill quickly with large volumes — empties every 5–10 minutes
Method 3: String Trimmer in a Trash Can (No Equipment Cost)
Fill a large trash can one-third full of leaves, insert a string trimmer, and run for 30 seconds. Produces finely shredded material without additional tools.
- Best for: Small batches — 1–3 bags at a time
- Arms fatigue quickly with larger volumes
- Cost: Requires only a string trimmer you likely already own
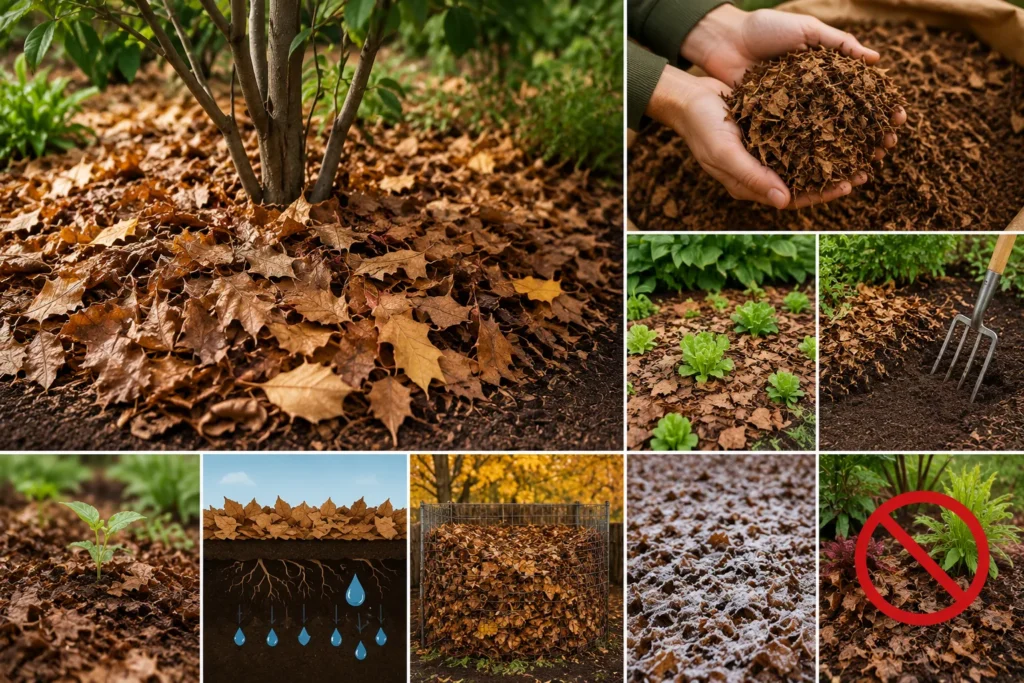
How to Apply Leaf Mulch: Depth by Garden Type
Correct depth is the difference between mulch that helps and mulch that harms. Too thin and weeds break through. Too thick and soil suffocates, moisture cannot penetrate, and crowns rot.
| Garden Area | Correct Depth | Key Rule |
| Flower beds (perennials/annuals) | 2–3 in / 5–7.5 cm | Keep 2 in (5 cm) away from plant crowns |
| Vegetable garden beds | 2–3 in / 5–7.5 cm | Apply after transplanting, not before |
| Around trees (drip line) | 3–4 in / 7.5–10 cm | Never touch the trunk — leave 6 in (15 cm) gap |
| Around shrubs | 3–4 in / 7.5–10 cm | Pull back from base to prevent crown rot |
| Lawn (in-place shredding) | 0.5–1 in / 1.3–2.5 cm | Thin enough to see grass blades through mulch |
| Container gardens | 0.5–1 in / 1.3–2.5 cm | Mix shredded leaves into top layer of potting soil |
Step-by-Step Application
For garden beds where root health and soil quality determine plant performance, follow these 5 steps:
- Clear the area. Remove existing weeds before applying mulch. Mulch slows new weed growth but does not kill established weeds with deep roots.
- Water the soil. Apply leaf mulch over moist soil. Dry soil under mulch stays dry — mulch reduces evaporation but does not move water from surface to depth.
- Spread shredded leaves at the correct depth for your garden type (see table above).
- Leave clearance gaps. Keep mulch 2–6 inches (5–15 cm) away from all plant stems, crowns, and tree trunks.
- Top up annually. Leaf mulch decomposes within one growing season. Replenish each fall with fresh shredded leaves.
Best Leaf Types for Mulch (And 1 to Avoid)
Best Leaves
- Oak leaves: High tannin content slows decomposition — ideal long-lasting mulch for shrubs and trees. Slightly acidic (pH 4.5–5.5), good for blueberries, rhododendrons, and azaleas.
- Maple leaves: Medium decomposition speed, neutral to slightly acidic. Best all-purpose mulch for vegetable beds and perennial gardens.
- Beech and birch leaves: Fine-textured and easy to shred. Decompose quickly and release nutrients fast — best for vegetable gardens where fast fertility boost matters.
- Elm and ash leaves: Neutral pH and good nitrogen content. Breaks down in one season and improves soil structure.
1 Leaf Type to Avoid: Black Walnut
Black walnut leaves contain juglone, a compound toxic to tomatoes, peppers, apples, and many garden plants. Never use black walnut leaves as mulch in vegetable gardens or near susceptible plants. Juglone persists in soil for 1–2 years after decomposition.
Other plants resistant to juglone — including corn, beans, onions, and most grasses — tolerate black walnut leaf mulch with no damage.
How to Make Leaf Mold: The 2-Year Soil Upgrade
Leaf mold is fully decomposed leaf material — the richest free soil amendment available. It improves water retention in sandy soils by up to 50% and loosens clay soils, increasing drainage without any synthetic additives.
To make leaf mold:
- Collect shredded or whole leaves into a wire cage, bin, or corner pile at least 3 ft x 3 ft (0.9 x 0.9 m) in size.
- Keep the pile moist — not waterlogged — throughout the process. Cover with a tarp in dry climates.
- Turn the pile every 2–3 months to introduce oxygen and speed decomposition.
- Wait 12 months for rough leaf mold (usable as mulch). Wait 24 months for fine, crumbly leaf mold (usable as seed-starting mix and soil amendment).
Use the Zoned Garden compost calculator to estimate how much leaf mold your beds need before the next planting season.
4 Mistakes That Turn Leaf Mulch Into a Problem
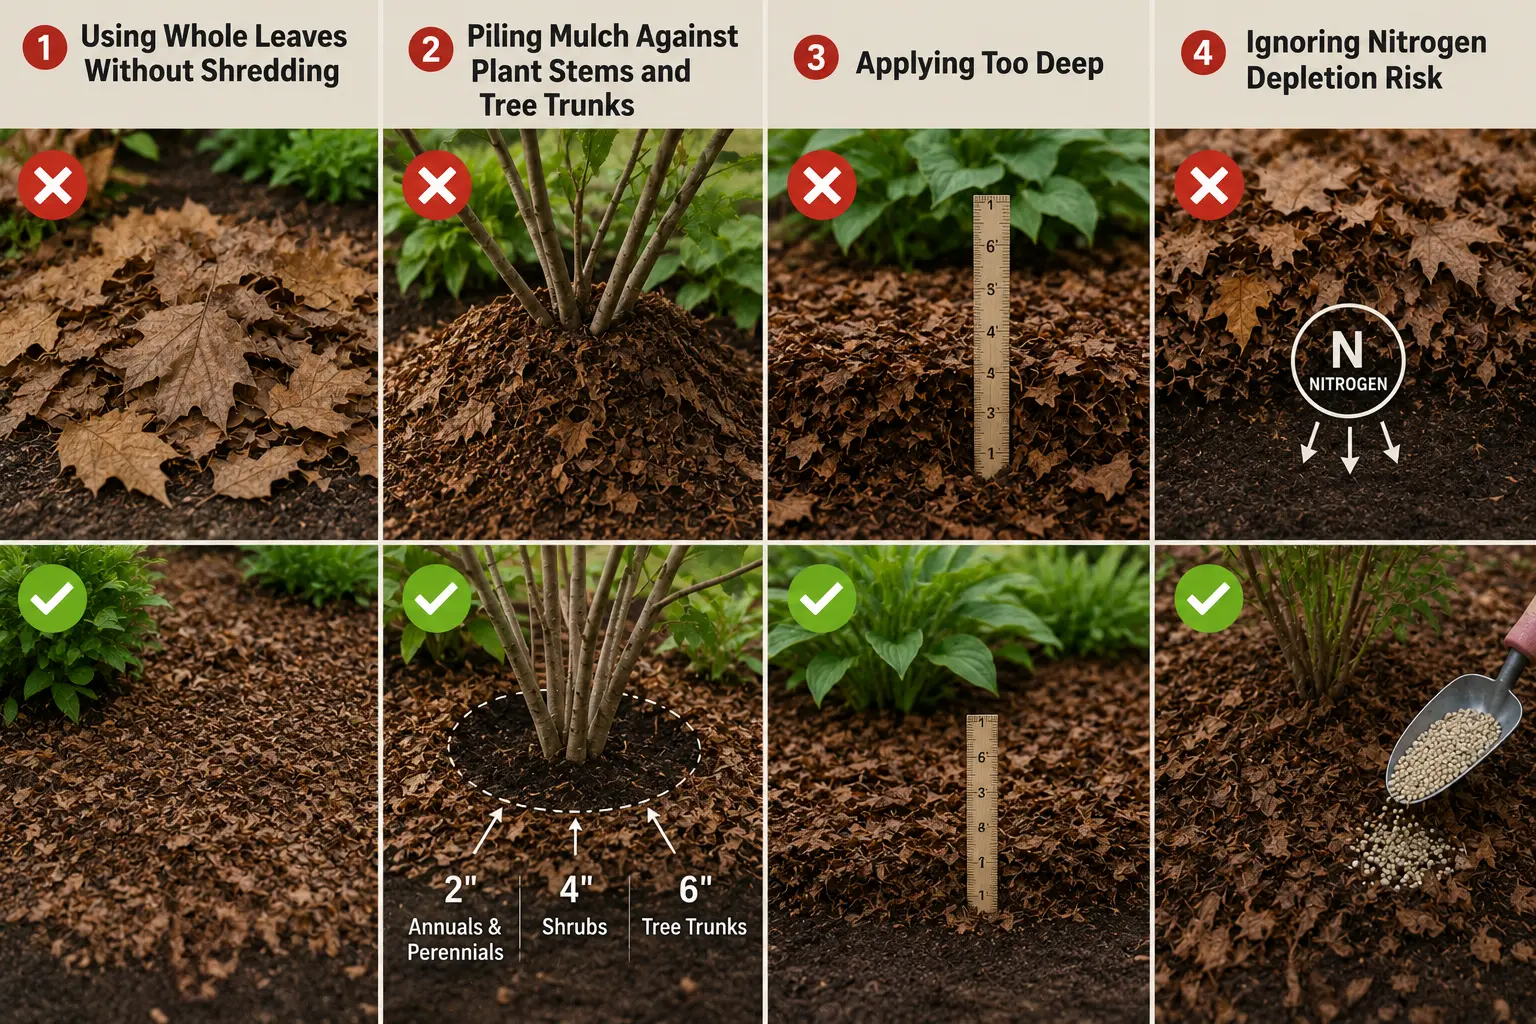
Mistake 1: Using Whole Leaves Without Shredding
Whole leaves, especially large ones like maple and sycamore, mat together into a water-repelling layer. This mat blocks rainfall and irrigation from reaching soil, effectively causing drought stress directly under the mulch.
Shred all leaves before use. Even a single pass with a mower converts whole leaves into mulch that stays permeable to water and air.
Mistake 2: Piling Mulch Against Plant Stems and Tree Trunks
Mulch touching stems and trunks traps moisture against bark, creating conditions for crown rot, fungal disease, and rodent nesting. This is the single most common mulching error across all mulch types.
Keep a 2-inch (5 cm) gap around annual and perennial stems, a 4-inch (10 cm) gap around shrubs, and a 6-inch (15 cm) gap around tree trunks. The mulch ring should look like a donut, not a volcano.
Mistake 3: Applying Too Deep
Leaf mulch deeper than 4 inches (10 cm) suffocates soil, reduces oxygen to roots, and prevents water penetration. Roots grow up into the mulch layer seeking moisture and oxygen — these surface roots are vulnerable to drought and frost damage.
Stay within the recommended depths for each garden type. If existing mulch has not fully decomposed from last season, rake it back before adding fresh material.
Mistake 4: Ignoring Nitrogen Depletion Risk
Fresh shredded leaves have a carbon-to-nitrogen (C:N) ratio of 40:1 to 80:1. As soil microbes break down this high-carbon material, they temporarily consume soil nitrogen — which can cause yellowing in shallow-rooted annuals and vegetables planted directly into or immediately after fresh leaf mulch.
Two solutions: compost leaves for 6–12 months before applying near vegetables, or apply a light dusting of balanced fertilizer (10-10-10) alongside fresh leaf mulch in vegetable beds. This feeds the microbes without robbing plants of nitrogen.
Leaf Mulch Timing by USDA Hardiness Zone
| USDA Zone | Best Application Time | Primary Purpose | Depth Recommendation |
| Zones 3–4 | October, before first hard frost | Insulate perennial roots from freeze-thaw | 3–4 in / 7.5–10 cm |
| Zones 5–6 | November, after first light frost | Protect crowns, build soil before spring | 2–3 in / 5–7.5 cm |
| Zones 7–8 | November–December | Weed suppression, moisture retention | 2–3 in / 5–7.5 cm |
| Zones 9–10 | Year-round, peak in Dec–Feb | Moisture retention in dry winters | 1.5–2 in / 4–5 cm |
Frequently Asked Questions
Are leaves good mulch for a vegetable garden?
Yes, shredded leaves are excellent mulch for vegetable gardens — with one condition. Apply a thin nitrogen source (blood meal or balanced fertilizer) alongside fresh leaf mulch to prevent temporary nitrogen depletion that yellows leafy vegetables like spinach and lettuce.
Can you use wet leaves as mulch?
Yes, but mix wet leaves with dry material before applying. Wet leaves mat and clump when applied alone, blocking water and air movement. Mixing wet leaves with dry straw, wood chips, or soil at a 50/50 ratio prevents matting and keeps the mulch layer permeable.
How long do shredded leaves take to decompose?
Shredded leaves decompose fully in 3–6 months during warm growing seasons and 6–12 months in cool climates (USDA zones 3–5). Whole leaves take 12–24 months. Smaller shred size, adequate moisture, and warmer temperatures all speed decomposition.
Do leaves attract pests and rodents?
Leaf mulch applied at correct depth — 2–3 inches — does not attract rodents. Thick piles of whole leaves (6 inches or more) provide nesting material. Maintain correct depth, keep mulch off plant stems, and rodent activity stays minimal.
Which leaves should not be used as mulch?
Avoid black walnut leaves near vegetables and most ornamentals — the juglone compound persists in soil and kills susceptible plants including tomatoes, peppers, and apples. Diseased leaves showing visible fungal lesions or bacterial spots should go in the trash, not on garden beds.
Do I need to remove old leaf mulch before adding new?
No, if the previous layer has fully decomposed into soil. If older mulch remains as recognizable leaf material, rake it back and check depth before adding new. Layering beyond 4 inches (10 cm) causes the root and oxygen problems described in the mistakes section above.
Can leaf mulch replace compost?
No — leaf mulch and compost serve different purposes. Leaf mulch sits on the soil surface and decomposes slowly. Compost is worked into soil as a fertility amendment. For best results, use both: compost improves soil structure and fertility; leaf mulch protects that amended soil between seasons.
The Bottom Line
Shredded leaves are the most effective free mulch available to home gardeners. Applied at the right depth — 2–3 inches (5–7.5 cm) for beds, 3–4 inches (7.5–10 cm) around trees and shrubs — leaf mulch delivers weed suppression, moisture retention, temperature regulation, soil fertility, and a habitat for beneficial organisms in a single annual application.
The only requirement: shred before applying. One pass with a lawn mower converts a pile of fall leaves into a full season’s mulch supply.Stop bagging and start mulching. Your soil — and your water bill — will show the difference by spring.