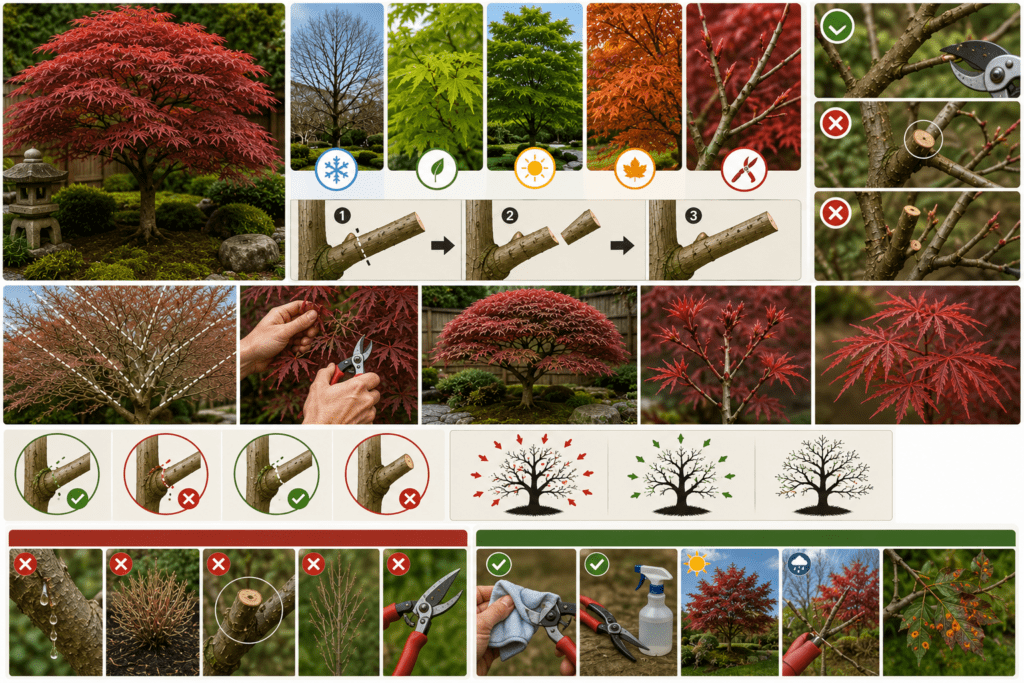
Prune a Japanese acer between late autumn and mid-winter, while the tree is fully dormant and leafless. This window — typically November through January in most temperate climates — stops the sap bleed that weakens the tree if cuts are made in spring or summer. Japanese acers (Acer palmatum) rarely need heavy pruning. Most established trees only need dead, damaged, or crossing wood removed once a year. The goal is never to change the tree’s natural shape — it’s to clear away what’s blocking light, air, and healthy growth.
This guide covers exact timing, the tools to use, the cuts that keep a Japanese acer healthy, and the mistakes that turn a graceful tree into a stressed one. For general seasonal cutting rules across other species, see Zoned Garden’s complete pruning guide.
Japanese Acer Pruning at a Glance
This table summarizes the core facts before the detailed breakdown below.
| Factor | Answer |
| Best time to prune | Late November to late January (full dormancy) |
| Worst time to prune | February to June (active sap flow) |
| Maximum removed per session | 20% of total canopy |
| Main tool for young trees | Bypass secateurs |
| Main tool for branches over 1 inch (2.5 cm) | Pruning saw or loppers |
| Cut type used most often | Thinning cut, back to a side branch or the trunk |
| Typical USDA hardiness zones | Zones 5 to 8 for most Acer palmatum cultivars |
When to Prune a Japanese Acer
Prune Japanese acers from late autumn through mid-winter, once all leaves have dropped and the tree is dormant. Cutting during this window avoids the heavy sap bleed that occurs when the tree is actively moving water and nutrients through its branches. A dormant tree heals cuts faster once growth resumes in spring.
Why Timing Matters More Than Technique
Acer palmatum bleeds sap from any cut made between February and the start of summer. This sap loss drains energy the tree needs for spring growth and leaves the wound open longer, raising the risk of fungal infection. The same cut, made in December instead of April, closes over within weeks rather than bleeding for days.
Signs a Japanese Acer Is Ready for Its Annual Trim
- Dead, brittle branches with no buds remaining after leaf fall
- Branches crossing or rubbing against each other inside the canopy
- Dense interior growth blocking light and air movement
- Shoots growing toward the trunk instead of outward
- Frost-damaged tips visible after a hard winter
Can You Prune a Japanese Acer in Summer?
Yes, but only for emergency or corrective work. Removing a single broken or diseased branch in summer causes far less stress than waiting, since a damaged limb left untreated invites disease faster than a small bleed from one cut. Skip routine shaping and thinning until the dormant season returns.
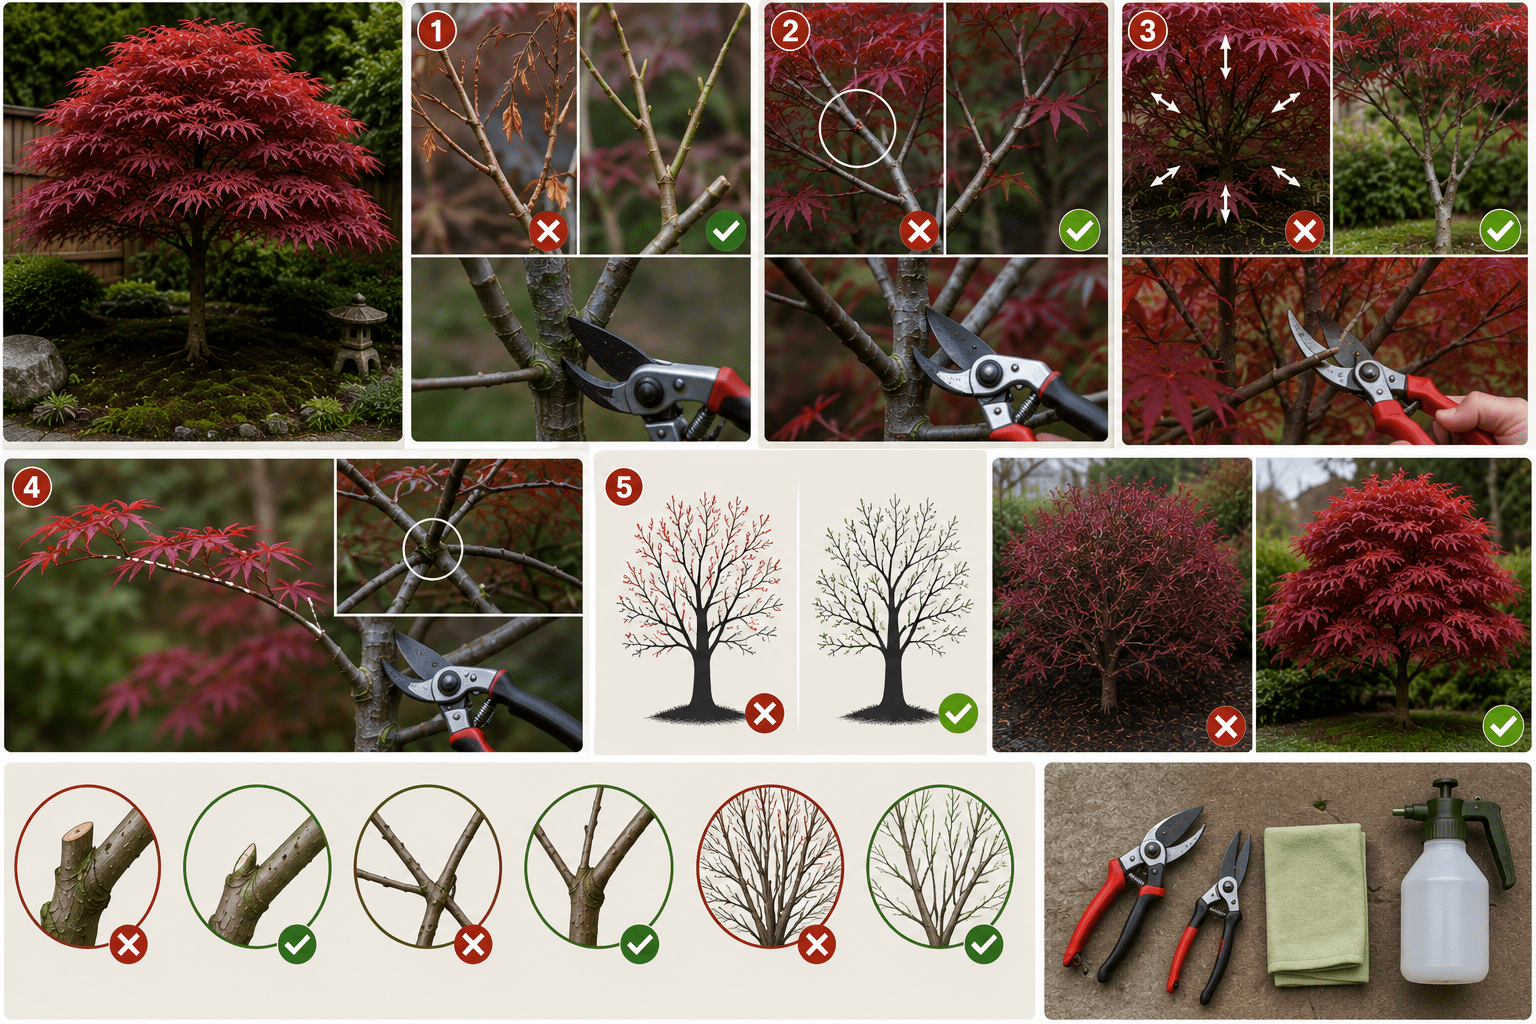
Tools Needed for Pruning a Japanese Acer
Match the tool to the branch diameter. Forcing a tool that’s too small tears bark and crushes tissue instead of cutting cleanly.
| Branch Diameter | Tool |
| Under 0.75 inch (1.9 cm) | Bypass secateurs |
| 0.75 to 1.5 inches (1.9–3.8 cm) | Loppers |
| Over 1.5 inches (3.8 cm) | Pruning saw |
Sharpen blades before starting and wipe them with 70% isopropyl alcohol between trees. A dull or dirty blade crushes the cut surface instead of slicing it, and that crushed tissue is where fungal disease enters most often. For the same reason across other species, see this site’s guidance on pruning shrubs the right way.
How to Prune a Japanese Acer, Step by Step
To prune a Japanese acer, remove dead and crossing wood first, then thin congested interior growth, and finish by lightly shaping outer shoots. Work in this order on every tree, every season.

1. Remove Dead, Damaged, or Diseased Wood First
Cut back to healthy wood, identified by green or white tissue under the bark rather than brown or black. Take dead branches all the way back to the point of origin — the parent branch or trunk — rather than leaving a stub.
2. Cut Out Crossing and Rubbing Branches
Where two branches cross or touch, remove the weaker or less well-placed one. Constant rubbing wears through bark and creates an open wound that never fully closes.
3. Thin the Interior Canopy
Open the center of the tree by removing some of the older, lower branches back to the trunk. This lets light and air reach the inner canopy, which reduces fungal problems and reveals the tree’s natural branch structure. Work from the bottom up and the inside out.
4. Follow Long Shoots Back to a Side Branch
To control spread or height, trace an overly long branch back to where it meets a smaller side branch, then cut just above that junction. The side branch takes over the role of the removed growth, and the cut disappears into the tree’s natural shape within a season.
5. Step Back and Check the 20% Rule
Never remove more than 20% of the canopy in one session. Acer palmatum responds poorly to heavy pruning — it pushes out weak, congested regrowth rather than strong new branches. If a tree needs more reduction than that, spread the work across two or three winters instead of one.
Where to Make the Cut
Cut just outside the branch collar — the slightly raised ring of tissue where a branch meets its parent stem — never flush against the trunk. The collar contains the cells that grow over the wound. Cutting into it removes the tree’s own healing mechanism and leaves a larger, slower-closing wound.
When shortening a branch rather than removing it entirely, cut at a slight angle just above an outward-facing bud or side shoot. Angling the cut sheds rainwater away from the wound instead of letting it pool and encourage rot.
Never leave a stub. A stub with no bud or side branch below the cut cannot heal. It dies back further into the branch and becomes an entry point for decay.
Pruning by Tree Age and Type
Young Japanese Acers (Years One to Three)
Leave a newly planted acer unpruned through its first full year so it can establish roots without added stress. From the second dormant season, remove only dead or damaged shoots and lightly trim wayward growth. By the third winter, begin selectively removing some lower branches to expose more of the trunk, and clear any shoots growing into the tree’s center.
Mature, Established Japanese Acers
A mature tree generally needs only annual maintenance: clearing dead wood, opening congested areas, and correcting any branch that has outgrown its space. Mature acers with a strong branch framework can tolerate removing up to a third of the canopy if necessary, but spreading that reduction across two or three winters protects the tree’s energy reserves better than doing it all at once.
Laceleaf and Weeping Acers (Acer palmatum var. dissectum)
Laceleaf or cutleaf maples form a low, mounded, weeping shape and need a lighter touch than upright varieties. Comb out dead leaves caught in the fine branching, then remove dead or dying wood from the base and interior, working from the bottom up. Avoid cutting the outer canopy hard — the layered, cascading form is part of what makes this variety distinctive, and heavy shaping flattens that effect permanently.
Overgrown or Neglected Japanese Acers
An acer that has been left unpruned for years needs a staged approach rather than a single hard cutback. In the first winter, remove dead wood and the most obviously misplaced branches. In the second winter, thin the interior further and reduce the longest outer branches back to a healthy side shoot. By the third winter, the tree should be back to a manageable annual maintenance routine.
Common Japanese Acer Pruning Mistakes
4 mistakes account for most Japanese acer pruning problems: pruning at the wrong time, removing too much at once, leaving stubs, and trying to restrict the tree’s height.
- Pruning in spring or summer. causes heavy sap bleed and weakens the tree heading into the next growing season.
- Removing more than 20–25% of the canopy. triggers stressed, congested regrowth instead of healthy new branching.
- Leaving stubs above the last bud. creates dead wood that invites decay and disease entry.
- Trying to reduce overall height. rarely works — the tree responds with faster, thinner, less attractive regrowth. Width can be managed; height generally cannot.
- Using dull or dirty tools. crushes stems instead of cutting cleanly and spreads disease between trees.
Protecting a Pruned Acer from Disease
Japanese acers are vulnerable to coral spot and Verticillium wilt, both of which enter through fresh wounds and damaged bark. Sterilize blades between trees with 70% isopropyl alcohol, especially if a previous tree showed any sign of dieback or fungal growth. Avoid pruning in wet weather when spores spread more easily, and remove any cut material showing orange pustules (a sign of coral spot) or one-sided branch dieback (a sign of Verticillium wilt) well away from the rest of the garden rather than composting it.
Caring for a Japanese Acer After Pruning
A freshly pruned acer needs no wound sealant — clean cuts on a healthy tree close naturally as new tissue grows over the wound through the following season. Focus aftercare on the roots instead. Refresh the mulch layer around the base, keeping it a few inches clear of the trunk, and check that the soil drains well; waterlogged roots stress a tree far more than a well-placed pruning cut. For wider guidance on protecting root zones through colder months, see this site’s guide to winterizing the garden, and for material choice and depth, the mulch cost guide and notes on mulching around trees both apply directly to acers.
Pruning Container-Grown Japanese Acers
Potted acers follow the same dormant-season timing as those grown in open ground, but congestion happens faster because root space is limited. Check container-grown trees every winter for crossing growth and remove it promptly. Repot every two to three years into a slightly larger pot using free-draining, loam-based compost, since restricted, compacted roots stress the tree as much as incorrect pruning does.
Frequently Asked Questions About Japanese Acer Pruning
Is it OK to prune a Japanese acer in October?
No. October falls before most acers have fully dropped their leaves and before dormancy sets in fully in many climates. Wait until the canopy is bare and growth has stopped, generally from November onward, to avoid unnecessary sap loss.
How much can you cut off a Japanese acer at once?
No more than 20% of the canopy in a single session. Removing more triggers stress responses, including weak regrowth and reduced disease resistance, particularly in mature trees.
Do Japanese acers need pruning every year?
No. Most established Japanese acers only need a light check each winter for dead, damaged, or crossing wood. A tree left to grow naturally in adequate space may go several years between any meaningful pruning.
Why is my Japanese acer bleeding sap after pruning?
Because the cut was made outside the dormant window. Sap bleed happens when pruning occurs between roughly February and June, while the tree is actively transporting water and nutrients. It looks alarming but is rarely fatal on its own — the bigger risk is the energy loss and the open wound it leaves during active growth.
Can you restrict the height of a Japanese acer through pruning?
Not effectively. Cutting back the leader or top growth tends to produce thin, fast, unruly regrowth rather than controlled height. Width can be managed by following long branches back to a side shoot, but height reduction works against the tree’s natural growth pattern.
What is the best USDA zone for growing Japanese acers?
Zones 5 through 8 suit most Acer palmatum cultivars. Some cultivars tolerate zone 4 with winter protection, and a few perform well into zone 9 with afternoon shade. Confirm the specific cultivar’s range before planting, since cold hardiness varies between varieties.
Bottom Line on Pruning Japanese Acers
A Japanese acer rewards a light touch. Prune while dormant, remove only what’s dead, crossing, or congested, never take more than a fifth of the canopy at once, and let the tree’s natural branching do the rest of the work.